Share


ECi Software Solutions, Inc.
Featured Content
View More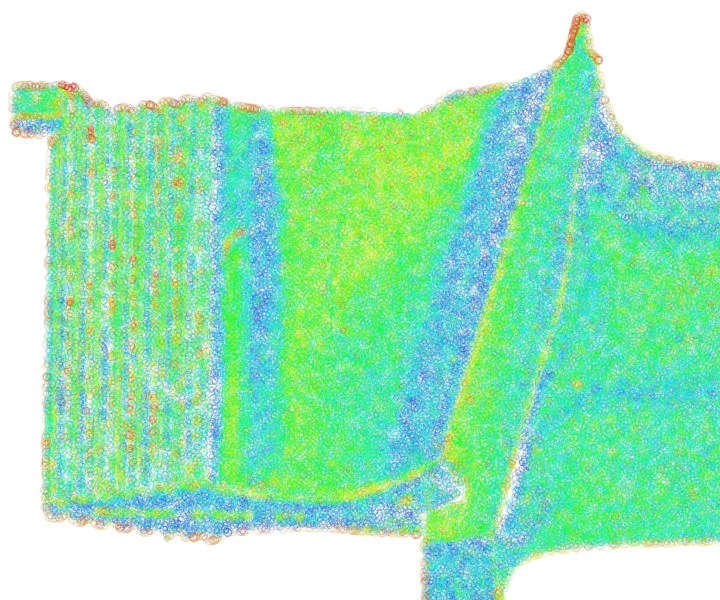
The FeaturePrint software provides traceability of individual components by detecting the minute surface detail that makes that part unique.
Everything needed to trace, track or certify any individual manufactured part is already present on the part itself, according to Brian Crowley, CEO of Alitheon, a startup company focused on object traceability. The surface detail of a manufactured part is unique in the same way fingerprints are, he says. And, importantly, off-the-shelf imaging technology — notably including the cameras in our phones — is now capable of accurately capturing this distinctive surface-level detail. The result is a new possibility for identifying parts, arguably better and more reliable than serial numbers. Alitheon’s technology for using this surface detail for part ID is called “FeaturePrint.”
Mr. Crowley says he and his team often run this demonstration: Playing cards from a new deck are imaged only from the back side, allowing company representatives to show how the FeaturePrint system unerringly identifies each card, even though to the human eye they are identical. At the company’s headquarters in Bellevue, Washington, 1,000 crisp $1 bills have been imaged, he says. A scan of the side without the serial number always correctly identifies the individual bill, because of the way the bills are all different at the level of minute surface features.
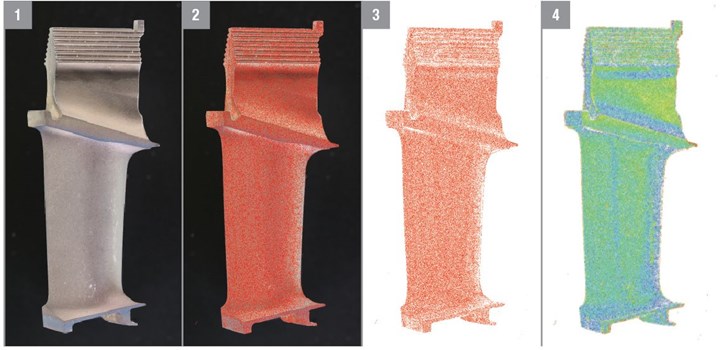
This sequence of images shows how the software creates an identifying mathematical model unique to an individual component: (1) A base image is taken using over-the-counter optics. (2) The software identifies about 100,000 unique points of interest. (3) Image data is discarded to leave only these points. (4) The points are weighted to identify stronger points, and this weighted map is ultimately transformed into the multidimensional mathematical model that can later identify this precise component.
Applied to production parts, this means the part itself can accomplish every purpose that might otherwise require a serial number, including tracking parts through the process, capturing part history for the sake of liability or recall in the field, and certifying parts to guard against counterfeiting. But where a serial number might be forged, a part’s unique surface characteristics can’t be. And where a serial number might be removed or destroyed, the FeaturePrint capability still can identify a part accurately if 90% of the surface is gone, the company says.
The imaging technology can be selected to fit the job, Mr. Crowley notes. Frequently, a cell phone can be used. For small parts (such as 4-mm gears in a recent test), a camera with a macro lens might be needed. Flat parts can be scanned or imaged in batches. Alitheon is not selling hardware, but instead markets its machine vision software and cloud services.

Seemingly plain and indistinguishable parts can be traced using the software. Here is the point map of a bolt head, allowing it to be identified out of a large quantity of bolts just like it.
The system works this way: Starting with the image of the part, the software derives something like 100,000 points of interest from that image. The point map is weighted, as the software identifies certain points that are particularly distinctive within the map and therefore particularly useful for identification. These points are then converted to a multidimensional mathematical model, and this model — typically less than 100 kilobytes of data — is all that Alitheon stores. Pixel data itself is not stored, meaning no image can be reverse-generated from the data used. The part is later successfully identified when it is matched to a stored mathematical model. This authentication can be performed much later, at a different location, using different imaging tools.
“We generate a complex equation that can only be solved by one object, even if it is among billions of products indistinguishable to the human eye,” Mr. Crowley says.
“We generate a complex equation that can only be solved by one object, even if it is among billions of products indistinguishable to the human eye,” Mr. Crowley says.
The technology comes from outside of manufacturing, based on the company founders’ experience in vision-based systems for uses including bomb detection and rapid object identification in the post office. Its applications go beyond manufacturing as well. An airline is testing it for high-speed, tagless luggage tracking. But part production is perhaps the most promising application, particularly in cases where there is a risk of part counterfeiting. In manufacturing, one of the investors in the technology is car maker BMW.
Practically any part can provide enough distinctive detail for ID, Mr. Crowley says. The exception: “Certain amorphous materials lack stable surface features for a positive ID.” Beyond that, whether a part has been cast, milled, ground, anodized, or even painted or plated is of no consequence. Indeed, even changes to the surface after the modeling might not matter.
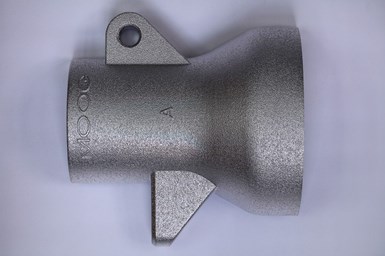
Moog purposely damaged some of the test parts like this in its evaluation of the FeaturePrint system. The parts were still identified accurately even after more than 90% of the original points of interest had been removed.
Aircraft component supplier Moog discovered this in a test of the technology. Twenty titanium parts made through additive manufacturing were identical on the outside, but contained secret identifying features on an inner feature a camera could not see. The parts were all registered with FeaturePrint, after which Moog set about damaging nine of them. Parts from this set were subject to wear including (from Moog’s report) “dropping the part onto a concrete floor 10 times, attacking the part with a handheld motorized grinder, harperizing the part (a form of vibratory deburring) and grit blasting.” None of this abuse foiled the identification. The grit blasting was particularly severe; a part whose image offered 54,000 FeaturePrint points of interest had less than 3,700 points left after this operation. However, even that was still enough to match the model — enough, that is, to still solve the equation associated with that part.
All of this suggests the possibility of parts providing for their own traceability and history, even long after manufacturing. If imaging and modeling a part is a routine step in the production process when the part is made, then everything about that part’s origin and manufacturing can be discovered in the future, even well into the future, by anyone able to again simply capture that part’s image.
Related Content
The Link Between CNC Process Control and Powertrain Warranties
Ever since inventing the touch-trigger probe in 1972, Sir David McMurtry and his company Renishaw have been focused on achieving process control over its own manufacturing operations. That journey has had sweeping consequences for manufacturing at large.
Read MoreTurning Fixed-Body Plug Gages Inside Out
Fixed-body mechanical plug gages provide fast, high-performance measurement for tight-tolerance holes.
Read MoreHow to Calibrate Gages and Certify Calibration Programs
Tips for establishing and maintaining a regular gage calibration program.
Read MoreBallbar Testing Benefits Low-Volume Manufacturing
Thanks to ballbar testing with a Renishaw QC20-W, the Autodesk Technology Centers now have more confidence in their machine tools.
Read MoreRead Next
Switching To Automated Marking Boosts More Than Productivity
This job was previously done manually, but switching from hand marking its flat and rotary mounted equipment tags to an automated marking and identification system has not only increased productivity by 15 percent, it has given Hy-Tech many other time and cost savings over the last 6 months since a new system was installed.
Read MoreHow Part Data Control Will Expand and Simplify the Supply Chain
Digital rights management for manufactured part files will enable OEMs to enforce manufacturing requirements at a distance, as an alternative to in-person certification of suppliers.
Read MoreHow Is Digitalization Affecting the Manufacturing Supply Chain?
Leaders across the supply chain offered their thoughts during a recent panel presentation.
Read More


.png;maxWidth=150)


.jpg;maxWidth=300;quality=90)


.jpg;maxWidth=300;quality=90)


