Turning Fixed-Body Plug Gages Inside Out
Fixed-body mechanical plug gages provide fast, high-performance measurement for tight-tolerance holes.
Share


Using a fixed-body mechanical plug gage is one of the best ways to measure inside diameters. There is no rocking with this type of gage, as with an adjustable bore gage; therefore, it is fast and provides high performance for tight-tolerance holes. Because these gages are so easy to apply, they are typically used to measure a high volume of parts. Even in cases where the volume of parts is not high, if the parts are expensive and the tolerance tight, a fixed-body plug gage may still be an economical choice for the application.
With a fixed plug-type bore gage, the body size is very close to the diameter it is made to measure; therefore, the plug “locks” the gaging part in the hole. This requires very little operator skill and results in virtually no operator influence.
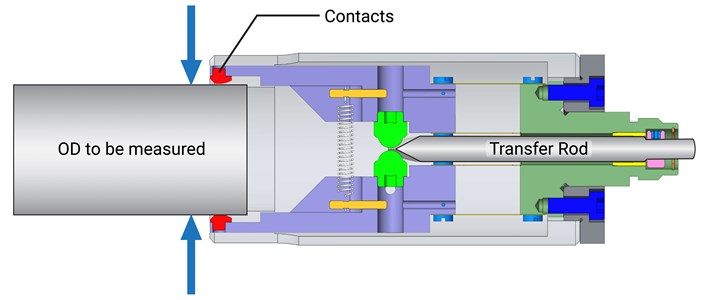
In fact, the plug body acts as a way of holding and centralizing an internal mechanical transfer mechanism. Typically, this consists of a set of contacts mounted to a linear spring arrangement that is in contact with a 90-degree transfer rod. The transfer rod has a precisely-ground vee that takes the diameter change seen at the contacts and transfers it to an indicator at the rear of the plug. The ground-in vee is made at such an angle that there will be a one-to-one 90-degree transfer, and no compensation is needed by the indicating device.
The transfer mechanism is also a two-point floating differential system. This means that once in the hole, the plug may be moved (albeit slightly) side-to-side in the direction of the contacts. When this is completed, one contact moves out a little while the other moves in, causing them to cancel each other out. The result is always the diameter of the hole, regardless of plug position. This configuration is very important for exploring bores in various geometric conditions, including ovality, barrel, taper or hourglass shapes.
One can see many benefits to this type of ID gaging system, including ease of use, speed and accurate results. However, all measuring tasks are not limited to inside diameters; there are many applications where an outside diameter must also be measured.
There are some great outside diameter gages that offer similar characteristics for these applications. Snap gages and air rings come to mind as easy-to-use, fast and accurate tools. These tools are proven and have solved many outside-diameter application challenges. Unfortunately, some OD checks are difficult to access with a snap gage or the OD is buried inside a part below other IDs. Or, even though the ID has a tight tolerance, it may be slightly out of the range of a typical air ring. Finally, the part diameter’s surface finish may not be conducive to measuring with an air gage.
For such applications, a fixed-body mechanical plug gage can be turned inside out to adapt it to measuring an OD. It still uses the same characteristics of the fixed-plug gage — made to the specific size for measuring tight-tolerance parts and provides easy operator use. But because it is so portable, has a good measuring range, and can use extensions to get deep into parts and two-point contact, it possesses the same features when measuring an ID. Instead of being spring-loaded to push the contact out for the ID, the inside mechanism is reversed, and a spring is employed to pull the contacts in towards the OD.
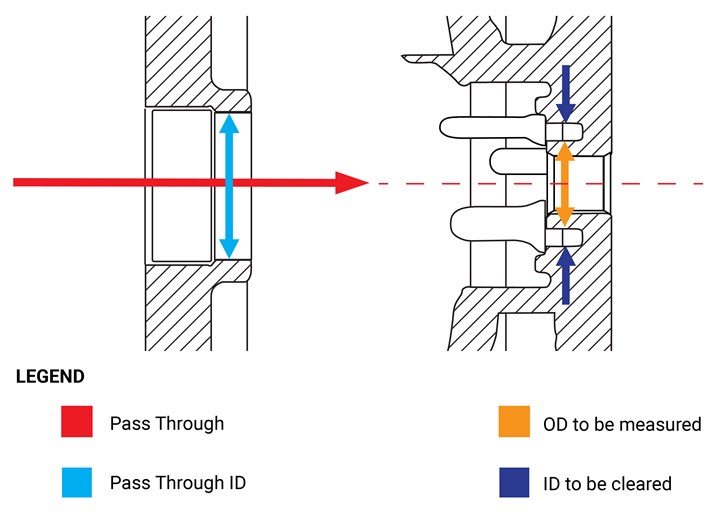
The following is one application ideal for this type of gaging. Here, the OD was buried in the part and had to pass through a machined hole a few inches in to measure the diameter.
The OD is generated by the short groove machined into the part. Thus, the gage not only has to measure the OD, but also must be able to clear an ID to enter the part to reach the diameter being measured, with the caveat that the plug still just fits within the ID of the groove.
As with all fixed-plug mechanical gages, they are custom-made to size, so it’s important to have all the required details when ordering. This also enables the fixed-plug mechanical gage to be adaptable to unique gaging challenges.
Related Content
Process Control — Leveraging Machine Shop Connectivity in Real Time
Renishaw Central, the company’s new end-to-end process control software, offers a new methodology for producing families of parts through actionable data.
Read More4 Ways to Establish Machine Accuracy
Understanding all the things that contribute to a machine’s full potential accuracy will inform what to prioritize when fine-tuning the machine.
Read MoreHelp Operators Understand Sizing Adjustments
Even when CNCs are equipped with automatic post-process gaging systems, there are always a few important adjustments that must be done manually. Don’t take operators understanding these adjustments for granted.
Read MoreOrthopedic Event Discusses Manufacturing Strategies
At the seminar, representatives from multiple companies discussed strategies for making orthopedic devices accurately and efficiently.
Read MoreRead Next
Building Out a Foundation for Student Machinists
Autodesk and Haas have teamed up to produce an introductory course for students that covers the basics of CAD, CAM and CNC while providing them with a portfolio part.
Read MoreSetting Up the Building Blocks for a Digital Factory
Woodward Inc. spent over a year developing an API to connect machines to its digital factory. Caron Engineering’s MiConnect has cut most of this process while also granting the shop greater access to machine information.
Read MoreRegistration Now Open for the Precision Machining Technology Show (PMTS) 2025
The precision machining industry’s premier event returns to Cleveland, OH, April 1-3.
Read More


.png;maxWidth=300;quality=90)


