How to Calibrate Gages and Certify Calibration Programs
Tips for establishing and maintaining a regular gage calibration program.
Share


All gaging equipment must be calibrated periodically to ensure that it is capable of measuring parts accurately. This has always been necessary to maintain quality, but there are now additional, external reasons to establish and maintain a regular program of gage calibration: customer requirements. More and more OEMs demand that suppliers document their quality efforts from start to finish. ISO 9001 is one manifestation of this trend, requiring companies to examine their calibration programs, identify weaknesses and improve them wherever possible.
Some large companies with thousands of gages can cost-justify hiring or training specialists in gage calibration methods and supplying them with equipment and resources to perform virtually all calibration duties in-house. For most machine shops, however, the economical approach is to hire a calibration service.
ISO 9001, which applies to all manufacturing operations, requires suppliers to calibrate “all inspection, measuring and test equipment and devices that can affect product quality at prescribed intervals, or prior to use, against certified equipment having a known valid relationship to nationally recognized standards — where no such standards exist, the basis used for calibration shall be documented,” (ISO9001.7.1.5.2a) Let’s elaborate on some of these points:
- “Prescribed intervals” usually translates into a minimum of once per year. A shorter interval must be established where annual calibration is inadequate to ensure accuracy.
- “Certified equipment having a known, valid relationship” means that the calibration house must have its own equipment certified. In the U.S., “nationally recognized standards” implies the National Institute of Standards and Testing (NIST), although other standards, such as DIN, may be used to satisfy overseas customers.
- “Where no such standards exist” usually refers to highly specific industries or products, where the manufacturer must develop its own standards and test methods (for example, a foam pad of known density used to master a chocolate-pudding-consistency gage). Calibration houses issue a certificate of calibration for every gage tested.
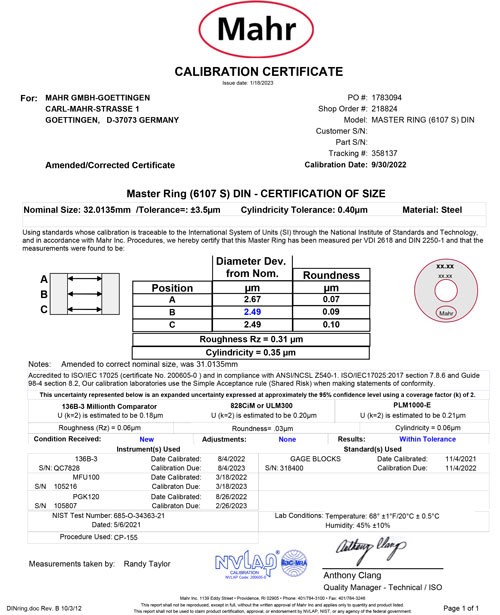
As shown in Figure 1 below, these certificates are essential for users to document their calibration programs. At minimum, they must include the following:
- The serial number and description of the gage tested.
- The serial number of the gage(s) used to perform the testing.
- The level of uncertainty of the calibration — in other words, the tolerances of the data.
- A statement of traceability to NIST (or another standard).
- A serial number identifying the NIST test upon which the calibration house’s standard is based.
- Reference temperature under which the calibration was performed.
- Name of the customer; name and address of calibration service.
- Date of calibration and signature of the technician.
- Test results, including error in the gage, measured at appropriate intervals across its entire range.
- If the gage is adjusted after testing, it must be recalibrated, with results as above.

Figure 1. A sample calibration certificate. Photo Credit: Mahr Inc.
Some providers automatically remind their clients which gages must be calibrated and when. Most gages can simply be boxed and shipped to the calibration house, although in the case of large, elaborate gages (for example, circular geometry gages, CMMs and so on), the calibration service will come prepared with NIST-traceable gage blocks, precision balls, a thermometer and any other standards needed to perform the job.
How can a machine shop without expertise in calibration intelligently select a provider? Naturally, cost and turnaround time are important, but don’t sacrifice quality for convenience. Above all, ISO 9000 requires that consistent procedures be applied, and any professional calibration house should be able to document its methods in a procedures manual. Ask to see it, and if it’s unavailable, look elsewhere.
Today, there are a number of certifying organizations such as NVLAP, A2LA, ANAB and others whose function is to ensure accredited laboratories are assessed against the management and technical requirements published in the International Standard, ISO/IEC 17025:2017. However, even though a laboratory may be certified, don’t be afraid to ask questions — lots of them.
If certified, they will have a scope of capabilities available. This should be easily obtained from their website. From this, you can learn what their areas of expertise and capabilities are, such as, what test equipment is used and to what standards test methods can be certified (for example, MIL, GGG or ANSI), along with what the uncertainties of measurement are for the various types of measurements. Uncertainties are critical when verifying dimensional standards and should be a point to explore.
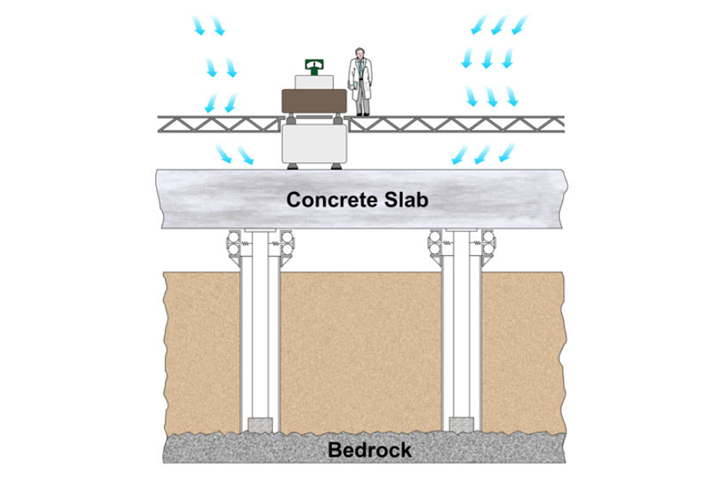
When doing an in-depth evaluation, check processes such as how are the technicians trained, and what is their experience level? What quality control methods are in place? What is the physical design of the facility, what are the control tolerances on temperature and humidity, and how is the equipment protected from the effects of outside vibration? Figure 2 shows an example of state-of-the-art isolation from dynamic forces: how does the facility under consideration compare? Additionally, in any long-term relationship, it’s good to visit, see the facility and get to know the team you will work with.
Related Content
Choosing the Correct Gage Type for Groove Inspection
Grooves play a critical functional role for seal rings and retainer rings, so good gaging practices are a must.
Read MoreTurning Fixed-Body Plug Gages Inside Out
Fixed-body mechanical plug gages provide fast, high-performance measurement for tight-tolerance holes.
Read MoreHelp Operators Understand Sizing Adjustments
Even when CNCs are equipped with automatic post-process gaging systems, there are always a few important adjustments that must be done manually. Don’t take operators understanding these adjustments for granted.
Read MoreRethink Quality Control to Increase Productivity, Decrease Scrap
Verifying parts is essential to documenting quality, and there are a few best practices that can make the quality control process more efficient.
Read MoreRead Next
How To Calibrate Your Calipers
If you’re interested in calibrating your own digital, dial or Vernier calipers, here are some steps to take to make sure it goes off without a hitch.
Read More5 Rules of Thumb for Buying CNC Machine Tools
Use these tips to carefully plan your machine tool purchases and to avoid regretting your decision later.
Read MoreRegistration Now Open for the Precision Machining Technology Show (PMTS) 2025
The precision machining industry’s premier event returns to Cleveland, OH, April 1-3.
Read More


.png;maxWidth=300;quality=90)


