Monitoring the State of Tool Monitoring
Digital technology that enables tool changes to be triggered by data-driven predictions of tool wear rather than part counts also is opening the door to other opportunities for optimizing production. A look at in-the-field applications shows that advanced tool monitoring is a step toward plant-wide digitalization.
Share


Gear hobbing is not the most common metalworking process. In some segments of the manufacturing industry, however, it’s a big deal. For automotive companies, gear hobbing is a mainstay of transmission component production. Many transmission plants have substantial numbers of gear hobbing machines, with most of these machines running multiple shifts a day or virtually around the clock.
In the last few years, tool monitoring systems have been a boon to these plants. This development is good news for users of many other machining processes. Gear hobbing, however, is an especially telling example.
One of the biggest expense items in gear hobbing operations is the cost of cutting tools for this process. Because these cutting tools are complex (multiple cutting edges, critical geometry, special coatings and so on) the price of a new tool is high. Resharpening worn tools is time-consuming and costly (they are some of the most difficult tools to sharpen, even on the special high-end grinding machines designed for this work). On top of this, by the nature of the gear hobbing process, these tools are subject to a number of variables that can cause excessive wear or premature failure, creating scrap or rework—another economic headache.
The typical, conventional strategy for coping with these realities has been to exchange hobbing tools based on a fixed number of parts—whether the tool was ready to be pulled because of expected wear, not ready to be pulled because wear was low, or should have been pulled earlier because wear was excessive or the tool was damaged. To avoid this last and worst-case scenario, users routinely set the fixed number of parts at a very conservative limit.
Clearly, this approach is inherently inefficient and wasteful, but it has been the most practical one given the limits of then-current technology. At best, some machines could be set up with a preset limit to current draw on the spindle motor that drives the hobbing cutter. A spike in amperage was taken as indication of excessive wear or cutter tooth damage. An emergency response was required as intervention.
Under these circumstances, automotive transmission plants were eager to find, test and implement alternative approaches that might improve cutting tool management of gear hobbing lines. About seven or eight years ago, advanced cutting process monitoring systems began to appear. They promised to move away from the fixed target strategy to one based on actual cutter conditions. The concept was to prevent inappropriate tool changes--not too soon, not too late.
One of the early systems to reach the market was the Artis CTM, developed by Artis, a Marposs Monitoring Solutions brand that is well-established in the field of tool monitoring and adaptive control systems.
In 2013, the Artis CTM was chosen by a major domestic automaker for a pilot project at one of its transmission plants in Ohio. At first, the system was tested on older hobbing machines on which cutter life was conspicuously problematic. In essence, the installed systems determined cutter conditions by monitoring spindle power consumption and other real-time operational data.
Initial results of this approach reported by the company were very promising. Cutter usage improved by as much as 17 to 30 percent with no changes in machining parameters. It was clear that cutter changes could be triggered by reliable prediction of expected tool wear, and thus ahead of any detection of sub-optimal conditions. This makes it a true preventive strategy, says Jorge Peña, the Marposs Monitoring Solutions product manager who guided the pilot project from the system supplier side.
The success of the pilot project in gear hobbing process monitoring prompted the company to adopt the technology throughout the original pilot transmission plant as well as on a corporate-wide, global basis for all of its transmission plants. Overall corporate savings are being measured in the millions of dollars, as reported by Peña. In fact, the project was a finalist for the company’s 2019 Global Manufacturing Technical Excellence Award.
According to Peña, the experience of this automaker gives a new, broader perspective on cutting tool monitoring. It is a clear demonstration of the value of data-driven manufacturing. Tool monitoring should be seen as one of the essential building blocks in the fully digitalized factory of the future. For this reason, he says, the Artis CTM systems deserve a closer look because they are representative of this class of automation products. They show how system developers are responding to the opportunities presented by digital sensors, data processing for operator visualization, network connectivity, trend analysis and coordination with plant-wide management systems.
Hobbing Is Different
For automotive transmission plants, gear hobbing is a critical process because precisely machined gears are essential components in almost all power trains. Gears are necessary to transfer the energy of the motor to the wheels. The geometry, surface finish and other characteristics of the completed gear greatly influence the efficiency and reliability of the power train.
Of course, gear quality is a result of the processes used to produce them. Gear hobbing is one of the most productive means of machining gears because the cutting tool is designed to mill the gear with multiple rows of cutting elements. Typical gear hobbing machines have a vertical or horizontal spindle that rotates the hobbing cutter supported in a cone-shaped center. Gear blanks are mounted on an arbor held between a spindle and a live center. The workpiece spindle rotates the gear blank to index it as each tooth is formed. This spindle may also act as a B axis that rotates the gear blank in opposition to the rotation of the hob to form spiral gears and other gear types.
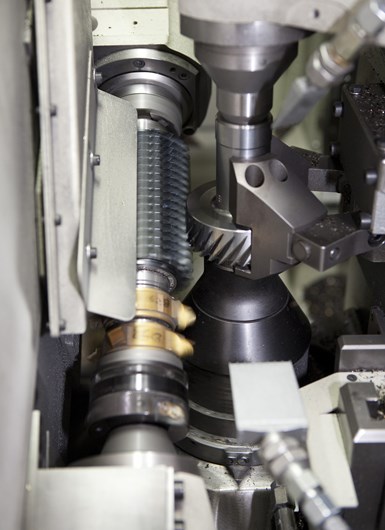
This view of a gear hobbing operation on a Liebherr LC120 hobbing machine shows the hob in action producing the teeth of a transmission component. (All photos courtesy of Artis.)
For automotive gear production, the gear hobbing cutter (or simply, the hob) is most often a solid tool of high speed steel or carbide on which the rows of hobbing teeth have been ground. The flute or channel between the rows enables coolant and chips to flow away from the cutting zone. The individual cutting teeth on the hob are shaped to match the desired shape of the root between the finished gear teeth. A hob may have as many as 500 cutting teeth. Hobs can be designed for roughing or finishing passes on the workpiece. Today, most hobs are coated with titanium nitride (TiN) or other material to resist wear and improve lubricity.
Hob cutter life is affected by a number of process variables, including the sharpness of the hob teeth, the hob’s substrate and the type of coating. The hardness and microstructure of the gear blank, as well as the accuracy of its outer diameter and the diameter of its center bore also influence cutter life. The rigidity of the machine spindles and clamping components can influence hob cutter life as well.
Clearly for this automaker, the challenge of improving hobbing cutter performance was both complicated and compelling and would have to be the object of a bold but well-executed engineering research project.
The Pilot Program Takes Off
For its pilot implementation of the Artis CTM monitoring system, the automaker selected its Ohio transmission plant because it has a mix of older and newer hobbing machines typical of the company’s other transmission plants. At the time, the plant was using 10 different hobs for various sizes and shapes of gears. All were set to a standard of 6,000 cutting cycles per tool before removing it to be resharpened.
Because this automaker was looking for a long-term solution to inefficiencies in gear hobbing for its worldwide base of transmission plans, the pilot project was designed to test tool monitoring technology, prove its effectiveness and develop a program for implementing a proven system across the board with the least disruptions to operations. At the Ohio plant, a single machine was retrofitted with an Artis CTM-MU4 monitoring system, which is designed for older machines with control units that do not have the capability to collect digital data from spindle motor and linear axis drives. In this case, the selected machine was a Gleason Pfauter P90 hobber dating to 2005.
Installing the monitoring system involved mounting the CTM input/output (I/O) processing card into an available PCI slot in the computer rack inside the control cabinet so that it is interfaced with the PC-based operator panel. Two power sensors were installed on the electrical leads to the B-axis spindle motor and connected to the CTM card via a multi-pin cable. These analog power sensors detect variable current flow by responding to changes in the magnetic field (Hall effect) of the power leads as the spindle motor runs during the hobbing process.
The response of the sensors to the fluctuating magnetic field is a proportional output voltage that can be amplified to detect slight changes in spindle motor power draw. The output of the sensors is recorded as digital data to produce a graph of spindle motor power over time, which is then correlated to the corresponding measured tool wear.
Data from this machine was collected and analyzed over a period of a year and a half. Power curves and cutter wear curves were compared to infer cutting force as a reliable predictor of tool wear. Programmed power limits could then be set as signals for a tool change.
Convinced that this approach to monitoring hob cutter life was moving in the right direction, the automaker proceeded to install Artis CTM systems on additional machines, including newer hobbing machines with CNCs (primarily from Siemens) in which spindle and axis drives provide digital feedback to the control and operator panel. For this generation of hobbing machines, Artis provided the CTM-V6 processor card that can be interfaced to the existing CNC system via a standard Ethernet-based, fieldbus cable. No power sensors needed to be installed because the digital motor drives already transmit the necessary current usage feedback.
In addition to spindle power, the CTM-V6 is able to track a number of sensory inputs such as spindle torque, spindle vibration and other factors related to machine health. The main benefit is an opportunity to detect and respond to non-tooling related conditions affecting hob cutter performance.
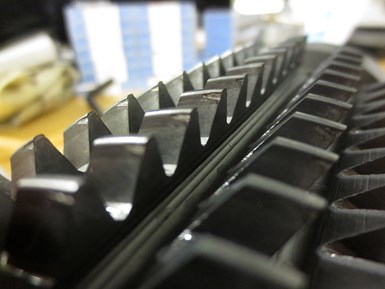
The wear visible on the teeth of this hob removed for resharpening would have caused cutting forces to increase proportionately as wear progressed. This increase in cutting forces can be detected by monitoring electric current draw of the spindle motor and used as a reliable predictor of tool aware.
With either type of monitoring system (sensor-based or digital), the hobbing-specific analytical software produces similar results and creates the same graphical display. This enables the plant to identify the optimum time to take any hob out of production for a resharpening or replacement based on its actual condition. Reportedly, with the monitoring system in place, hobs are now producing an average of 12,000 pieces per resharpening, while protecting the machine, the hob and the workpiece from damage due to abnormal conditions such as unexpected tool breakage or coating failure.
At the beginning of 2020, Artis CTM systems have been implemented on all 95 hobbing machines at the Ohio plant. Several years earlier, the automaker began implementing CTM units at its other four transmission plants in the United States, Mexico and Brazil. To date, a total of nearly 200 monitoring system are in place.
Add Meaning to the Monitoring
Although the first test machine in Ohio was used to gather data for about 18 months as proof of concept, subsequent installations of the Artist CTM require a much shorter “teach-in” period--typically two or three weeks. This period is necessary to establish a baseline of performance measures that indicate a stable process undergoing normal, expected tool wear within an appropriate tolerance band. For each machine, this baseline represents the unique signature of a “good” operation on that particular machine. For this purpose, the collection and analysis of digital or analog feedback (depending on the type of CTM system installed) are functions of the system’s software based on algorithms developed by the Artis engineers specifically for monitoring the hobbing process.
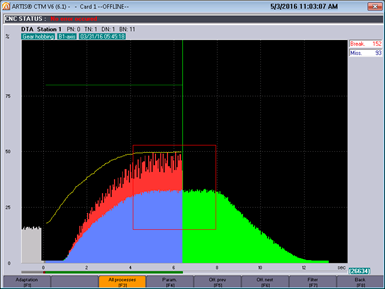
The system can detect distinctly anomalous conditions resulting from unexpected tool breakage or deterioration and react in time to avoid damage to the workpiece or the machine. This display indicates that a broken tooth is causing a telltale drop in current draw when cutting forces are interrupted by the missing tooth’s cutting material removal action.
Because process anomalies, such as chip welding, coating breakdown, a chipped or broken tooth, create distinct signatures of their own, these anomalies can be identified and quantified. As Peña explains, once these signatures are established, the monitoring system is able to distinguish normal wear (that eventually reaches a set limit) from conditions that require an immediate response, including an emergency shutdown to prevent or minimize damage. Normal wear and anomalous conditions can be displayed in real time on the operator’s graphical interface and the differences are unmistakable, he says, adding that this ability to maximize tool usage and minimize the chance of catastrophic tool failure sets this approach to tool monitoring apart from other tool wear or tool breakage detection systems.
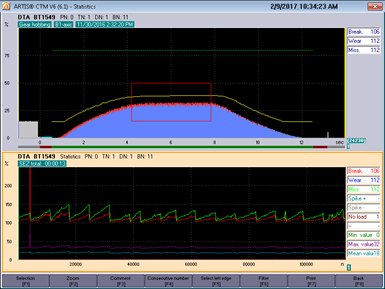
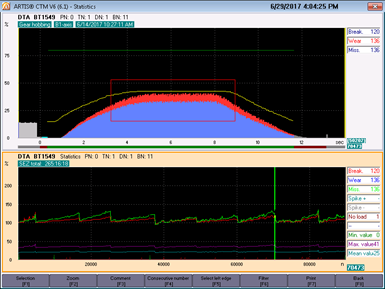
Graphical “signatures” of the hobbing process can be generated by the monitoring system’s software. In the upper half of the display above, a stable process experiencing normal wear shows a power curve within the desired range, whereas the display below shows the expected rise in the power curve approaching the wear limit as the hob grows dull.
Another advantage of this new approach is the use of tool performance data as a diagnostic indicator for detecting non-tooling issues. In other words, sub-optimal tool performance can be evaluated as a symptom of deterioration in some aspect of machine health. For example, a problem with the bearing on the outboard side of the tool holder is likely to cause an increase in power consumption required when the outboard end of the hob is engaged. The displayed power curve will show this intermittent increase in power consumption as a characteristically choppy wave pattern. According to Peña, such an incident occurred at the Ohio transmission plant during the pilot program. The bearing was replaced before the cutter was damaged.
Likewise, part slippage due to inadequate workpiece clamping pressure may result in insufficient material removal during the roughing pass. The excess material condition will then cause a power spike in the finishing pass and an increase in the rate of tool wear. The fact that the power curve for the finishing pass is abnormal following a normal power curve for the roughing pass points to the problem.
An oversized diameter of the gear blank center bore can also cause part slippage that is detectable by telltale changes in the power curve of the roughing and finishing passes, Peña explains. In the past, he says this condition was almost impossible to detect at the machine and typically was not caught until damage occurred to cutters in downstream gear tooth operations.
Today and Tomorrow
Peña points out that the benefits of running the hobs to a wear limit rather than to a targeted part count extend beyond reduced cutter costs. For sure, maximizing each tool run based on the machining conditions that exist at the time (how many times the hob has been resharpened, the integrity of the tool coating, overall machine fitness, blank workpiece material properties and so on) is a significant improvement. Based on figures from the automaker, he estimates that the Ohio transmission plant has reduced hobbing cutter costs by more than $500,000 each year (2018 and 2019) after the tool monitoring systems were installed.
However, tool management based on reliable predictability of tool wear contributes to other aspects of production efficiency, he says. These benefits include:
- Greatly reduced number of damaged tools.
- Improved throughput by eliminating stoppages associated with tool-wear related issues such as damaged or broken cutter teeth.
- The ability to run hobs more aggressively to reduce cycle time, resulting in fewer operating hours or number of machines needed.
- Fewer part defects and reduced costs for sorting or scrapping parts.
- Reduced hidden factory costs by detecting and resolving degradation in workholding effectiveness, hob collet clamping, outboard support bearings and spindle motor bearings.
- Detection of oversize bores on incoming gear blanks.
From an operational standpoint, Peña notes that this approach to cutter management has proven to be flexible and reliable. For example, the CTM system’s software automatically can detect and compensate for changes in hob diameter after resharpening. That is, the resulting influence on power consumption creates a new process signature, thus foregoing the need to re-master machine parameters at each tool change and eliminating associated machine downtime. In a high-volume environment where the practice is to use any given tool on several different machines, this boost in uptime is substantial, he says.

The Artist CTM-V6 is a single I/O processing card that can be installed in a PCI slot of the machine’s control system and interfaced to the operator panel. This V6 card is designed for CNCs with digital feedback from servo motors. Other versions for older CNCs require analog power sensors attached to the spindle motor electrical leads.
Peña reports that operating costs of tool monitoring are low, mainly because the systems have proven to be reliable, with no component failures occurring at the Ohio plant in the last two years of full production. At this site, the automaker invested approximately $10,500 per machine, depending on the age and capability of the control unit. Similar figures hold for the other transmission plants as well, he says. For new machines acquired by any of these plants, the automaker now specifies that the Artis CTM-V6 be installed by the OEM before delivery.
Going forward, this automaker is said to be making this approach to tool monitoring a part of its drive to data-driven manufacturing and production optimization. It is becoming a component of the company’s in-station process control strategy that links machine-generated and operate-entered data to each plant’s production management system.
“The opportunity here is to use the Artis CTM’s capability of collecting and transmitting data or sensory feedback to a database on a network server for storage and trend analysis. In other words, data normally used for online functions at the machine tool, such as visualization, alarms and power curve displays, can be captured for off-line processing,” Peña explains. Although the automaker is implementing its own digital platform for its data-driven manufacturing initiatives, Artis offers a database management system for its general commercial customers, the C-Thru4.0.
“This product enables machine shops and production plants to collect and process data from Artis CTM systems as well as feedback generated by the machine controller,” he says. The data is stored in the widely-used SQL database format to generate actionable information on the condition of networked machines and individual tools.
Peña sees the most valuable application of information derived by the system to be condition-oriented predictive maintenance of machine tools. This is essentially the same concept behind tool monitoring based on actual wear not part counts. Most shops, he believes, rely on preventive maintenance, which involves scheduling maintenance routines on their estimated timeliness in the hope that problems don’t have the chance to arise. Predictive maintenance, in contrast, triggers appropriate inspectuons, adjustments and replenishments when truly needed as indicated by predictable, measurable conditions — not too soon, not too late.
Returning to the automaker and its experience with hobbing machines, Mr. Peña notes that the company recently has installed the CTM-V6 on single-spindle stand-alone machining centers and multi-spindle production machines. He says these applications reflect the flexibility of condition-based tool monitoring. “Gear hobbing may be an exemplary demonstration of the concept and an indication of the depth of engineering behind it, but advanced tool monitoring is a step forward for all critical metalworking operations.”
Related Content
How to Choose the Correct Fixed-Body Plug Gaging Solution
The two types of fixed-body plug gages are both accurate, fast and easy to use. Consider these factors when selecting one for your gaging application.
Read MoreTurning Fixed-Body Plug Gages Inside Out
Fixed-body mechanical plug gages provide fast, high-performance measurement for tight-tolerance holes.
Read MoreHow to Calibrate Gages and Certify Calibration Programs
Tips for establishing and maintaining a regular gage calibration program.
Read MoreThe Link Between CNC Process Control and Powertrain Warranties
Ever since inventing the touch-trigger probe in 1972, Sir David McMurtry and his company Renishaw have been focused on achieving process control over its own manufacturing operations. That journey has had sweeping consequences for manufacturing at large.
Read MoreRead Next
Horizontal Gear Hobbing Machines Enable Customization
The CLC H series of heavy-duty horizontal gear hobbing machines from Koepfer America are customizable for high-precision gear hobbing.
Read MoreSetting Up the Building Blocks for a Digital Factory
Woodward Inc. spent over a year developing an API to connect machines to its digital factory. Caron Engineering’s MiConnect has cut most of this process while also granting the shop greater access to machine information.
Read More


