How to Choose the Correct Fixed-Body Plug Gaging Solution
The two types of fixed-body plug gages are both accurate, fast and easy to use. Consider these factors when selecting one for your gaging application.
Share


Takumi USA
Featured Content
View More


Fixed-body plug gages are one of the best ways to measure hole diameters. With this type of gage there is no rocking, as with an adjustable bore gage, and therefore it is fast and provides high performance for tight-tolerance holes. Because these gages are so easy to apply, they are typically used to measure a high volume of parts. Even in cases where the volume of parts is not high — if they are expensive and the tolerance is tight — a fixed-body plug may still be an economical choice for the application. There simply may be no other way of measuring the critical part tolerance required.
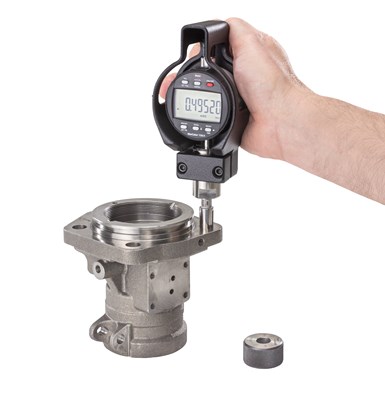
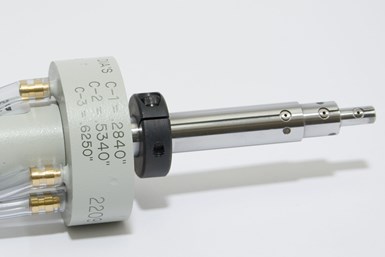
There are two types of fixed-body plug gages. The first is the mechanical type that uses two contacts on a flexible sprint arrangement to squeeze a “V” rod that transfers the diameter change to the indicating readout. The second is air gaging, which typically uses two small air jets restricted by the bore building backpressure, which is converted to a dimensional change. Both are very accurate, fast and easy to use.
With fixed-plug gaging, the body size of the gage is very close to the diameter it is made to measure. Therefore, the plug “locks” the gaging part of the plug in the hole. This requires very little operator skill and results in virtually no operator influence. There has to be some body clearance between the plug body and the hole diameter so the plug will fit into the hole being measured, and control of this clearance is critical for the gage builder. Limited clearance will provide a shorter measuring range, but better performance. More clearance increases the measuring range but enables for more “centralizing error” (actually measuring the chord rather than the diameter).
Selecting the best fixed-body plug gage for your application depends on several different factors. These may include:
Portability – Many mechanical plug gages are used with dial or digital indicators, offering ultimate portability. Depending on the diameter being measured, most bores are typically less than 50 mm. They can easily be moved around the bench, brought into the machining center or even walked around aircraft wings checking rivet holes.
Air plugs are restricted by their supply hoses. While air plugs are portable, they will always be connected to their display unit, creating some restrictions. However, the same restrictions would apply if a mechanical plug gage is being pushed in performance with an electronic linear variable differential transformer (LVDT) probe and readout.
Environment – Air plugs may have a bit of an advantage here. There are no moving parts with air tooling, and the air pressure tends to blow away water-based contamination on a part. Thus, an air plug will perform well in some of the harshest shop conditions. As the name implies, mechanical plug gages have moving parts with some very close clearances and are therefore susceptible to contamination. Consider where the fixed plug gage is going to be used.
Multiple diameters – A fixed-body plug gage is primarily designed to measure one diameter at a time. While there are designs out there that can measure two diameters in the same plug, they are limited to larger sizes. Air plugs, with their small jets (sensors), have the ability to do multiple diameters in the same plug and can do so with some very small sizes (less than 8 mm). Being able to measure multiple diameters can save a lot of inspection time.
Depth of the bore – Fixed-body mechanical plug gages typically use extension transfer rods to extend the reach of the plug. Any time more transfer motion is added to a gaging system, the chances of repeat and calibration issues increase. Adding an LVDT and a long handle can help here. With air tooling, there is no added transfer to allow the plug to go deep into a bore — just a longer hose. While there may be a slight delay in response, it’s not uncommon to use air gaging on parts 15 meters deep.
Contact wear – Speaking of 15 meters, consider the wear one might expect on the contacts of a mechanical fixed-body plug as it is pushed through and pulled back through the part. On the other hand, an air plug, having no contacts, is not susceptible to this issue. Certainly, the bodies of the fixed or air plug are apt to wear, and special coating can be applied to ensure long life even in these applications.
Performance – Both types of fixed-body plugs offer the highest performance compared to a measuring hand tool or an adjustable bore gage. In the end, the air plug may have a slight advantage in performance since there are no moving parts, and they are less susceptible to contamination. This is especially true when some of the tightest tolerance need to be held — those approaching a couple of microns.
Cost – Here, the air system will be more expensive, especially when considering not only the cost of the air plug and master but also the air readout system. A mechanical plug gage, master and digital indicator will provide a lower total price point. Based on performance requirements, one must consider the best value from the results.
Fixed-plug gaging is the choice for checking precision bores when accuracy, speed and ease of use are prime considerations. The choice of mechanical vs. air comes down to some fine application factors.
Related Content
6 Machine Shop Essentials to Stay Competitive
If you want to streamline production and be competitive in the industry, you will need far more than a standard three-axis CNC mill or two-axis CNC lathe and a few measuring tools.
Read More4 Ways to Establish Machine Accuracy
Understanding all the things that contribute to a machine’s full potential accuracy will inform what to prioritize when fine-tuning the machine.
Read MoreRethink Quality Control to Increase Productivity, Decrease Scrap
Verifying parts is essential to documenting quality, and there are a few best practices that can make the quality control process more efficient.
Read MoreThe Many Ways of Measuring Thickness
While it may seem to be a straightforward check, there are many approaches to measuring thickness that are determined by the requirements of the part.
Read MoreRead Next
5 Rules of Thumb for Buying CNC Machine Tools
Use these tips to carefully plan your machine tool purchases and to avoid regretting your decision later.
Read MoreBuilding Out a Foundation for Student Machinists
Autodesk and Haas have teamed up to produce an introductory course for students that covers the basics of CAD, CAM and CNC while providing them with a portfolio part.
Read MoreRegistration Now Open for the Precision Machining Technology Show (PMTS) 2025
The precision machining industry’s premier event returns to Cleveland, OH, April 1-3.
Read More


.png;maxWidth=150)


.jpg;maxWidth=300;quality=90)


