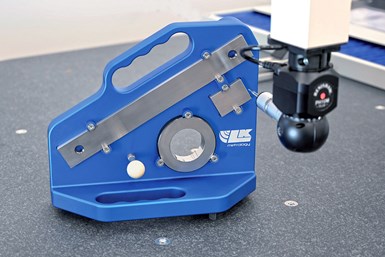
LK Metrology CMM Gage Identifies Accuracy Issues
Each CMM checking gage enables independent monitoring and verification of accuracy through regular intermediate checks on a CMM or portable measuring arm.
Share


LK Metrology has introduced a new range of UKAS-certified length and form gages, complete with holding fixture, enabling the inspection accuracy of any 3D measuring platform to be verified.
Each CMM checking gage (CCG) enables independent monitoring and verification of accuracy through regular intermediate checks on a CMM or portable measuring arm. Gage measurement tolerance is ±0.01 μm.
According to LK Metrology, CCG provides an efficient check with measurement results for ongoing CMM monitoring. Three combinations of length bars, ring gages, test spheres and fixtures of different sizes are available to suit various measuring machine models. Regular use provides an early warning of changes in the inspection system and an opportunity to take pre-emptive action. Once identified, accuracy issues due to environmental changes or an unnoticed probe crash can be addressed by scheduling an interim machine service or calibration before downstream manufacturing processes are impacted.
The gage is supplied in a carrying case with a program on a USB drive that runs in LK’s Camio measuring and reporting software. The program includes DMIS measurement and alignment routines for bridge and horizontal arm CMMs, enabling the CCG cycle to run seamlessly on LK machines. However, it is designed to be easy for operators of other 3D measuring platforms using different software to program a probing cycle around the gage to check for machine accuracy.
Related Content
-
How to Evaluate Measurement Uncertainty
Manufacturing and measurement are closely coupled. An important consideration for the use of measurement results is the associated measurement uncertainty. This article describes common metrology terms and provides an example uncertainty analysis.
-
Turning Fixed-Body Plug Gages Inside Out
Fixed-body mechanical plug gages provide fast, high-performance measurement for tight-tolerance holes.
-
Orthopedic Event Discusses Manufacturing Strategies
At the seminar, representatives from multiple companies discussed strategies for making orthopedic devices accurately and efficiently.


.jpg;maxWidth=300;quality=90)


