Vibration: An Invisible Source of Gaging Error
Vibration can make or break a gage’s performance, but vibration errors can be resolved by using a vibration isolation table or other correction measures.
Share


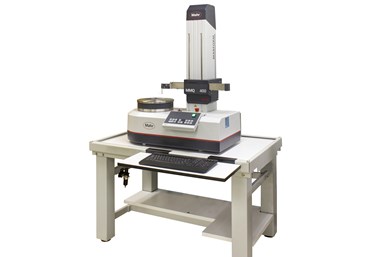
A vibration isolation table, like the one pictured here, may be required to eliminate errors due to vibration.
It was the last day of an automated surface gage runoff. A customer had been in our facility all week doing the final check and approval of three identical CNC surface finish and profiling systems. After being approved, they would be shipped to three automotive plants in North America. The runoff tests for the first two gages went smooth as silk. Programs were working, the user interface was to the customer’s liking, the interchangeable fixturing was rock solid and the results were as expected and correlated well between the two machines — and then there was the third system.
The third machine was in the special gage assembly area on the lowest level of the building. As I walked by, there was a look of desperation beneath the sweat on the application engineer’s face. The results were nothing close to what was expected in terms of results or even repeating those results. I could hear the application engineer saying to the customer that he had never seen the machine act like this before. They devised a plan to figure out what was going on — perform a system reboot, recalibrate the probes and check all the fixturing. It was not looking good for the final acceptance after things appeared to be going so well.
By now, the engineering team had joined the group and I had left to go back to my office on the third floor to give the situation some more thought. With the computer on and my coffee within reach, I had a “Jurassic Park” flashback. In my coffee was the rippling of waves. I couldn’t feel them at first, but with a little concentration, I felt the vibration through the seat of my chair. Must be a bad bearing in an HVAC system on the roof, I thought.
I had the maintenance team go check it out, and one of them found the source: A building lot was being cleared and there were soil compactors hard at work. That was it! This was the source of error being picked up on the gage.
On the third floor, the vibration was amplified enough to actually feel it. Although the people down where the machines were couldn’t feel the vibrations, the machines certainly had the capability to measure them. I immediately ran down to the testing group with this information. We then did a surface finish measurement without moving the probe to check for vibration and there it was — a large, high-frequency vibration originating from a block and a half down the street. Now that we knew what the problem was, we could work around the construction schedule and conduct a successful runoff of the third machine.
Errors due to vibration are the insidious type. In most manufacturing facilities located in urban areas, there is a constant tremor which everyone gets acclimated to, and no one is apt to take notice as things vibrate and pulse. However, when trying to measure with precision instrumentation, a vibration-free environment is critical. Fortunately for many gaging applications, vibration may not play much of a factor because of their dimensionally large tolerances. But with today’s tighter tolerances, vibration is something that requires knowing about, monitoring and potentially taking steps to mediate.
When measurements don’t repeat, or there are unusual readings coming from a surface or form measuring system, it’s time to look to the environment and vibration as the potential source of the unusual readings. Relocating the gaging equipment further away from the source, or to a location that has a better foundation, may be the first step. Sometimes vibration pads under the gage will also help eliminate some of the problem. Mass often helps with vibration, so placing the gage on a large steel or granite plate can be a solution. A vibration isolation table may also be required.
In any case, vibration is one of those enemies of precision measurement that can make or break a gage’s performance. But once it has been identified, it can be eliminated.
Related Content
4 Ways to Establish Machine Accuracy
Understanding all the things that contribute to a machine’s full potential accuracy will inform what to prioritize when fine-tuning the machine.
Read MoreChoosing the Correct Gage Type for Groove Inspection
Grooves play a critical functional role for seal rings and retainer rings, so good gaging practices are a must.
Read MoreHow to Evaluate Measurement Uncertainty
Manufacturing and measurement are closely coupled. An important consideration for the use of measurement results is the associated measurement uncertainty. This article describes common metrology terms and provides an example uncertainty analysis.
Read MoreHow to Choose the Correct Measuring Tool for Any Application
There are many options to choose from when deciding on a dimensional measurement tool. Consider these application-based factors when selecting a measurement solution.
Read MoreRead Next
Building Out a Foundation for Student Machinists
Autodesk and Haas have teamed up to produce an introductory course for students that covers the basics of CAD, CAM and CNC while providing them with a portfolio part.
Read More5 Rules of Thumb for Buying CNC Machine Tools
Use these tips to carefully plan your machine tool purchases and to avoid regretting your decision later.
Read MoreSetting Up the Building Blocks for a Digital Factory
Woodward Inc. spent over a year developing an API to connect machines to its digital factory. Caron Engineering’s MiConnect has cut most of this process while also granting the shop greater access to machine information.
Read More


