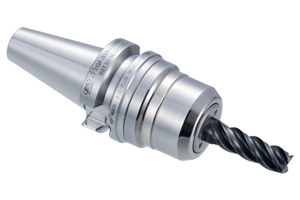
The Real Cost Of Runout
A seemingly small amount of runout can still be too large for the tool. Reduce this runout, and tool life or productivity may dramatically increase.
What constitutes “good runout” for a cutting tool in a machining center?
Many shops think about the answer to that question in terms of a single number. When precision toolholder supplier Big Kaiser (Elk Grove Village, Illinois) informally surveyed metalworking facilities to ask what they considered acceptable runout, the consensus seemed to be about 0.0005 inch.
Jack Burley is Big Kaiser’s vice president of sales and engineering. He says that consensus is correct—sometimes. If the tool is 3/4 inch in diameter or bigger, then 0.0005 inch may be good runout indeed. But applying this standard to all of the tools in the shop can be a costly mistake, he says. For tools that are very small, reducing runout to 0.0001 inch or less can yield considerable gains in tool life and productivity.
A recent example involved a shop that held runout to 0.0002 inch for a precision drilling operation. This shop (like most other shops) considered 0.0002-inch runout to be small. However, switching to a toolholder designed for precision clamping allowed the shop to reduce this runout to 0.00009 inch, or 90 microinches. Forces and wear on the tiny drill became more evenly distributed. As a result, the shop was able to cut faster with this tool, realizing a cycle time savings of 20 percent. In addition, tool life increased by 3 times.
Runout Revealed
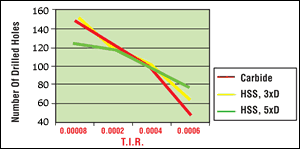
Figure 1 shows the results of an experiment conducted by Big Kaiser’s parent manufacturer, Big Daishowa Seiki. In the experiment, three drills were tested at four different runout values. Cutting conditions were the same, and the tools were the same except for tool material and length. The three drills included a carbide tool penetrating to 3 times diameter, an HSS tool reaching the same depth and an HSS tool with through-tool coolant penetrating to 5 times diameter. Runout for all of the tools ranged from 0.0006 inch down to 80 microinches.
The findings illustrate various important points, Mr. Burley says. One is that the right runout is relative not just to tool size, but also to tool material. While the life of each tool improved as runout got tighter, the carbide drill suffered the most when runout was high.
The findings also show just how much significance a “small” amount of runout can have on a 3-mm drill. Runout of 0.0006 inch is close to the figure that shops considered good runout in the informal survey. However, reducing the runout to well below this value improved the life of the carbide tool by almost 3 times. Even the least responsive tool saw tool life improvement of 60 percent.
This effect does not just apply to drilling. When similar testing was performed on a small-diameter, four-flute carbide end mill, the difference between 80 microinches and 0.0006 inch of runout was a tool life improvement of more than 30 percent.
Toolholder Features
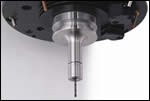
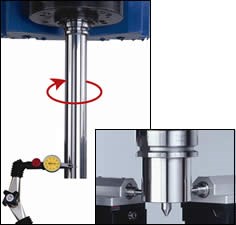
To realize these savings, start with the spindle, Mr. Burley says. Most shops are familiar with the common gage used to test spindle runout error. The gage is essentially a bar machined to extremely tight tolerances. This is slowly rotated in the spindle to measure static runout. Less well known is the existence of dynamic runout. At the spindle’s operational speeds, runout can change as a result of heat, vibration and centrifugal force. Figure 2 shows both the common gage for static spindle runout evaluation and a gage that is capable of measuring a spindle’s dynamic runout. If evaluation of the spindle shows that it can maintain an acceptably small runout on its own, then the key to imparting that low runout to the tool is the toolholder.
Various design features of a precision toolholder allow it to realize tight concentricity, Mr. Burley says. Those features include:
- Taper tolerances. How precisely the toolholder’s taper is machined affects how well the toolholder fits into the spindle. Toolholders manufactured with submicron tolerances and micro-mirror surface finish can achieve taper-into-taper contact exceeding 96 percent.
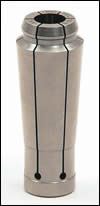
- Collet angle. In a typical collet toolholder, the angle of the collet is 16 degrees. Toolholders using a smaller collet angle achieve tighter runout values. Figure 3 shows a collet with an angle of just 8 degrees. The trade-off of using such a toolholder is a smaller clamping range. The small-angle collet covers a clamping range less than half that of the 16-degree collet. Thus, the tighter-runout toolholder needs more collets to cover the same range of tool shank sizes.
- Collet nut. The nut that squeezes the collet to clamp the tool may be more than just simple hardware. Clamping engages the collet with the nut’s internal raceway. Usually there is friction between these surfaces, but a precision collet nut may place ball bearings between the nut and raceway to counter this friction. Reducing the friction reduces the twisting force that might otherwise deform the collet and increase the runout error.
- Retention knob. Also known as the pull stud, this replaceable part of the toolholder should not be considered cheap or disposable. Higher-quality retention knobs will resist wear and deformation better, and they will also locate more accurately on the toolholder’s center line.
Concentricity And Cost
Determining the potential cost or value of runout may involve just a straightforward calculation. The 3-mm carbide drill used for the test in Figure 1 cost $40. The tightest runout permitted 148 holes, while the largest runout permitted just 1/3 this number. Therefore, the cost per hole dropped from 80 cents to 27 cents. Tighter runout thus saves the shop about $50 for every 100 holes.
Even with HSS, the savings are significant. The shorter HSS tool cost $15. Improving runout reduced the cost per hole from 23 cents to 10 cents. However, comparing HSS and carbide tells a story that may be more dramatic. Holding runout to 0.0004 inch or better let the carbide tool deliver the same life as HSS—at 2.8 times the speed. In other words, controlling runout could make it possible to switch to a faster tool. The ROI would then be measured in cycle time instead of tool life. This is the kind of potential that may be going unrealized in a shop that hasn’t given thought to just how much runout is really right for the process.
Related Content
Tungaloy's Modular Turning System Extends Tool Life
The ModuMini-Turn exchangeable-head modular turning tool system enables quick tool changes in Swiss machines for minimum downtime.
Read MoreBig Daishowa Chuck Eliminates Chatter in Milling Operations
The Mega 12DS chuck is designed for trochoidal milling with anti-vibration end mills.
Read MoreHow to Mitigate Chatter to Boost Machining Rates
There are usually better solutions to chatter than just reducing the feed rate. Through vibration analysis, the chatter problem can be solved, enabling much higher metal removal rates, better quality and longer tool life.
Read MoreMaking the Most of Mixed Toolholder Assemblies
While nearly all ER systems will have cross compatibility, they’ll have small differences across manufacturers that make their implementation at the shop level not as standard.
Read MoreRead Next
Handle With Care
Micro-size drills and end mills don’t have to be difficult to use.
Read MoreRegistration Now Open for the Precision Machining Technology Show (PMTS) 2025
The precision machining industry’s premier event returns to Cleveland, OH, April 1-3.
Read MoreRego-Fix’s Center for Machining Excellence Promotes Collaboration
The new space includes a showroom, office spaces and an auditorium that will enhance its work with its technical partners.
Read More









.jpg;maxWidth=300;quality=90)


