Sensitive and Strong: Advanced Digital Comparators
Borrowing from cell phone touchscreen technology, user interfaces on industrial gages are increasingly sensitive — and strong.
Share


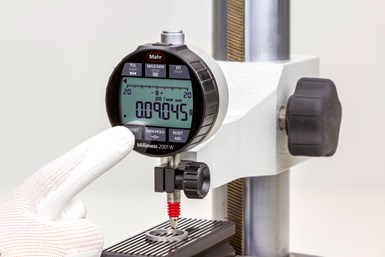
Advances in metrology have led to unique user interfaces that are controlled by touch — even with gloves on. Image: Mahr
The metrology industry is constantly changing. Microelectronics and PCs have changed the way measurements are made and how data is used to improve and document processes. However, other than new sensor technologies that have been developed, most user interface technologies for measuring systems are borrowed from other fields. There are probably no more dynamic industries over the past few decades than the world of user interfaces developed for cell phones, tablets and PCs. Through advances in these industries, we have seen products go wireless, and dedicated switches and keyboards have moved to touch screens as the primary user interface.
We have all had experience dropping our cell phones and gasping as they tumble out of our hands. But more often than not, with a quick wipe, it’s good for another day. This is where the metrology industry is borrowing from the technology in today’s smartphones. Just as many smartphones are made from glass, a new generation of digital comparators follow the same path.
As scary as it sounds, putting a glass indicator on the shop floor is actually a good idea. The newest glass technology in phones and tablets is extremely tough. Maybe dropping them is not a good idea, but under normal use, one can get a lifetime of button pushes on a glass screen without degrading performance.
No buttons also mean fewer areas for contamination. And because the button labeling is under the glass face, there is no chance for the labeling of the button to wear off. We all know that re-zeroing is often recommended, and it is not uncommon to use a dynamic reset button for every measurement. Thus, typical switches in a digital indicator can take a beating. Even the painted or stamped markings associated with the push button can eventually rub off or be removed by solvents used at the workstation. But with a touch-sensitive screen, the new technology means longer life and better sensitivity on the shop floor.
However, the more significant improvement could be the ease of use, even when the operator is wearing gloves at the point of manufacture. Certain glass screens do not need an actual finger touch but can be switched or selected while wearing gloves, even in the harshest conditions, but are still sensitive enough that resetting zero does not create sufficient force to deform the measurement set up and create an undetected bias during the zeroing process.
In many ways, digital indicators are becoming so powerful that they are taking on the performance and features once found in PC-based gaging systems. It is not uncommon to find features such as dynamic measurements, multiplication factors, unilateral tolerances, different output formats and sub-micron resolutions in higher-end digital indicators. If there was a weakness in digital indicators, it usually came from the accuracy side. This is because most longer-range digital indicators are built upon scale technology, which is great for most of the applications found around the shop. But when it comes to parts with extremely tight tolerances, there is no match for an LVDT-based bench amplifier system or an LVDT-based digital comparator.
LVDT technology has long been known for its extreme accuracy, repeatability and long life in the manufacturing environment. Again, borrowing from new battery technology and power management found in cell phones and tablets, this power-hungry technology can be built into digital comparators with long battery life that can run a month before requiring a charge.
The combination of an LVDT-based transducer built into the display of a digital indicator offers a much less expensive solution to a PC or bench amplifier system. It makes for a high-performance upgrade of dial or digital indicators in bench stands.
This combination has the sensitivity needed for high accuracy and extreme trouble-free life in the toughest environments.
Related Content
Process Control — Leveraging Machine Shop Connectivity in Real Time
Renishaw Central, the company’s new end-to-end process control software, offers a new methodology for producing families of parts through actionable data.
Read MoreOrthopedic Event Discusses Manufacturing Strategies
At the seminar, representatives from multiple companies discussed strategies for making orthopedic devices accurately and efficiently.
Read MoreHow to Calibrate Gages and Certify Calibration Programs
Tips for establishing and maintaining a regular gage calibration program.
Read MoreParts and Programs: Setup for Success
Tips for program and work setups that can simplify adjustments and troubleshooting.
Read MoreRead Next
Setting Up the Building Blocks for a Digital Factory
Woodward Inc. spent over a year developing an API to connect machines to its digital factory. Caron Engineering’s MiConnect has cut most of this process while also granting the shop greater access to machine information.
Read MoreBuilding Out a Foundation for Student Machinists
Autodesk and Haas have teamed up to produce an introductory course for students that covers the basics of CAD, CAM and CNC while providing them with a portfolio part.
Read More5 Rules of Thumb for Buying CNC Machine Tools
Use these tips to carefully plan your machine tool purchases and to avoid regretting your decision later.
Read More


