Lasers Offer Viable, Noncontact Alternative to Touch Probes
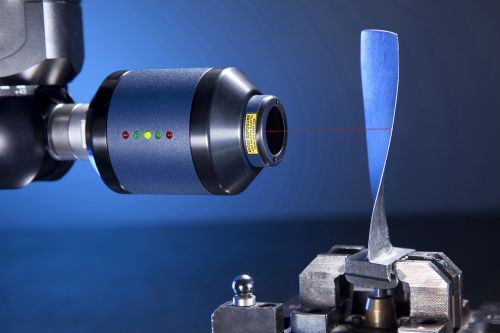
Specialized optics and automatic, real-time calibration make Nextec’s laser systems a viable alternative to mechanical touch probes for high-volume inspection applications involving complex geometry and tight tolerances.
Share


ECi Software Solutions, Inc.
Featured Content
View More

A supplier that touts laser measurement systems as a viable alternative to CMM touch probes says its technology addresses the common limitations of noncontact inspection while sacrificing none of the speed. According to the company, the result is a reliable and cost-effective means of measuring high-volume aerospace and automotive parts with freeform geometries, sharp edges, shiny surfaces and other troublesome features, even when faced with requirements for 100-percent inspection.
That supplier is Nextec Laser Metrology, which opened its doors in mid-2012 in East Lake, Ohio.The technology that drives all three of its laser systems—the Wizprobe, Wizblade and Wizinspect products—was developed by parent company Nextec Technologies, founded in 2001 in Haifa, Israel. Danny Shacham, president of the parent company, says these systems’ advantages derive primarily from two particular developments: a different approach to laser triangulation and a control system that adapts to individual application requirements in real time.
Together, these features unlock the full potential of the inherent speed of laser measurement, he says. By nature, measuring part geometry by tracking a beam across the part surface is faster than taking a series of points with a touch probe, especially for non-prismatic parts with complex, freeform geometries. Such components often require complex motion to keep the probe in constant contact with the surface, not to mention special fixturing that can be expensive and time-consuming to machine and set up. Minute, sculpted features like blade edges can be particularly problematic, even for the smallest-diameter touch probes.
The problem is that the latter features tend to confound laser measurement systems as well. The leading and trailing edges of a blade, for example, change the angle of the laser beam relative to the part edge profile. As a result, the light that actually makes it back to the detector might represent only a fraction of the angles at which the original beam was deflected. In that case, the system wouldn’t have enough data to glean an accurate representation of the part feature, Mr. Shacham says. As he puts it, “The angle of the laser is changing so rapidly that you just get garbage with a regular triangulation sensor.”
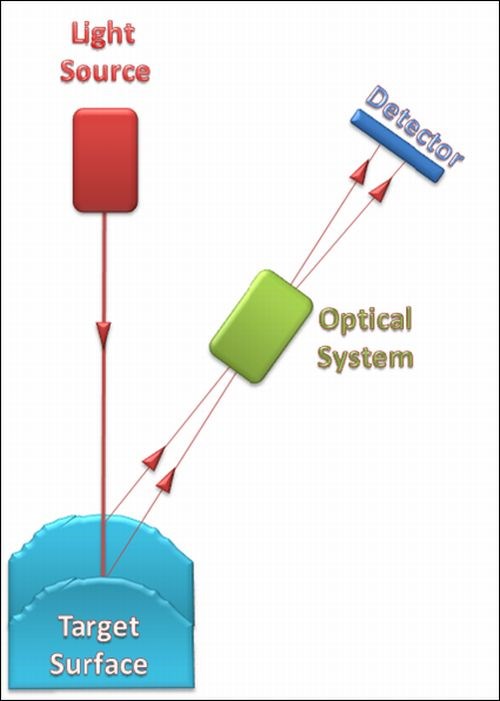
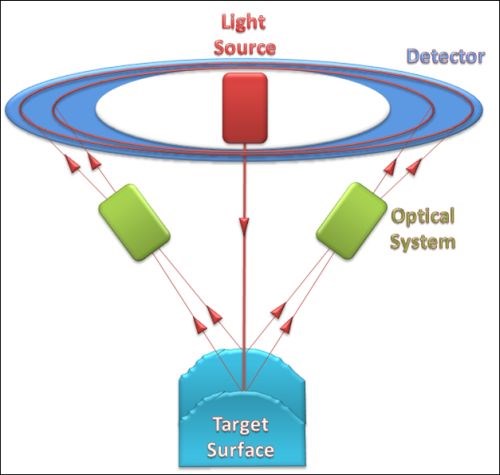
Nextec laser systems address this problem through what Mr. Shacham calls “circumferential triangulation.” Like other designs, this involves emitting a laser beam that reflects off the measured surface and passes through a set of optics to a detector (in this case, a charge-coupled device, or CCD). The difference is that Nextec systems use toroidal optics. This shape enables collecting the reflected beam not just along a single return path, but from infinite angles simultaneously. With more data to triangulate for a given portion of the part surface, the CCD can project a more complete and accurate depiction of the geometry. “The donut-shaped optic enables us capture the beam’s entire cone of reflection from any given point on the part surface,” Mr. Shacham explains. “Because we capture all the data from all 360 degrees, the output is a complete video image, just like you see on your camera screen.”
However, the toroidal-shaped lens does nothing to account for changes in the energy of the reflected beam that can affect the integrity of measurement results. In addition to the varying angles that occur with blade edges and other minute, sculpted features, common culprits for this problem include a part’s surface finish and color. For example, a shiny surface will reflect most of the energy back to the light source, whereas an opaque, black surface will absorb it. In either case, the result is extraneous noise. This is a common limitation of not only laser systems, but also comparators, white-light scanners and other noncontact measurement processes, Mr. Shacham says.
Nextec products automatically self-calibrate in real time to compensate for changing energy levels. As the beam moves across the surface, the laser software adjusts both laser intensity and CCD exposure time as fast as 50 times per second in a closed-loop process. This enables the laser systems to seamlessly transition through different angles, surface textures, materials and colors without requiring any operator input beyond the programming stage, Mr. Shacham says.
Together, the specialized optics and adaptive control enable Nextec systems to measure components with virtually any geometry, material and surface characteristics within microns. The company’s standard product is the Wizprobe, which features a standard PH-10 interface for installation on CMMs in place of mechanical probes. It is also available as a standalone product with customized software packages for integration into any process control. Also available are the Wizblade, a system designed specifically for aerospace jet engine blades as well as industrial turbine, marine and compressor blades in production and MRO environments; and the Wizinspect, a turnkey, production floor inspection system for direct integration with robots and conveyors.
Related Content
Process Control — Leveraging Machine Shop Connectivity in Real Time
Renishaw Central, the company’s new end-to-end process control software, offers a new methodology for producing families of parts through actionable data.
Read MoreParts and Programs: Setup for Success
Tips for program and work setups that can simplify adjustments and troubleshooting.
Read MoreHow to Calibrate Gages and Certify Calibration Programs
Tips for establishing and maintaining a regular gage calibration program.
Read MoreRethink Quality Control to Increase Productivity, Decrease Scrap
Verifying parts is essential to documenting quality, and there are a few best practices that can make the quality control process more efficient.
Read MoreRead Next
5 Rules of Thumb for Buying CNC Machine Tools
Use these tips to carefully plan your machine tool purchases and to avoid regretting your decision later.
Read MoreBuilding Out a Foundation for Student Machinists
Autodesk and Haas have teamed up to produce an introductory course for students that covers the basics of CAD, CAM and CNC while providing them with a portfolio part.
Read MoreRegistration Now Open for the Precision Machining Technology Show (PMTS) 2025
The precision machining industry’s premier event returns to Cleveland, OH, April 1-3.
Read More


.png;maxWidth=150)


.jpg;maxWidth=300;quality=90)


