Modern Bench Amplifiers Offer More Evaluation Capabilities
Today’s electronic gaging amplifiers can do more than take comparative measurements. New features have become common, opening possibilities for machinists and manufacturers.
Share


Takumi USA
Featured Content
View More


Autodesk, Inc.
Featured Content
View More
Electronic gaging amplifiers are one of those devices whose full potential is rarely appreciated by their owners — similar to that Ford F150 used to take home this week’s groceries. Gaging amplifiers have been around since electronics first entered the shop floor and were originally used as a step up from dial indicators where a higher degree of resolution is required. However, the ability to provide higher resolutions is just a small part of the capabilities found in modern amplifiers.
The first form of amplifiers were analog devices that had the ability to choose higher resolutions (at the cost of shorter measuring ranges) that, in effect, simulated high-resolution indicators. At the time, achieving resolutions of 10 μ" or even 1 μ" was a breakthrough in precision measurement for production or quality lab applications. These first analog amplifiers evolved by adding features, such as two inputs for differential measuring applications or the ability to set limits to trigger lights/relay closers to classify and control processes.
Eventually bench amplifiers went digital, offering a new level of features that eliminated many of the manual measurements that a user would previously have done with great difficulty on an analog system. For example, with digital electronics, it is easy to incorporate dynamic measurement capabilities, including minimum (Min.), maximum (Max.) and total indicated reading (TIR) functions. The amplifier “remembers” the highest and lowest points measured on a part, and displays either or both of them, or subtracts the Min. from the Max. to calculate TIR. With an analog system, a user would have to watch the movement of the hand on the dial and remember the degree of swing to estimate these values. Digital amplifiers today do this as a basic function.
However, an analog dial can still be a benefit to some users. In the analog world, the speed of the moving dial or its position relative to the tolerance can inform a user without them having to read and digest the numbers being presented. When the first generation of digital displays entered the manufacturing world, the displays tried to simulate an analog dial. Unfortunately, because of the capabilities at the time, the displays were choppy and slow, ultimately creating a poor substitute for an analog dial. However, today’s displays are now HD/LED-capable and react fast. They are clear and crisp — often even easier to read than an analog meter because of the higher contrast, with no potential for parallax error.
Many other standard features for digital bench amplifiers have become very common, including functions that can speed gaging setups. For example, the “auto-zero” function is the electronic equivalent of the rotating bezel on mechanical dial indicators. The operator brings the gage head into rough contact with the master and simply zeroes the amplifier, eliminating the need for ultra-careful positioning of the gage head. A “master deviation” function allows the addition of a fudge factor to the zero setting. Say your spec calls for a nominal dimension of 1.99980 inches, but you've only got gage blocks handy for 2.00000 inches. No problem. Simply set your zero at 2.00000 inches, master the gage, program in a deviation of +0.00020 inches to all measurements and voilà! Quick and easy mastering, without the hassle of post-measurement arithmetic.
A “preset value” allows switching between comparative and absolute measurements. In other words, instead of gaging deviation from nominal, the amplifier displays actual part dimensions. In the above example, if a part is 0.00010 inch above nominal, the display will read 1.99990 inches.
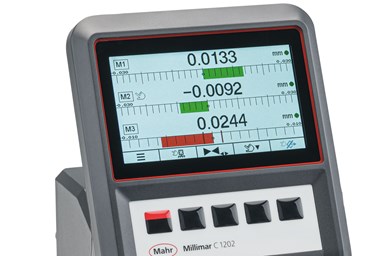
Many amplifiers also accept signals from two or more gages. This means that more than one part feature can be measured on a multi-gage fixture by simply toggling between the inputs. Somewhat more sophisticated is the capability for differential measurements, in which the amplifier subtracts the reading of one gage head from the other. For example, straightness can be derived by calculating the difference in height of two co-linear points on a shaft. But more important than just displaying the difference might be the ability to display the two input signals as well as the difference between them. Thus, today’s amplifiers can have two inputs of different types and display three features or results from a mathematical formula using the two inputs.
An example of this would be the measurement of tapers. Tapers are usually measured by measuring two diameters along the taper, then, if one knows the distance between the two diameters, the taper angle can be calculated. With these amplifiers, the diameters can be displayed as inches or mm, while the taper can be displayed as an angle in decimal degrees or in degrees, minutes and seconds.
Digital bench amplifiers also allow the user to establish tolerance limits, and some incorporate green, amber and red lights as part of the display to indicate “in tolerance,” “approaching limits” and “out of tolerance” conditions. Using LED capabilities, the whole dial can be utilized as a classification signal by turning the background green for good, yellow for close to tolerance or red for out of tolerance.
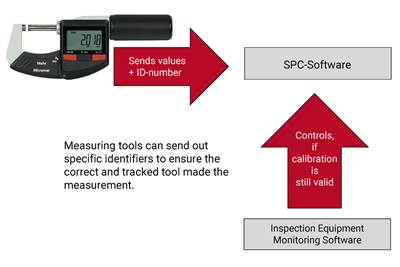
In addition to these enhancements, the most important and widely used feature on modern bench amplifiers is the output port for data collection. Now, data can be transferred and stored in management software-based programs or sent directly to a statistical process control system so that data-based decisions can be made about the sample lot or the process. However, the output feature of today’s systems is not a one-way street. Modern ports incorporate the ability to send data and receive information. This allows for control or set up by remote devices, which saves time. A more important feature is the ability to assign a unique identifier to the amplifiers. This can be part of the data transfer. It not only tells the user the results of the measurement but also what instrument made the measurement, completing the last missing bit of information for a complete process control system.
Not all gaging amplifiers incorporate all of the features listed here, although most modern options incorporate some of them. When selecting a new amplifier, one can readily identify the product features needed to meet the requirements of the application. For those who are currently using amplifiers simply to take comparative measurements, it may be worthwhile to review the owner’s manual to look for built-in functions that can enhance productivity.
Related Content
Help Operators Understand Sizing Adjustments
Even when CNCs are equipped with automatic post-process gaging systems, there are always a few important adjustments that must be done manually. Don’t take operators understanding these adjustments for granted.
Read MoreRethink Quality Control to Increase Productivity, Decrease Scrap
Verifying parts is essential to documenting quality, and there are a few best practices that can make the quality control process more efficient.
Read MoreHow to Calibrate Gages and Certify Calibration Programs
Tips for establishing and maintaining a regular gage calibration program.
Read MoreOrthopedic Event Discusses Manufacturing Strategies
At the seminar, representatives from multiple companies discussed strategies for making orthopedic devices accurately and efficiently.
Read MoreRead Next
Preparing SQC For Machinists and Future Requirements
The current complexity of machines means machinists are already busy — assigning them new, expanded SQL duties (such as gage identification) will require gages and processes to prioritize accessibility.
Read MoreQuality Control Process Improved with Real-Time Data Collection, Analysis
Pinnacle Machine Works uses Mitutoyo’s MeasurLink data collection and SPC software to make the QC process more efficient and accurate.
Read MoreRegistration Now Open for the Precision Machining Technology Show (PMTS) 2025
The precision machining industry’s premier event returns to Cleveland, OH, April 1-3.
Read More


.png;maxWidth=150)


.jpg;maxWidth=300;quality=90)


