Calling Home on a Portable Surface Gage
Today’s surface gages have a user interface that is just like a smartphone, and setting them up to make measurement requirements should be easy for the operator.
Share


In today’s ever-changing, fast-paced production environment, the concept of putting simple-to-use tools in the hands of the machinist is critically important with surface finish measuring tools. Machinists are asked to do more and more as part of their daily tasks, and it seems like metrology or surface finish is increasingly a part of this. The metrology of surface finish can be complex; first with the probe design for measuring roughness with skidded systems or with a skidded system, allowing for roughness, profile and waviness parameters. The complexity comes from the 100 or so parameters available to analyze the results.
For most applications, a simple roughness average may be all that is needed. However, if a designer surface is engineered to perform in a particular manner when used, a more in-depth analysis of the surface using a parameter specific to the function may be required. Setting up the surface gage to meet the measurement requirements should be easy for the machinist.
There are a few ways of doing this. Today’s surface gages have a user interface that is just like a smartphone. They require very little training and can be used by the operator in minutes. Features, functions and setup parameters are available by swiping and selecting features just as how one would set up their smartphone. There can even be features such as “favorites,” where the user can choose certain parameters to be measured by specific functions determined through a created shortcut. These smartphone features are built in to make the surface gaging intuitive to the casual “inspector.”
Another option, as in the remote setup of digital indicators, is the ability to set up the surface gage remotely or by an optical scanner. Surface devices are starting to be capable of receiving setup information as well. This is a valuable feature for the user as there is a reasonable probability of new setup information for each part as it begins being manufactured. This most likely means new probe settings, surface finish parameters and surface tolerances for the surface measurement system. Even with the simplest surface finish system, there are literally hundreds of possibilities for setup parameters.
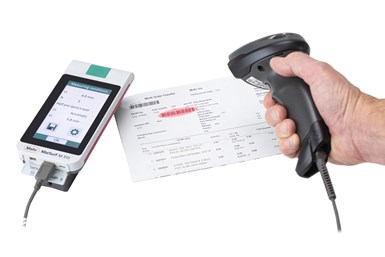
It also seems as if every piece of paper following the job on the shop floor has a barcode associated with it, and the barcode is used to route the process and track the job during every stage of the machining process. Every machining station has a barcode reader available — and the same is happening with portable surface finish systems. The work order documents for the next set of parts to be machined contain a barcode identifying all the setup parameters for the surface finish gage. The user can simply scan the traveling documents and the system is ready to measure the next part — with the specific parameters and tolerances the design engineer specified. The operator requires no time to set up the measuring system.
And finally, another option is to connect the portable surface gage to the companies’ network, potentially downloading parameter programs for the job at hand and then storing the measured data as part of the part tracking process. This includes the ability for two-way communication between the gage and a process engineer. Should a part be measured out of specification, a process engineer could send information back to the operator via the portable gage in order to remeasure or adjust the machine.
Related Content
The Many Ways of Measuring Thickness
While it may seem to be a straightforward check, there are many approaches to measuring thickness that are determined by the requirements of the part.
Read MoreHow to Evaluate Measurement Uncertainty
Manufacturing and measurement are closely coupled. An important consideration for the use of measurement results is the associated measurement uncertainty. This article describes common metrology terms and provides an example uncertainty analysis.
Read MoreHow to Calibrate Gages and Certify Calibration Programs
Tips for establishing and maintaining a regular gage calibration program.
Read MoreHow to Choose the Correct Measuring Tool for Any Application
There are many options to choose from when deciding on a dimensional measurement tool. Consider these application-based factors when selecting a measurement solution.
Read MoreRead Next
Setting Up the Building Blocks for a Digital Factory
Woodward Inc. spent over a year developing an API to connect machines to its digital factory. Caron Engineering’s MiConnect has cut most of this process while also granting the shop greater access to machine information.
Read MoreBuilding Out a Foundation for Student Machinists
Autodesk and Haas have teamed up to produce an introductory course for students that covers the basics of CAD, CAM and CNC while providing them with a portfolio part.
Read MoreRegistration Now Open for the Precision Machining Technology Show (PMTS) 2025
The precision machining industry’s premier event returns to Cleveland, OH, April 1-3.
Read More


.png;maxWidth=300;quality=90)


.png;maxWidth=970;quality=90)