What Questions to Ask About Surface Finish Call-outs
All the details of the measuring process must be uncovered.
Share


.png;maxWidth=45)
DMG MORI - Cincinnati
Featured Content
View More

ECi Software Solutions, Inc.
Featured Content
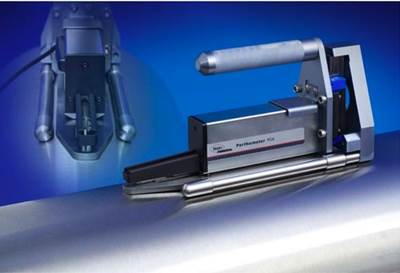
View MoreWhen looking at any type of dimensional measurement request, it is very rare that all the information is available with said request. Even if it’s a simple outer diameter check, one needs to know not only the tolerance, but also where it is, who’s making the check, how many parts are being measured and so on, because all these pieces of information help point to the best measurement solution. The same applies to finding the best solution for a surface finish requirement.
Let’s look at a very specific surface finish request: the measurement of a surface finish call-out of 1.6 microns on a 2.3 mm by 45-degree chamfer — typical of a sealing function between two parts. The dimension is well called out on the print; we know the surface finish, specific diameter that the chamfer is on, and where the dimension is located within the bore. However, there are specific pieces of information that are not on the print.
What are some questions to ask about surface finish call-outs?
One important piece of information needed, especially with a surface finish check, is the manufacturing method used to put that feature on the part. Was it turning, grinding or something else? This information will tell us if the feature surface finish needs to be measured axially or radially.
Once we know this information, we can then think about:
- Is this a specific part, or could there be a family of parts to be measured? If the latter, how many part variations are there, and what are the size ranges? This will help define the system as fixed or multi-purpose.
- How often will the surface finish be inspected on these parts, or how often should it be inspected? This helps to identify the type of gage to supply.
- Where is the gage used? Is it next to the production of the parts or in a lab? This helps to identify the need for gage robustness.
- Will data collection via PC or data export be required?
- How skilled are the operators of the gage going to be? Are they capable of staging and measuring?
Once you get past these basics, the actual way the surface finish measurement is performed can get very technical. In some cases, knowledge of specific technical information is necessary for setting up the surface finish gage to get the best result. For a short check like this, consider the method of determining the correct cutoff (Lc) value for the calculation. Since the surface finish requirement is 1.6 microns, national specifications recommend a cut-off value for this roughness value of 0.8 mm in length. This minimum length of 0.8 mm ensures that there is “enough roughness” to perform the mathematical calculation of roughness. If cut-off value is too low, the measured roughness values will be lower than the actual value because part roughness values will be left out of the calculation.
Knowing that the surface to be measured axially on a chamfer is 2.3 mm in length, then the trace length realistically would be 1.6 mm (0.8 mm x 2) to ensure that the stylus physically remains on the chamfered surface during the evaluation.
Typically, when measuring Ra, a total number of five cut-offs (0.8 mm x 5) is used to calculate the roughness average. But this is too long for this surface. Thus, the system will have to be set to adjust its stroke length to two cut-offs. Because the filtering process requires eliminating a fifth of the first and last cut-off length, we will be left with one cut-off or 0.08 mm of surface being analyzed. As you can imagine, this sample length is probably not enough data to achieve the best repeat of measurements around the sample area. The data may not be wrong — just mostly inconsistent — and should be understood and anticipated by the user. This is not a manufacturer limited condition but one associated with any surface finish system.
This scenario provides a good example of where some information was provided, questions were asked, solutions were provided and the validity of the measurement results could be qualified because of the specific application. One would never know this unless all of the details of the measuring process were uncovered.
Related Content
Process Control — Leveraging Machine Shop Connectivity in Real Time
Renishaw Central, the company’s new end-to-end process control software, offers a new methodology for producing families of parts through actionable data.
Read MoreHow to Calibrate Gages and Certify Calibration Programs
Tips for establishing and maintaining a regular gage calibration program.
Read More6 Machine Shop Essentials to Stay Competitive
If you want to streamline production and be competitive in the industry, you will need far more than a standard three-axis CNC mill or two-axis CNC lathe and a few measuring tools.
Read MoreTurning Fixed-Body Plug Gages Inside Out
Fixed-body mechanical plug gages provide fast, high-performance measurement for tight-tolerance holes.
Read MoreRead Next
Measuring Surface Finish On Large ODs
The irregularity of a machined surface is the result of the machining process, including the choice of tool, feed rate, speed of the tool, machine geometry and environmental conditions. This irregularity consists of high and low spots that are machined into a surface by the tool bit or a grinding wheel. These peaks and valleys can be measured and used to define the condition and, sometimes, the performance of the surface.
Read MoreMeasurement for True Surface Analysis
Optical metrology is providing more information, faster, about surfaces that were once impossible to measure and understand.
Read More


.jpg;maxWidth=300;quality=90)


