
How To Become A Master Of Deviation
In the June 2009 issue, I wrote about how “less” can be “more,” by purchasing lower-grade master rings and discs and using their certified size—their master deviation—to improve the gaging process accuracy. This topic sparked a number of questions and some confusion, primarily because I did not have space to talk about actually applying this technique on the shop floor.


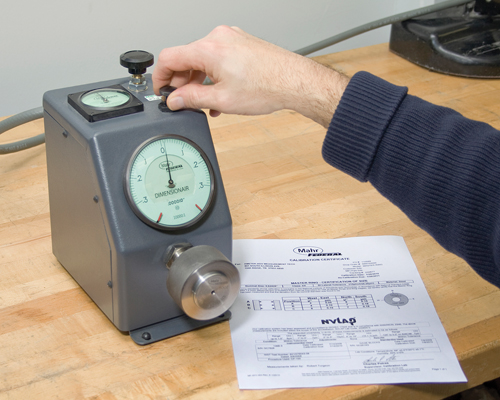
Using the master deviation from the calibration certificate to set up your gage can improve overall performance of the measurement, often using lower-class masters.
Share


.png;maxWidth=45;format=webp)
DMG MORI - Cincinnati
Featured Content
View More


Autodesk, Inc.
Featured Content
View More


Hwacheon Machinery America, Inc.
Featured Content
View More
In the June 2009 issue, I wrote about how "less" can be "more," by purchasing lower-grade master rings and discs and using their certified size—their master deviation—to improve the gaging process accuracy. This topic sparked a number of questions and some confusion, primarily because I did not have space to talk about actually applying this technique on the shop floor.
First, let’s summarize: Master rings and plug gages are classed by level of accuracy, with XXX indicating the tightest tolerances; XX, X and Y indicating intermediate grades (in descending order); and Z indicating the lowest level of accuracy. Of course, the higher the class, the more difficult the master is to manufacturer, the longer it takes to receive and the more you pay. Tighter-tolerance masters also wear more quickly. Traditionally, the rule of thumb was to buy the highest accuracy you could afford, because the best class master was assumed to ensure the best measurement results.
However, because of ISO and other standards, masters are now available with documents that certify their actual size. The difference between the nominal class size—what the master is supposed to be—and the actual size of the master is referred to as the master deviation. The uncertainty of this number is most likely smaller than the deviations you will find with a master made to a specific class size. You can use this number to improve your measurement performance using a lower-class master.
For example, a 1-inch class XXX master ring has a tolerance range, or potential error, of ±15 microinches. A 1-inch class X ring has a potential error of ±60 microinches. However, it also comes with a document that details a specific amount that the master is "off," say +55 microinches. Many gages, such as air tooling, bench amplifiers and even some good digital and dial comparators can resolve to 10 microinches, and by "dialing in" this master deviation when zeroing the gage, you may be able to squeeze an extra 40 microinches of accuracy out of a gage that is measuring a ±0.0001-inch tolerance (the difference between the ±15 microinch class XXX tolerance and the +55 microinch gage setting). Thus, you improve the process by 20 percent while paying 50 percent less for the master.
Using a dial indicator gage with a master deviation is pretty easy. If the master is off by +0.0001 inch, the setup person would adjust the gage to master at 0.0001 inch rather than zero. In effect, the operator is making the gage read what the master actually is. If a part is measured at the true nominal size, it would read 0.0 on the gage. This is even easier on many of the electronic gages in use today. Most of them have a procedure for entering the master deviation into the setup routine of the gage. Once set, the gage will show the actual deviation as seen on the certification whenever it is "zeroed."
However, there is a trade-off in that this process will require a little more work on your part. In order for this technique to work effectively on the shop floor, you and your operators will have to start keeping track of the master deviations by gage and ensure that everyone using the gages is aware of the master deviation. Processes will have to be set up to regularly measure and certify the master to its particular size. This number must be tracked by your quality department, and users must be aware of the offset and account for it. The number is apt to change annually, so this is a long-term process that has to become an integral part of your gaging routine.
However, these efforts will also pay another long-term dividend. Once you have set up a shop-wide process of using master deviations, you can start monitoring changes in the masters. Calibrations from year to year would normally show some wear in size and probably a small amount of change in the form of your masters. If over the course of a year you find that the size has changed more than 10 percent of your part tolerance—or more than 20 percent for tighter-tolerance parts—something significant has happened to your process, and you might want to question some of the parts you have measured since the last calibration.
Changing to a master-deviation-based measuring process requires a different process on the floor, but it can save big dollars in master costs and rework in the short run and provide an excellent long-term check on your manufacturing process.


Related Content

Selecting a Thread Mill That Matches Your Needs
Threading tools with the flexibility to thread a broad variety of holes provide the agility many shops need to stay competitive. They may be the only solution for many difficult materials.
Read More
What are Harmonics in Milling?
Milling-force harmonics always exist. Understanding the source of milling harmonics and their relationship to vibration can help improve parameter selection.
Read More
6 Machine Shop Essentials to Stay Competitive
If you want to streamline production and be competitive in the industry, you will need far more than a standard three-axis CNC mill or two-axis CNC lathe and a few measuring tools.
Read More
4 Steps to a Cobot Culture: How Thyssenkrupp Bilstein Has Answered Staffing Shortages With Economical Automation
Safe, economical automation using collaborative robots can transform a manufacturing facility and overcome staffing shortfalls, but it takes additional investment and a systemized approach to automation in order to realize this change.
Read MoreRead Next

Setting Up the Building Blocks for a Digital Factory
Woodward Inc. spent over a year developing an API to connect machines to its digital factory. Caron Engineering’s MiConnect has cut most of this process while also granting the shop greater access to machine information.
Read More
Registration Now Open for the Precision Machining Technology Show (PMTS) 2025
The precision machining industry’s premier event returns to Cleveland, OH, April 1-3.
Read More
5 Rules of Thumb for Buying CNC Machine Tools
Use these tips to carefully plan your machine tool purchases and to avoid regretting your decision later.
Read More