On-Machine Scanning Probes for Speedier Setups
Renishaw introduces new on-machine, touch-probe scanning technology to enable faster workpiece setup and inspection cycles.
Share


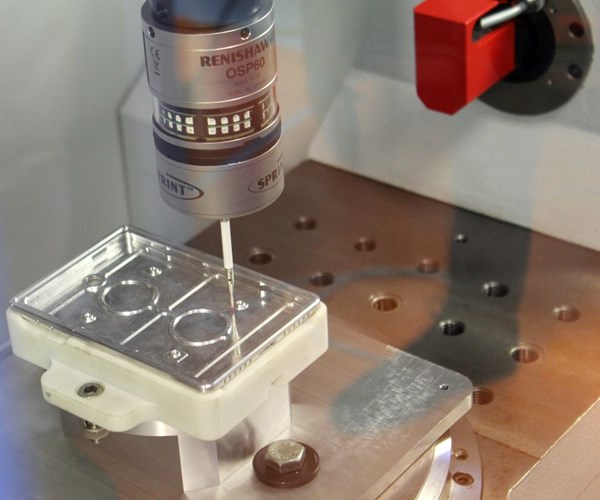
The Supascan on-machine scanning probe offers an alternative to touch-trigger probing for faster workpiece setup as well as part measurement.
It is hard to follow the scanning touch probe’s path as it races across the workpiece in the machine. At rapid feed rates (G0), Renishaw’s Sprint system with “Supascan” technology acquires a vast quantity of surface and position data within seconds. In June, Renishaw’s Product Manager Armin Bucher unveiled the company’s latest on-machine scanning technology at its German headquarters in Pliezhausen to a select group of trade journalists. This presentation was just one example of the new technology the company will display in September at EMO 2017 in Hanover, Germany.
For many years, on-machine scanning probes have been used for advanced measurement applications, including complex-part-setup tasks, but most usually for special applications. In addition, while scanning provides great speed benefits on most types of workpieces, the programming and data processing requirements can be a significant overhead in some cases. However, Supascan, the newest addition to the company’s on-machine Sprint scanning system for high-speed, high-accuracy, in-process control applications, is also designed for simple machine-tool integration to enable fast workpiece setup to maximize spindle uptime.
According to Renishaw, the Sprint system with Supascan brings scanning within reach of a wider range of production users because the components are relatively straightforward. The system is designed to be compatible with Renishaw’s existing probing cycles so users can introduce scanning as an upgrade to existing processes. Supascan also provides the ability to perform advanced scanning functionalities such as monitoring the final condition of a component surface, Mr. Bucher explains. Even at rapid feed rates—which is the maximum scanning speed, depending on machine capabilities and required tolerances—the new Supascan system can provide as many as 1,000 data points per second and is designed for applications in which free-form calculations are not required.
The Sprint version with Productivity+ probe software, which is capable of scanning speeds ranging to 15 m/min. and able to collect 1,000 data points per second, is said to be well-suited for highly advanced applications. This includes automated aircraft engine manufacturing with real-time access to true-machine-position data during measurement operations. Both the Sprint with Supascan and Sprint with Productivity+ use the company’s OSP60 probe.
“Supascan is designed for workpiece setup and on-machine inspection on high-speed production machinery for prismatic applications—typically three-axis machines or those with high-speed rotary tables—without the closed loop of information being constantly fed back to the machine in real time,” Mr. Bucher explains. “Testing on typical industrial components has seen probing-cycle-time reductions of more than 70 percent when compared to standard high-speed touch-trigger cycles.”
According to Renishaw, the company has tested Supascan at rapid feed rates on some of the world’s leading high-speed machines. “But there are many factors to the machine performance,” Mr. Bucher says. “We could not absolutely put a limit on feed rate without considering the entire performance of the machine tool. Clearly, users have to make their own assessments of the performance of their systems, taking into account their requirements for speed, form measurement and setup tolerances for their particular tasks.”
While touch-trigger probes gather discrete points on a workpiece surface, scanning systems acquire vast quantities of surface data, providing a clearer picture of the form and shape of the workpiece. For setup, there are several advantages to using scanning technology, says Paul Street, Renishaw’s marketing communications manager, machine tool products division, UK. With the increased data volume, scanning is much less prone to setup errors from individual marks or contamination on the part. “For example, the increased form information is highly desirable in setup of refurbishment applications of sealing faces where minimum depth is required,” Mr. Street explains. “For pure speed, the continuous motion of scanning results in a significantly faster measurement time for setup compared to touch-trigger probes.”
Supascan provides very similar cycles to those used for touch-trigger probing, such as to scan circles, planes, lines and quick points. However, with touch-trigger probing, it is common to separate the probing moves for translation and rotation offsets, which can require the probe to re-visit the same point on the workpiece, Mr. Street says. With scanning cycles, all this information is collected simultaneously, so typically the probe just has to traverse the part once, he explains. “In some situations, such as re-work or casting setup, it is also beneficial to monitor the form of the workpiece during setup to find the lowest point, which can be done using the scanning probe in one continuous motion rather than digitizing each point sequentially.”
For on-machine process checking, the advantages of measuring form and surface condition are clear, Mr. Street adds. “As the high density of surface points allows the rapid detection of machined defects caused by cutter length or diameter errors, worn cutter inserts, chipped tooling or tool deflection. This enables detection of production issues very quickly using the same probing system without having to rely on external test equipment or multiple probes in the machine.”
The inspection results can be visualized using a new “surface condition” app, which can be installed on a machine’s CNC or connected PC, that enables the review of measurement data across a workpiece surface.
However, touch-trigger probing cycles still have a place, which is why the Sprint system with Supascan retains compatibility with Renishaw’s touch-trigger cycles, Mr. Bucher says. “For example, where the variation in stock material or fixturing is large, the potential for a touch-trigger cycle to ‘search’ for the part can be used as a precursor to detailed scanning to detect surface condition or to locate the high or low point on a surface.”
The Supascan system uses existing Sprint system hardware, and introduces the new DPU-1 data-processing unit, which is designed to simplify system integration and requires only minimal control options and machine connections. According to Renishaw, supplied macro cycles enable the offset and alignment of components from lines, circles and plane measurements.
The Sprint system with Supascan is available globally through all Renishaw offices for users with FANUC and Siemens controls. Other control types will follow. The price is positioned between standard touch-trigger systems and the high-end Sprint system with Productivity+ software.
Renishaw will be exhibiting its range of metrology and additive manufacturing systems in two booths at EMO, which runs September 18 to 23. In addition to Supascan, new products highlighted will include software for the Equator flexible gage that enables users to fully integrate the system with CNC machine tools, on-machine and mobile apps that simplify the use of machine-tool probing, an enhanced non-contact tool setter for machining centers, a multi-probe optical interface system, a surface-finish probe for coordinate measuring machines (CMMs), and software that enhances the functionality of Renishaw’s XM-60 multi-axis calibration system.
Related Content
The Many Ways of Measuring Thickness
While it may seem to be a straightforward check, there are many approaches to measuring thickness that are determined by the requirements of the part.
Read MoreBallbar Testing Benefits Low-Volume Manufacturing
Thanks to ballbar testing with a Renishaw QC20-W, the Autodesk Technology Centers now have more confidence in their machine tools.
Read More4 Ways to Establish Machine Accuracy
Understanding all the things that contribute to a machine’s full potential accuracy will inform what to prioritize when fine-tuning the machine.
Read MoreChoosing the Correct Gage Type for Groove Inspection
Grooves play a critical functional role for seal rings and retainer rings, so good gaging practices are a must.
Read MoreRead Next
Setting Up the Building Blocks for a Digital Factory
Woodward Inc. spent over a year developing an API to connect machines to its digital factory. Caron Engineering’s MiConnect has cut most of this process while also granting the shop greater access to machine information.
Read MoreBuilding Out a Foundation for Student Machinists
Autodesk and Haas have teamed up to produce an introductory course for students that covers the basics of CAD, CAM and CNC while providing them with a portfolio part.
Read More5 Rules of Thumb for Buying CNC Machine Tools
Use these tips to carefully plan your machine tool purchases and to avoid regretting your decision later.
Read More


