Video Measuring System Ensures Diamond Quality for Waterjets
A CNC video measuring system from Nikon Metrology helps Diamond Technology Innovations produce a more accurate diamond waterjet orifice.
Share


Combining pumps, intensifiers and articulated cutting heads capable of producing 3D parts, CNC waterjets are highly engineered pieces of capital equipment. At the heart of the process though, is the waterjet orifice—an assembly often built around an industrial ruby, sapphire or diamond to concentrate and maintain the strength of the waterjet cutting stream. “Without the orifice, the entire system is essentially useless,” says Ted Jernigan, president of Diamond Technology Innovations located in Olympia, Washington.
And with the right orifice, the entire system can be more productive. With 30-plus years in the waterjet cutting industry, Mr. Jernigan’s company manufactures diamond waterjet orifices. To guarantee circularity and other internal geometry features, DTI invested in a CNC video measuring system from Nikon Metrology (Brighton, Michigan). Using the system has shortened measurement times and increased accuracy, which helps eliminate geometric discontinuities of the diamond orifice.
According to DTI, diamonds are the most effective orifice for the waterjet industry because they are at the top of the Mohs scale, which measures mineral hardness from one to 10. Talc is at the bottom of the scale at one. Ruby, which has been used for manufacturing waterjet orifices for years, is a nine, and diamonds are a 10. Even though diamonds are only one step from rubies on the Mohs scale, they are actually more than four times harder, Mr. Jernigan says. “Compared to a diamond, ruby is like talcum powder.”
The hardness of the orifice is important because cutting super hard materials requires waterjet streams entrained with abrasives to be expelled at pressures ranging to 100,000 psi and at speeds approaching Mach 3 (three times the speed of sound). Yet the combination of the abrasives, high pressure and force can damage poorly designed orifices, even those incorporating diamonds.
This is because diamond orifices can contain sharp edges known as stress risers. Other problems that diamond orifices can face are inferior diamond material, poor retaining materials and retention methods, misalignment with the cutting head, and inconsistent internal geometries if they are not manufactured correctly. All of these issues can lead to degraded jet streams, early wear on the surrounding cutting head equipment, less effective cutting and ultimately premature orifice failure.
To prevent these problems, DTI uses Nikon Metrology’s NEXIV VMZ-R3020 CNC video measuring system to inspect its diamond orifices. The system combines high-magnification zoom optics, LED illuminators for micron-level inspection, computer-speed image processing, and automated measuring and processing routines. Nikon’s VMZ inspects, measures and reports, enabling DTI to set up programs that accommodate a range of parts and their inspection requirements.
With any imaging system, it all starts with capturing a superior image, says Dennis Fenn, district manager for Nikon Metrology. The Nikon NEXIV series combines optics with a through-the-lens (TTL) laser system and edge-detection algorithms. The TTL laser enables quick and accurate focus for determining height measurements, and can be used for surface scanning and generating point clouds, gathering up to 1,000 points per second, Mr. Fenn says. The laser can detect top and bottom surfaces of a transparent layer for measuring the layer’s thickness or the depth of the surface beneath it.
According to the company, the LED light sources provide a more stable high-color temperature that does not change with intensity, resulting in more accurate images and shorter measurement times. Separate inner and outer illuminator rings in the light source have varying degree angles to the optical axis for defining edges that are almost invisible to coaxial top light. An image auto-focus feature helps quickly determine surface height and depth of small holes or steep surfaces.
Once inspection programs are run, images can be saved to a teach file, enabling Nikon’s VMZ video measuring system to search for these features on subsequent jobs. Users can preset rules for selecting the correct edge from multiple edge candidates with a filter to avoid abnormal points, minimizing errors. Reports with inspection results and graphics can be created automatically every time the program is run.
DTI inspects and measures down to the micron (one millionth of a meter, or about 0.000039 inch). “We supply a range of orifice sizes,” says Adam Miranda, diamond division manager. “Each customer has different cutting requirements with different tolerances, and certainly each OEM has its own standards. Every product we supply has to be as close to perfect as possible.”
Hole circularity is not the only orifice feature that needs to be measured. The company incorporates an inlet flare on each orifice’s inside diameter enabling even distribution of force over the entire area of the diamond during operation, eliminating geometric discontinuities. Without an inlet flare, stress fields could increase, leading to chipping or cracking. Not only producing, but inspecting, measuring and confirming flare characteristics using the Nikon VMZ video measuring system, helps guarantee product performance.
DTI’s Core diamonds are engineered and manufactured with a process designed to ensure flawless raw diamond material, eliminate sharp edges, use high-grade support materials and retention methods, incorporate alignment procedures for effective cutting, and ensure exact internal geometries for precise flow rate control. For example, in a 40-hour glass-cutting process for a telescope lens, an orifice failure in the middle of the cutting process means scrapping the entire part. In cutting titanium parts for the aerospace industry, one of DTI’s customers says ruby waterjet orifices had to be replaced every two days. By comparison, the Core diamond orifice had a service life of five years.
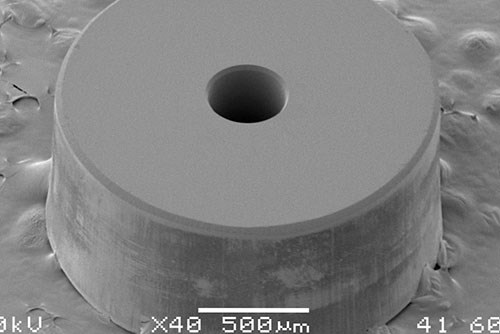
DTI emphasizes quality control throughout the manufacturing process, says General Manager Perry Hanchey. “We inspect as we manufacture, and each orifice undergoes final testing including scanning electron microscopy and laser interferometry. Orifice outer diameters can be between 0.040 and 0.070 inch while inner diameters range from 0.003 to 0.020 inch. We have to have a process that guarantees hole circularity and other internal geometry features down to the micron.”
DTI has been pleased with its video measurement system, but even more so with Nikon’s service. “Mr. Fenn is always showing us the newest ways to set up things or incorporate new features, such as a laser that determines where the surface really is in space, as well as analyzing it,” Mr. Miranda says.
According to Mr. Hanchey, DTI’s level of design and engineering processes set it apart from the competition. “The ability to inspect, measure and certify our compliance is integral to that effort,” he says. “The training we receive continues to help us be more efficient in our own production and quality control processes, and as business continues to grow, so does the credibility of our products.”
Related Content
How to Determine the Currently Active Work Offset Number
Determining the currently active work offset number is practical when the program zero point is changing between workpieces in a production run.
Read More6 Machine Shop Essentials to Stay Competitive
If you want to streamline production and be competitive in the industry, you will need far more than a standard three-axis CNC mill or two-axis CNC lathe and a few measuring tools.
Read MoreInside the Premium Machine Shop Making Fasteners
AMPG can’t help but take risks — its management doesn’t know how to run machines. But these risks have enabled it to become a runaway success in its market.
Read More5 Tips for Running a Profitable Aerospace Shop
Aerospace machining is a demanding and competitive sector of manufacturing, but this shop demonstrates five ways to find aerospace success.
Read MoreRead Next
Registration Now Open for the Precision Machining Technology Show (PMTS) 2025
The precision machining industry’s premier event returns to Cleveland, OH, April 1-3.
Read More5 Rules of Thumb for Buying CNC Machine Tools
Use these tips to carefully plan your machine tool purchases and to avoid regretting your decision later.
Read MoreBuilding Out a Foundation for Student Machinists
Autodesk and Haas have teamed up to produce an introductory course for students that covers the basics of CAD, CAM and CNC while providing them with a portfolio part.
Read More

