Shop Hands Over Gear Deburring to a Robot
Manual deburring of gears was an odious task for many of Katsa’s machinists, which in turn created a bottleneck that caused delays. The solution: a custom robotic deburring cell from Flexmill relying on Renishaw’s RMP60 probe.
Share


Using grinding wheels to manually deburr gears was once an unreliable process at Finnish gear and gearbox manufacturer Katsa Oy. The company decided to commission another Finnish company, Flexmill Oy, to design and build a robotized cell to finish and deburr gears ranging from 2 inches to 5 feet in diameter. Flexmill’s turnkey cell relies on the RMP60 probe from Renishaw to achieve the necessary precision.
When Katsa was still manually deburring gears, machinists had to be very skilled to achieve a high-quality and consistent finish; but even then, variations from one operator to another were unavoidable. In addition, manual deburring can be a dirty and hazardous job, one that few operators at Katsa wanted to undertake. As a consequence, finishing and deburring operations became a bottleneck in the company’s manufacturing process, culminating in significant delays.

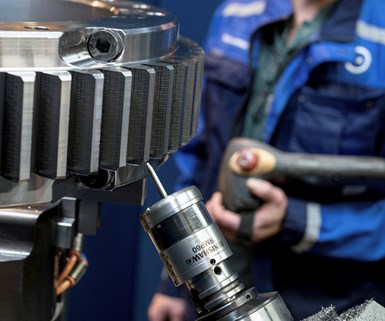
An robotic cell checks the dimensions on a finished gear after deburring. Katsa Oy commissioned the cell from Flexmill Oy when manual deburring became a costly bottleneck.
According to Sami Niemelainen, quality and development manager at Katsa, “The reason we invested in the robotic cell was not to make the job faster; it was for better quality and consistency. Also, the task of deburring is now cleaner and safer for our machine shop operators, and that’s very important,” he says.
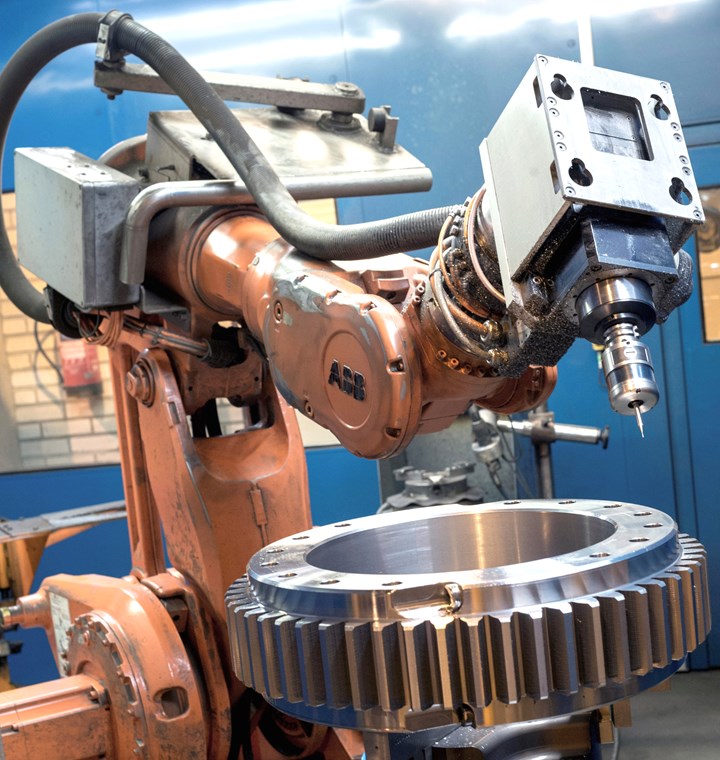
To automate the gear deburring process, Flexmill built a cell with a twin-pallet system that allows one gear to be machined while the other is loaded. The cell also incorporates Renishaw RMP60 probes mounted on custom-designed toolholders, which an ABB robot uses to collect part location data before finishing and deburring operations commence.
To ensure all excess material is removed from the machined gears automatically by the deburring process, the Flexmill software requires the exact geometrical parameters of the gears and the gear teeth. Some of these parameters are known and available for each many of the different gears made by Katsa. But the parameters that are not known can be measured using the Renishaw RMP60 probe with radio signal transmission. The ABB robot uses the probe for locating parts during setup, with the resulting positional data used by the control software to generate a complete, automated deburring cycle. No manual programming is required. Once machined, the RMP60 probe is used post-process to confirm finished dimensions.

The cell incorporates an ABB robot, a Renishaw RMP60 probe and a twin pallet system that allows one gear to be machined while another is loaded.
According to Flexmill, the RMP60 probe is ideally suited for this application because of its robust frequency hopping spread spectrum (FHSS) protocol. This means that communication between the probe and its receiver remains stable even if line-of-sight is lost, for example, or if another radio source enters the environment. This feature brings reliability to the automated cell, the company says.
Now that operators were willing to take on deburring using the automated system, delays have been eliminated and lead time is more consistent and flexible, Mr. Niemelainen says. The Renishaw RMP60 probe makes it possible for Flexmill’s software to generate a full deburring program for every one of the gears Katsa manufactures. “We only need to give some parameters to the control, and the robot will use the Renishaw probe to create the program automatically. The result is that quality is always the same, each and every time we deburr a gear.”
Related Content
Rethink Quality Control to Increase Productivity, Decrease Scrap
Verifying parts is essential to documenting quality, and there are a few best practices that can make the quality control process more efficient.
Read MoreChoosing the Correct Gage Type for Groove Inspection
Grooves play a critical functional role for seal rings and retainer rings, so good gaging practices are a must.
Read More6 Machine Shop Essentials to Stay Competitive
If you want to streamline production and be competitive in the industry, you will need far more than a standard three-axis CNC mill or two-axis CNC lathe and a few measuring tools.
Read MoreThe Link Between CNC Process Control and Powertrain Warranties
Ever since inventing the touch-trigger probe in 1972, Sir David McMurtry and his company Renishaw have been focused on achieving process control over its own manufacturing operations. That journey has had sweeping consequences for manufacturing at large.
Read MoreRead Next
What’s Telling About This Year’s Top Shops
Here, the 2019 Honors Program winners explain strategies they’ve used to help them become successful U.S. machining businesses. Plus, you can learn more about them by attending next month’s Top Shops Conference.
Read MoreBuilding Out a Foundation for Student Machinists
Autodesk and Haas have teamed up to produce an introductory course for students that covers the basics of CAD, CAM and CNC while providing them with a portfolio part.
Read More5 Rules of Thumb for Buying CNC Machine Tools
Use these tips to carefully plan your machine tool purchases and to avoid regretting your decision later.
Read More


.png;maxWidth=300;quality=90)


