Share


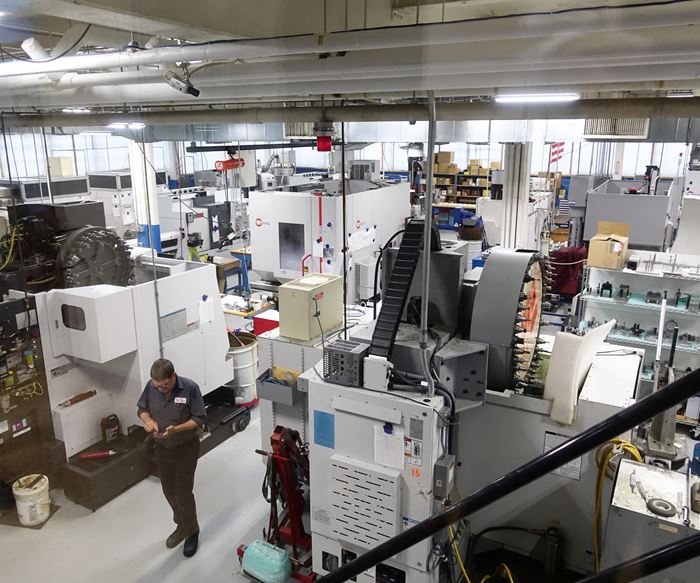
At 5 a.m. on most days, Robert Robles begins his shift at a machine shop in the Red Hook neighborhood of Brooklyn, New York. Like many other manufacturers of machined components, the floor of this shop, called Linda Tool, is laid out in rows of machines—vertical lathes, multitasking machines and multi-axis machining centers—all of which Mr. Robles tends. Out of nearly 30 employees at Linda Tool, Mr. Robles is the only person who knows the idiosyncrasies of each machine: He knows how to change the filters for several different models of machining centers, how to check and replenish the oil, measure coolant concentrations, remove chips and restock raw material. When he is finished, Mr. Robles notes the fluid levels on a clipboard attached to each machine, all of which are lined with papers that detail setup instructions, cycle times, programs numbers and workholding settings.
Mr. Robles, now in his mid 50s, is considered a highly skilled employee. He can thoroughly clean and recalibrate a machine in less than half a day—a feat that used to take a dedicated machine operator two days.
But this story is not about Mr. Robles, as much as he may deserve the tribute. In fact, the cost savings that Linda Tool realizes from having an employee dedicated to machine maintenance may seem like an ordinary personnel choice for any small to midsize machine shop. However, when you consider what Mr. Robles encounters on his daily rounds—custom setup instructions clipped to each machine, high-priced inspection equipment placed strategically in the middle of the shop floor, customizable fixturing and workholding units, multiple five-axis machining centers, and unusual tooling choices—it becomes clear that Linda Tool has made a series of smart decisions aimed at getting more out of each machining cycle and streamlining its operations. After a visit earlier this summer, it is also clear that those decisions have been highly effective.
So what precipitated the company’s highly strategized operation, and how do the components of that operation boost its bottom line?
The second answer is what this story will provide in detail. The first answer is easy: The Great Recession.
Taking a Punch
Linda Tool was founded in 1952 as the Linda Tool and Die Corp., a name that later would change to reflect the shop’s shifting focus from tool and die operations to precision machined components, predominantly for aerospace, oil and gas, and machine building. Mike DiMarino started working for Linda Tool and Die in 1975 at the age of 17, at a time when he was one of three employees under the stewardship of its then-owner, Mr. DiMarino’s soon-to-be father-in-law. Over the next 13 years, Mr. DiMarino learned to work every position on the shop floor as well as the front office, eventually taking control of the company in 1988. From there, Linda Tool slowly expanded operations to the point in which, in 2004, the company moved to its current location to meet growing production demands.
Longtime production manager David Holmes remembers that era of the company well. “When we moved in 2004, it was to a much more modern facility, and things were going well,” he says. Business was robust. He and Mr. DiMarino could see the impact of the move: The work flow was better, and the facility was consistently busy. Within roughly three years, however, not just one customer, but customer after customer was “coming in and saying that they wanted not just a 2 percent cost reduction, but a 10 or 20 percent reduction,” Mr. Holmes says. “And we started saying, ‘Wait a minute. What’s this all about?’”
Where Linda Tool had tried to relieve the pressure of scaling up, it was now under tremendous pressure to reduce costs. With the full force of the recession bearing down, work dried up, and suddenly the new facility was vastly underutilized. Mr. DiMarino and Mr. Holmes knew that if they eliminated part of their workforce—most of whom had worked there for several years—that they would eventually face the question: What happens when business picks up again?
“We looked out on the floor and realized that it was going to get harder and harder to find people to do what we did,” Mr. Holmes says. “If a customer suddenly wanted twice as much as we’d been producing, there was no way to scale up the business and buy three more CNC lathes and three more people to operate them, especially under those incredible cost pressures. That’s when we started to recognize problems in the way the business was structured.”
In 2009, Mr. DiMarino had just graduated from the first-ever Goldman Sachs 10,000 Small Business Program—a micro-MBA program started and steered by political and business luminaries such as Dina Powell and Warren Buffett who taught best practices in the areas of business and finance. After finishing the program, Mr. DiMarino sat down with Mr. Holmes, and the two men made a key decision to run Linda Tool more like a business and less like a traditional machine shop.
“Everybody's end product is the same no matter what business you're in,” Mr. DiMarino says in his staccato-style Brooklyn accent. “It's money. Whether you bake bread, make phonographic records or whatever you do. At a machine shop, your end product is money. That's what you want. So that's what you have to control.”
The best way to exert that control, he decided, and the best way to be agile during upswings and downturns, was to invest in capital equipment. Consider what the company’s first large-scale investment, a Mori Seiki NL2000 multitasking lathe with a twin-spindle Y axis, enabled Linda Tool to do. Instead of buying a bar, sawing a slug, loading the slug into a lathe, running one operation, making a new setup, loading that same slug back into the lathe, removing it, taking it over to a milling machine and making a new setup to mill the part, the NL2000 enabled the operator to load a 3- or 4-foot bar, make one setup and have a finished part. Suddenly, the operator could run that machine plus one or two other machines simultaneously.
Another multitasking lathe followed, as well as investments in quick-change tooling and collets and high-pressure coolant pumps to blow out the chips. Mr. Holmes and Mr. DiMarino helped set up tool blocks, offset files and method sheets to cross-train the operators more easily and allow the machines to be what they are: highly automated CNC machines. They invested in enterprise resource planning software, an ISO-AS9100 quality management system, and finally, the equipment that brought the company’s new business philosophy full circle: five-axis machining.
Get a Grip
Linda Tool's approach to realizing more output out of a largely fixed level of staffing—and therefore finding ways to expand the business without hiring additional skilled machine operators—ultimately meant that each machining cycle had to do more. That meant utilizing machines and machine tools that can accomplish more without the need for additional operator attention. While the company today has numerous three-and four-axis machining centers, it is realizing the highest margins on its Hermle five-axis machining centers that can attack numerous angles in the same cycle and machining program. Those margins are the result of further investments into the five-axis process, beyond the machines themselves, both in terms of tooling and procedural choices that let the machine cycle accomplish more.
A prime example can be found in the company’s use of workholding.
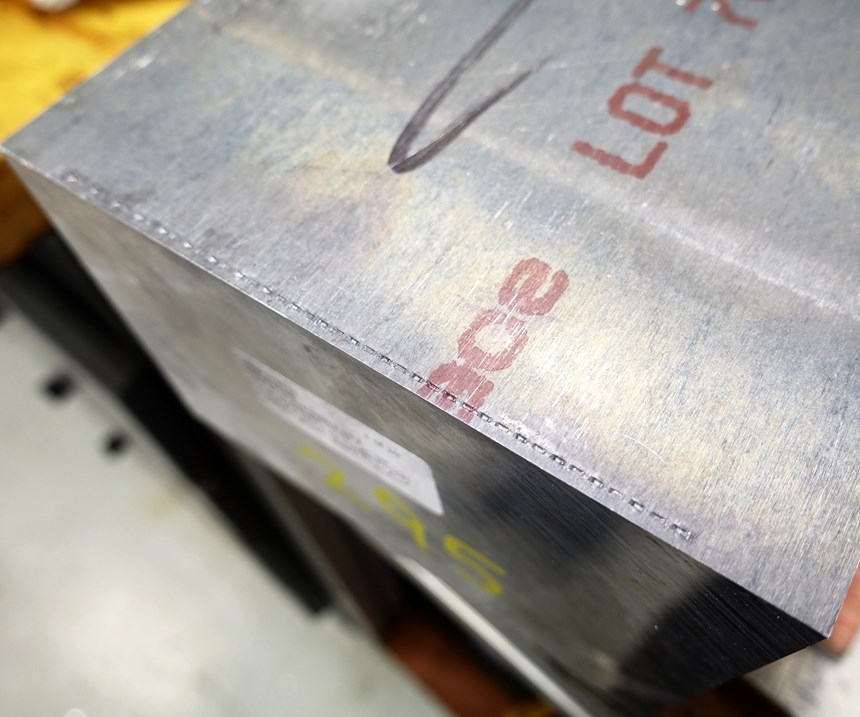
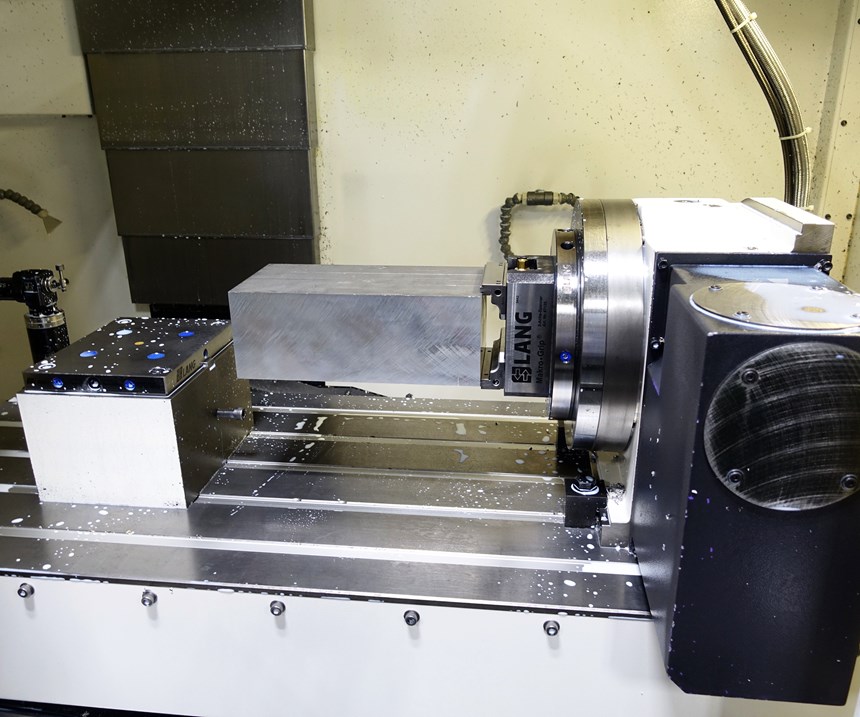
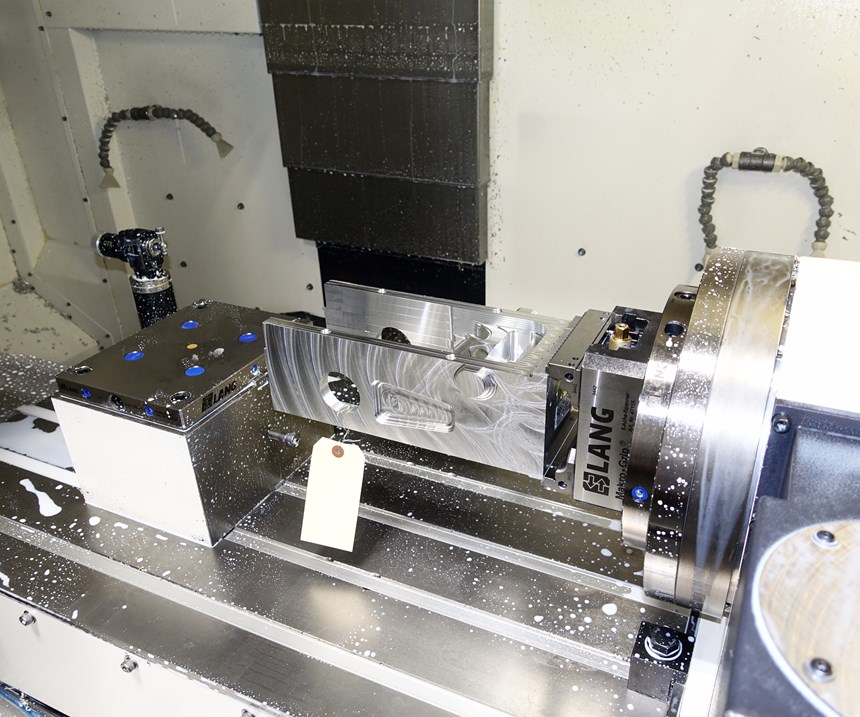
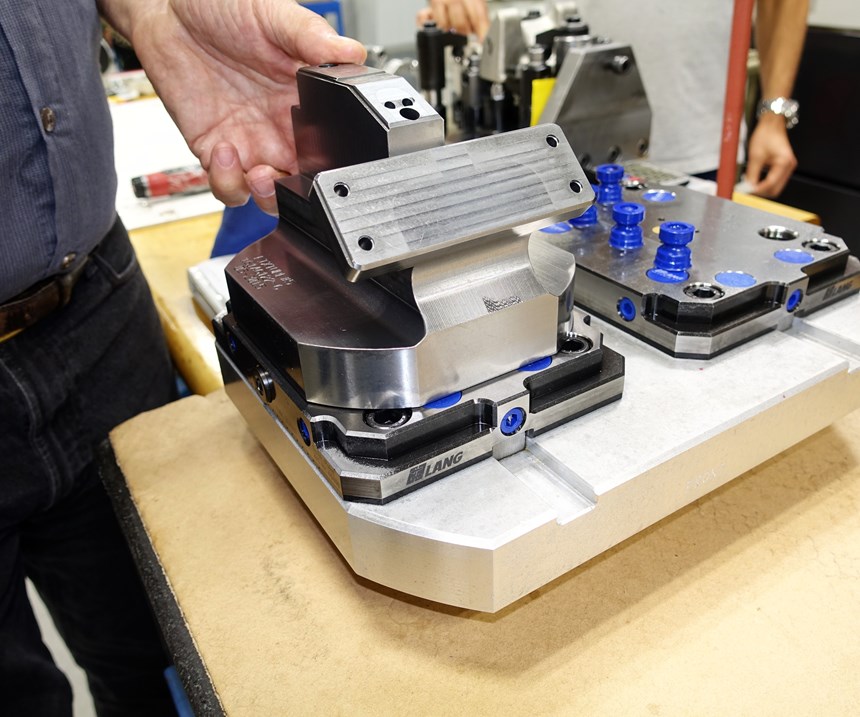
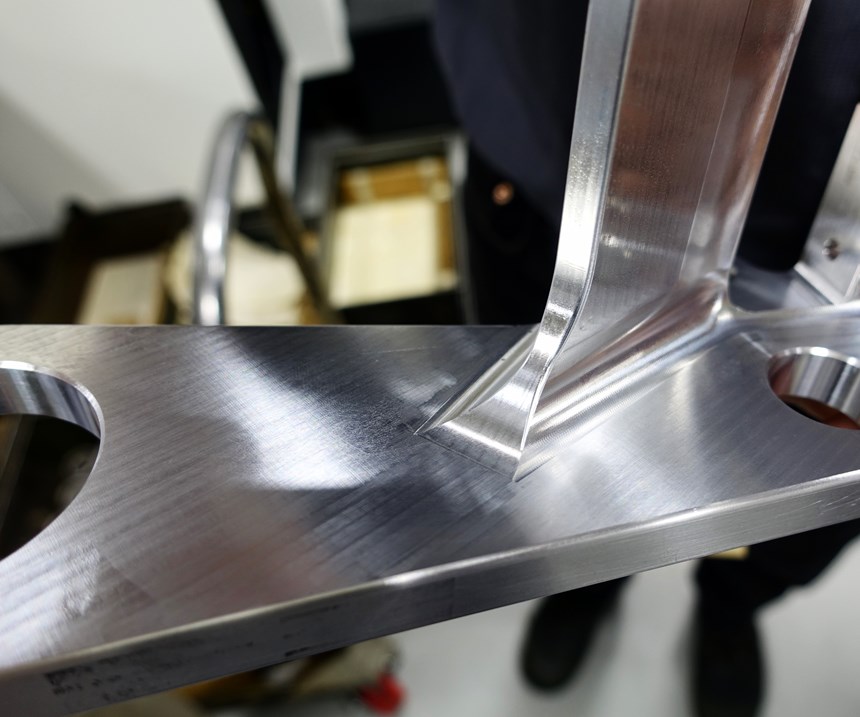
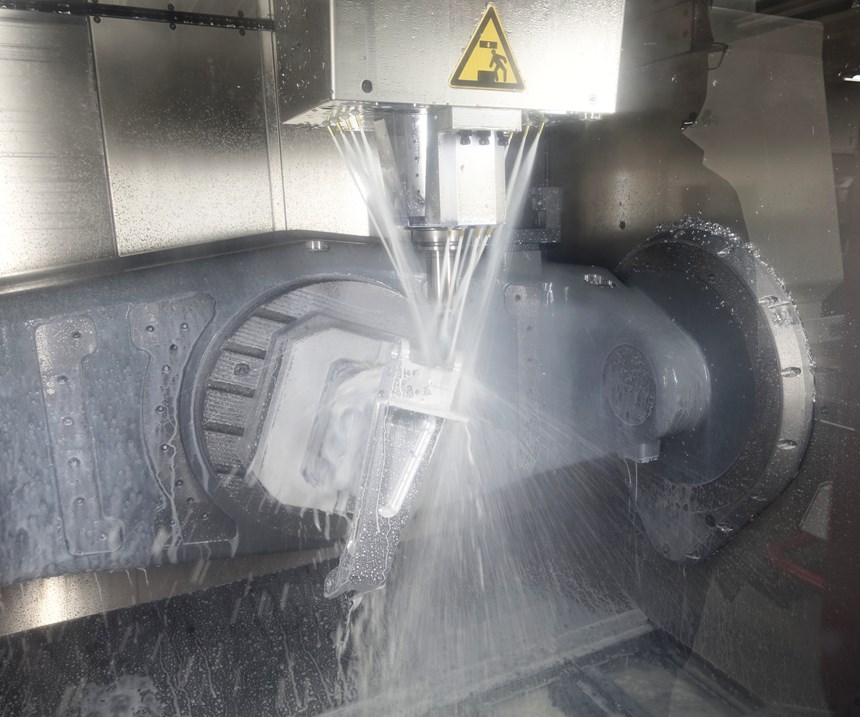
During our visit, we saw a number of challenging parts being produced in the shop, including an aerospace component for landing gear that starts out as a 13-inch block of raw aluminum (see Figure 2). By stamping 0.1-mm-deep serrations just 3 mm off the edge of the block with a Lang Makro-Grip stamping unit—a device that Mr. Holmes and Mr. DiMarino first discovered at the International Manufacturing Technology Show (IMTS) in 2014—the Lang five-axis vice can hold the part in a way that enables roughing to take place on five sides of the part with no additional fixturing. A 35-pound metal block cantilevered at 90 degrees and fixed at one end with just 3 mm of grip looks like an impossible thing (see Figure 3). Yet this positioning enables roughing to take place on nearly 98 percent of the part, which distorts only microscopically during the process. After the roughing operation has ended, holes are drilled into the part that enable it to be held in place for finished machining on the five axis..
While the weight of the aluminum block before roughing is 35 pounds, after roughing is finished, it weighs just 7 pounds. When the operation is complete, only the 3 mm serrated edge is sawed off the part.
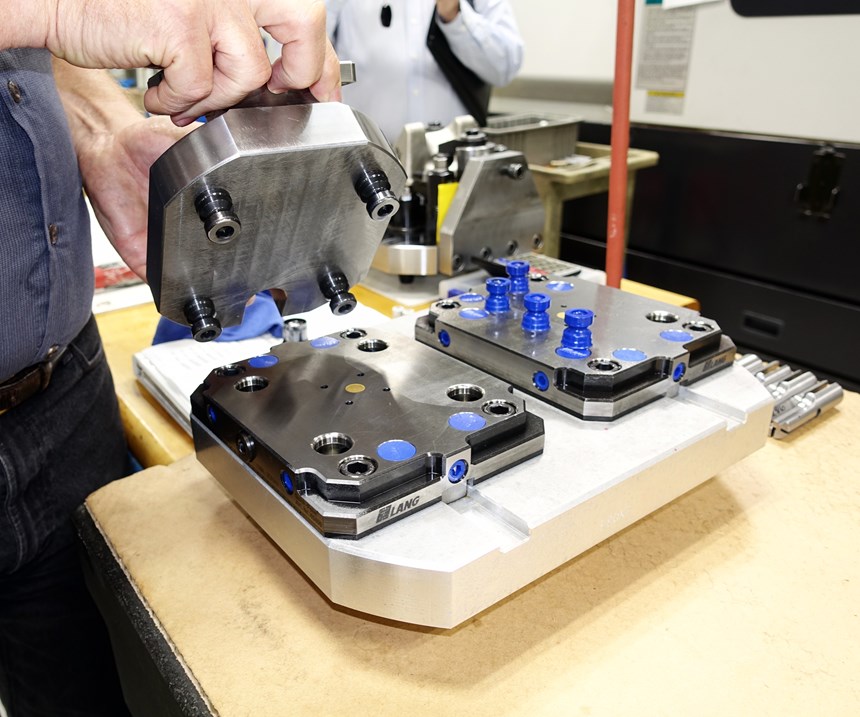
In addition to workholding, Linda Tools’s investment in the machining cycle also includes designing and machining its own custom fixtures for holding unusually shaped parts. As visible in Figures 5 and 6, the company mates its custom fixtures to a modular zero-point clamping system with receivers by Lang and Erowa, which enables the entire pallet and workpiece to be placed in and removed from the machine quickly. When it is time for finish machining, the part is held entirely by the screws from underneath rather than being pinched or squeezed, which enables the light finishing cuts to take place without distortion compromising the overall accuracy.
Of course, there is a reason that the company is willing to make these kinds investments in fixturing and workholding. In regard to the aluminum aerospace part in Figure 4, Mr. Holmes says that just a few years ago, he would have had to build elaborate fixtures with jack screws and take 20 minutes to load the piece. “And now we’ve virtually eliminated that,” he says. “We're able to hang it out there, rough five sides of the part, and produce a flat finished surface to mount the next operation on.”
That word, “eliminated,” represents a much greater value.
Full Circle
Take a look at Figure 7. This is a part for another aerospace assembly that Linda Tool produces by the hundreds each year. The reason it can produce this number is because the company has realized another way of letting the machining cycle do more: circle-segment tools. As an alternative to face milling, swarf milling or ballnose milling—all of which have unique challenges and advantages—the company uses circle-segment tools by Emuge as an efficient way to machine smooth, critical surfaces. Taking full advantage of circle-segment tools’ capabilities (which we will get to momentarily) means understanding the sophisticated programming behind them.
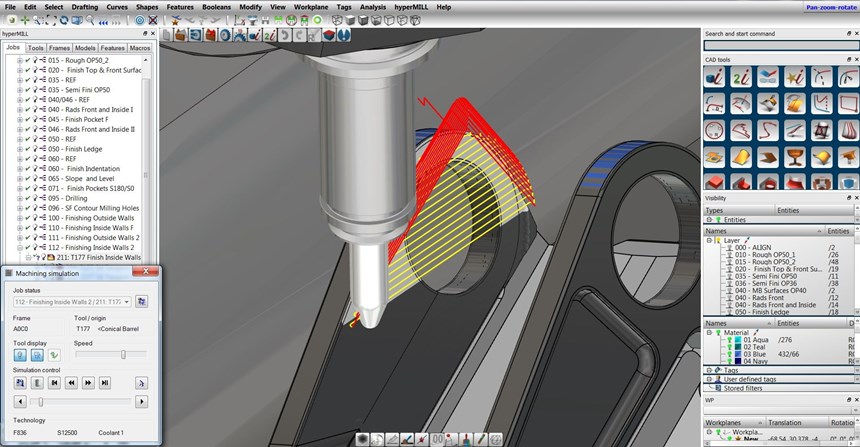
Anna Litovskaya is Linda Tool’s 28-year-old full-time CNC machining programmer. While Ms. Litovskaya was hired with SolidWorks experience, she previously had no CNC machining experience. Yet, in a relatively short period, she has become integral to the company. The need to maintain precise angles of engagement and dedicated tool paths that are unique to different circle-segment tool types makes CAM software critical in the use of circle-segment tools.
CAD/CAM software developer Open Mind Technologies was by all accounts the first to develop software programming for circle-segment machining with conical and taper-shaped end mills. According to Open Mind, the company brought the concept to Emuge to create the tool design to match this process. This collaboration between new programming capabilities and tool design is what led Linda Tool, years later, to utilize circle-segment cutters for its aerospace projects. Open Mind had been recommended to Mr. Marino by Hermle, the supplier of Linda Tool’s five-axis machining centers, and provided demonstrations that spotlighted the unique capabilities of circle segment tooling.
Because of their large cutting-edge radii, circle-segment end mills produce broad stepover passes that clear material in much wider bands than a ballnose end mill. At Linda Tool, circle-segment end mills offer a way to make light, low-force cuts without the rubbing and chatter that swarf cutting can produce. This enables the light cutting of curving, blended surfaces in a way that is efficient enough to remove large amounts of stock quickly.
In Figure 9, Open Mind’s HyperMill software is being used to run a simulation of a circle-segment tool. Because the five-axis machine motions with the circle-segment tool paths are so complex, the accuracies of these simulations are vital—so vital that Linda Tool has engaged with application engineers from Open Mind to assist with programming particularly complex features using circle-segment tools.
Finding Throughput
Standing in front of Linda Tool’s second-floor offices that overlook the shop floor, you will find two more examples of decisions aimed at optimizing operational efficiencies. From this elevated view, it is clear that nearly every CNC machine on the shop floor is lined with documents and photos. Viewed up close, they are revealed to be setup instructions, drawings related to specific operations, inspection features and photos that depict how a finished part is supposed to look when it is loaded correctly. Listed near that photo is the machining cycle time, which lets anyone who starts the machine know that in 20 or 30 minutes the cycle will be finished.
Other documents list the program number to ensure operators are running the correct program. Some list torque-wrench settings to make sure the clamps are set correctly. Finally, because CNC programs are complex and include multiple steps and tools, there are lists that outline each step of an operation—a brief description of what each tool is doing, as well as details of that particular tool. If an operator needs to order or find a tool, there is a description of the holder that the tool is in, a description of the tool itself and information about where to buy it. “That allows (operators) to be kind of self-contained,” Mr. Holmes says. “That’s a big thing. If somebody at 2 a.m. needs a tool, they know where to look for it. If they go to pull one out of a drawer and there's only a preset number left, they write a note that goes up to the office that says we need to refill this tool stock for this tool. If the program stops or we have a power outage and they need to go back and rerun part of the program, they know right where to go.”
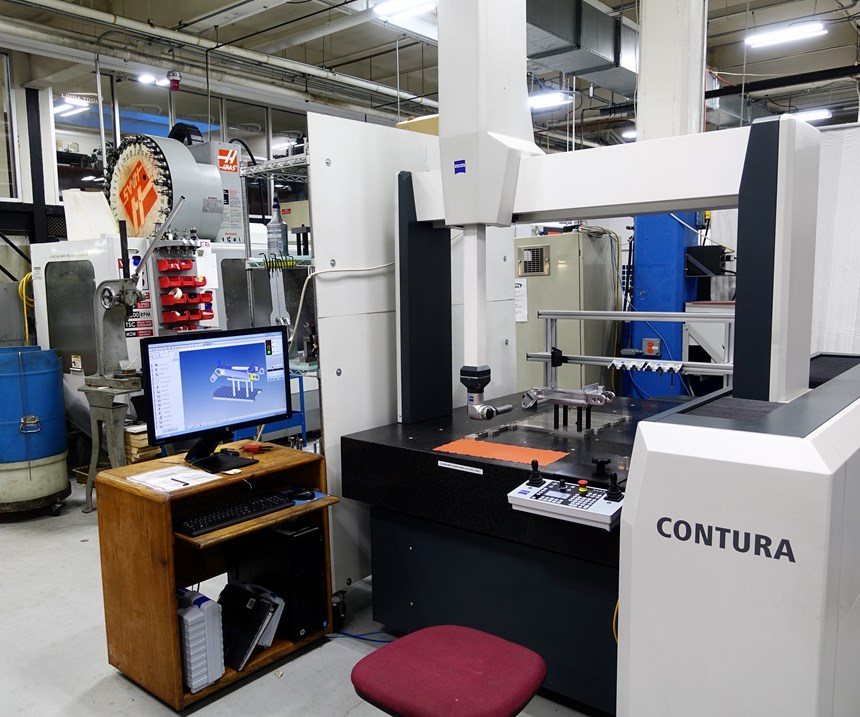
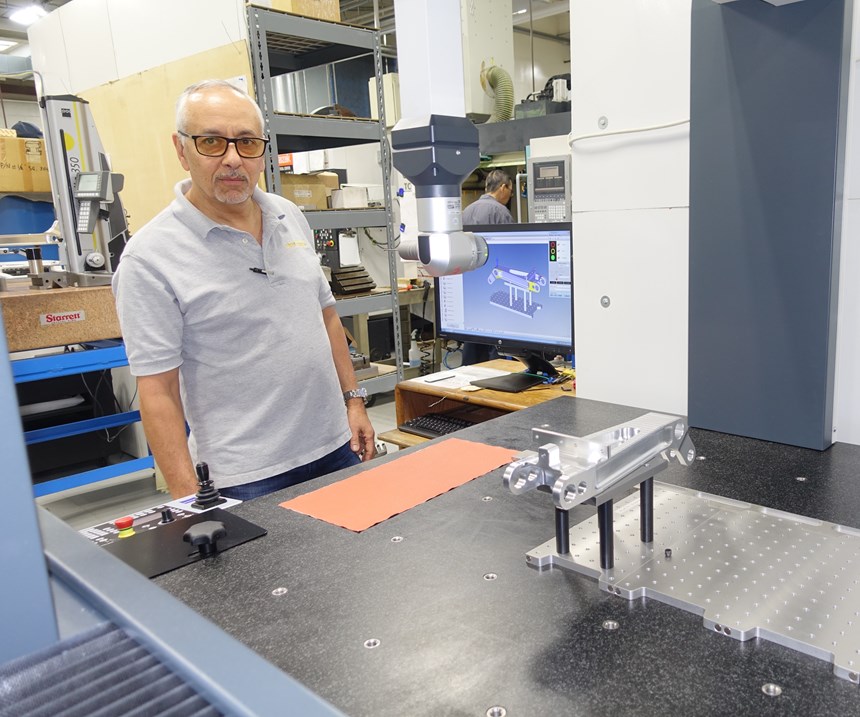
Finally, there is one more thing to notice while standing atop the second-floor deck, something near the center of the shop floor, partially curtained-off from its surroundings: a Zeiss Contura coordinate measuring machine (CMM). This expensive equipment situated in the middle of the shop (see Figure 10) can be controlled via computer by any operator who calls up a previously written program for the part that is currently being machined. The operator simply grabs a fixture for that part number off a nearby rack and knows exactly where to position that fixture on the table. It is then just a matter of running the program and capturing the necessary data for in-process quality assurance of the part. The data are captured automatically, which means the operators do not even have to write down a thing.
From an efficiency standpoint, this means a machine can be running while an operator walks a finished part a few feet away to get not only validation for the critical features of the part, but also quality assurance, since the CMM already has been set up with fixtures and programs ready to go for those parts. Compare this to the typical process of a machinist validating parts with handheld gages, inspecting only a few features at the machine, while another staff member in the quality area is responsible for all of the quality assurance. It bears repeating that this is another carefully considered process that delivers more output without increasing headcount.
In the end, what do we make of all of these strategies, investments and choices made by Linda Tool over the past 10 years? What do we make of the decision to operate Linda Tool as a business, and to invest not only in five-axis machining, but in the often-expensive equipment that enables the company to get the most out of each machining center and each machine operator? There are plenty of answers to these questions that deal with the company’s profitability. But there’s also this: Linda Tool has not laid anyone off since 1983.
Mr. Holmes chalks it up to one word: throughput. “I've worked for Mike a long time,” he says. I can't say I’ve ever really thought about this question before we started talking for this story, but what I know is that once we start working on a part, it moves in a very predictable and very controlled way through the shop, both technically and according to schedule. And not just through the shop, but from the moment we decide to make it. When we have to buy material, when the material hits the floor, there's documentation that follows it all the way through. Each person who is responsible for a step knows where the part has to go. It's automatic because the information is there. Because of that, we can pretty reliably tell you which part is going to be finished which day. We've spent a lot of time developing this throughput, and we're pretty good at it.”
Related Content
6 Machine Shop Essentials to Stay Competitive
If you want to streamline production and be competitive in the industry, you will need far more than a standard three-axis CNC mill or two-axis CNC lathe and a few measuring tools.
Read MoreQuick-Change Tool Heads Reduce Setup on Swiss-Type Turning Centers
This new quick-change tooling system enables shops to get more production from their Swiss turning centers through reduced tool setup time and matches the performance of a solid tool.
Read MoreWhere Micro-Laser Machining Is the Focus
A company that was once a consulting firm has become a successful micro-laser machine shop producing complex parts and features that most traditional CNC shops cannot machine.
Read MoreHow to Successfully Adopt Five-Axis Machining
While there are many changes to adopt when moving to five-axis, they all compliment the overall goal of better parts through less operations.
Read MoreRead Next
Setting Up the Building Blocks for a Digital Factory
Woodward Inc. spent over a year developing an API to connect machines to its digital factory. Caron Engineering’s MiConnect has cut most of this process while also granting the shop greater access to machine information.
Read MoreRegistration Now Open for the Precision Machining Technology Show (PMTS) 2025
The precision machining industry’s premier event returns to Cleveland, OH, April 1-3.
Read More5 Rules of Thumb for Buying CNC Machine Tools
Use these tips to carefully plan your machine tool purchases and to avoid regretting your decision later.
Read More




.jpg;maxWidth=300;quality=90)


