Cord Cutting and Code Reading Make Gaging Smarter
Many companies have “cut the cord” to streamline metrology operations and data management. Barcode scanning is an additional option.
Share


.png;maxWidth=45)
DMG MORI - Cincinnati
Featured Content
View More
Autodesk, Inc.
Featured Content
View MoreOver the last few years, many companies have “cut the cord” by adding integrated wireless data transmission to their digital gaging. This eliminates the cable nest, frees users to move gages around the shop and ensures accurate data collection. The goal is to enable the user to seamlessly collect accurate data and make good decisions about the quality of the part and the process. When the data is sent to a file locally, on the network or up to a cloud server somewhere, it can be made available to anyone who needs it. This provides useful information and is helpful once the gaging tools are running.
But what about the front end, before the gage is set up and ready for the user to start measuring parts? Most gaging systems today are computer-based, capable of flexible gaging routines. Often the gage is relatively universal and can perform many measurement functions — it just has to be told what to do. Instructions could be as simple as what tolerances to use for the part measurement or as complex as what parameter and sequence to use when measuring the new shaft coming down the line. With data storage in the cloud, a gaging routine could be created for a machine in a facility on the opposite side of the world and used in a different plant with the same machines and measuring equipment.

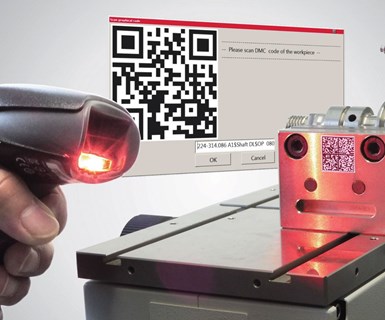
Using barcodes and scanners to send setup parameters to the gage can result in significant time savings and fewer errors.
Another idea for streamlining measurement functions is to enter or start measuring programs with a laser scanner. Surprisingly, you don’t even need PC-based gaging systems to do this. Bench-style amplifiers are available that can interface with a barcode scanner and read text from a scan code. Imagine a worksheet that accompanies the next batch of parts to be gaged. Rather than sitting down with the electronic column gage or bench amplifier and manually entering the next set of tolerances, the operator could scan the process card that contains all the gage setup parameters and, within a second, the gage would be ready to start measuring the new part. The result is significant time savings and reduced errors.
With more complex measuring systems that can be programmed to a virtually endless number of dimensions and parameters, entering a new part program or searching through a list of hundreds of parts can be a time-consuming process. Again, with the aid of a handheld scanner, measuring programs can be started easily and conveniently by scanning the DMC code. In addition, the information contained in the code can be used for logging or exporting data. Importing component information digitally eliminates errors in the log and export data because the operator simply scans the component’s data, and the associated measuring program is simultaneously started.
Once the scanner is available and the part program is ready to go, this is the best time to start logging the measured data against the specific part being measured. A scan code on the part can be read as the part is being measured so that every measurement on that part is tied to the data being stored — not only to measure and qualify its good or bad condition, but to document the part being measured, the operator, the time and the machine that was used to measure the part. Even the machine’s calibration data can be tied to this data file, ensuring that this information is available long after the part has been shipped.
Allowing the measuring system to read the data saves operators time they would otherwise spend checking data requirements and deciding what measuring program to use for a particular component, what features need to be checked, and associated tolerances. This allows the machine operator to optimize time and workflow. Using the scanner instead of manual data entry can improve the entire process.
Related Content
Rethink Quality Control to Increase Productivity, Decrease Scrap
Verifying parts is essential to documenting quality, and there are a few best practices that can make the quality control process more efficient.
Read MoreTurning Fixed-Body Plug Gages Inside Out
Fixed-body mechanical plug gages provide fast, high-performance measurement for tight-tolerance holes.
Read MoreHow to Evaluate Measurement Uncertainty
Manufacturing and measurement are closely coupled. An important consideration for the use of measurement results is the associated measurement uncertainty. This article describes common metrology terms and provides an example uncertainty analysis.
Read MoreHelp Operators Understand Sizing Adjustments
Even when CNCs are equipped with automatic post-process gaging systems, there are always a few important adjustments that must be done manually. Don’t take operators understanding these adjustments for granted.
Read MoreRead Next
Look for the Codes
Two-dimensional matrix codes are being used for everything from marketing campaigns to positioning tool presetters to linking print magazines with bonus online content. Consider how you might use them.
Read More5 Rules of Thumb for Buying CNC Machine Tools
Use these tips to carefully plan your machine tool purchases and to avoid regretting your decision later.
Read MoreRegistration Now Open for the Precision Machining Technology Show (PMTS) 2025
The precision machining industry’s premier event returns to Cleveland, OH, April 1-3.
Read More


.jpg;maxWidth=300;quality=90)


.jpg;maxWidth=300;quality=90)


