CMM Builds Quality, Throughput into Process
By using a CMM environmental enclosure and pallet-loading structure, one transmission manufacturer was able to increase its throughput along the entire production chain.
Share


Sometimes the best solution to a problem is right in front of you. That was the case at Allison Transmission when the company needed a CMM to inspect transmission parts on the shop floor. Although the company was happy with its 10-year-old Zeiss Prismo CMM, it needed a system that wouldn’t be affected adversely by environmental influences. By purchasing another Prismo CMM and adding an enclosure and conveyor, the company also improved throughput along the entire production chain.
Headquartered in Indianapolis, Indiana, Allison Transmission operates six manufacturing plants dedicated to the manufacture and assembly of medium- and heavy-duty automatic transmissions. Since its founding 1915, the company has grown to approximately 2,800 employees and has opened regional headquarters overseas. Allison’s products are specified by more than 250 vehicle manufacturers, and other markets include bus, refuse, fire, construction, distribution, military and specialty applications.
While Allison and other OEMs of automotive transmission components share similar part tolerances across the board, Allison produces much larger parts. In fact, some of the larger parts could fit in a 2 by 2 by 3 foot box, says Dave Renshaw, from the Central Manufacturing Engineering Group at Allison. Typical transmission parts include housings, valve bodies and covers that require tolerances common within the automotive industry: 0.005 inch overall face flatness, 0.002 inch incremental flatness and 0.004 inch datum dowel hole true positions. Large bore roundness tolerance ranges between 0.0004 and 0.0005 inch, with true position tolerance between 0.002 and 0.004 inch and bore runout requirements within 0.003 inch.
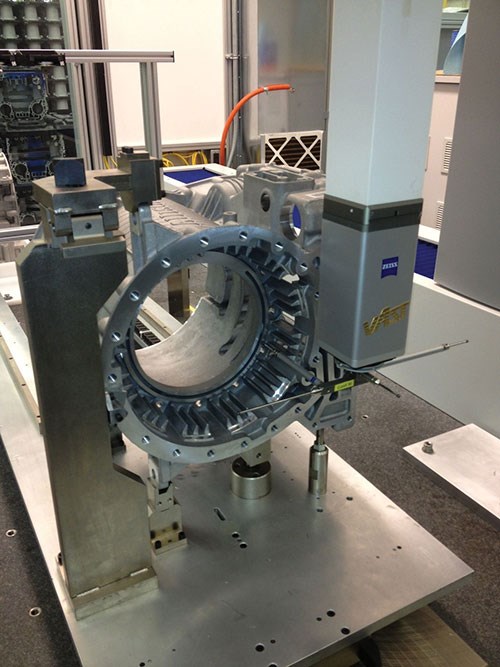
Allison says CMMs are critical to meeting both tolerances and lean goals. About 10 years ago, the company purchased two bridge-type CMMs from Carl Zeiss—an Eclipse and a Prismo. The Prismo’s active scanning technology delivered the flexibility necessary to inspect complex housings while providing information that various manual and touch-trigger measurements could not offer. It also reduced the need for hand gages as well as dedicated bench gages, which had the added effect of freeing floor space. These benefits, along with increased accuracy and reliability, have lead Allison to standardize on CMM scanning technology, Mr. Renshaw says.
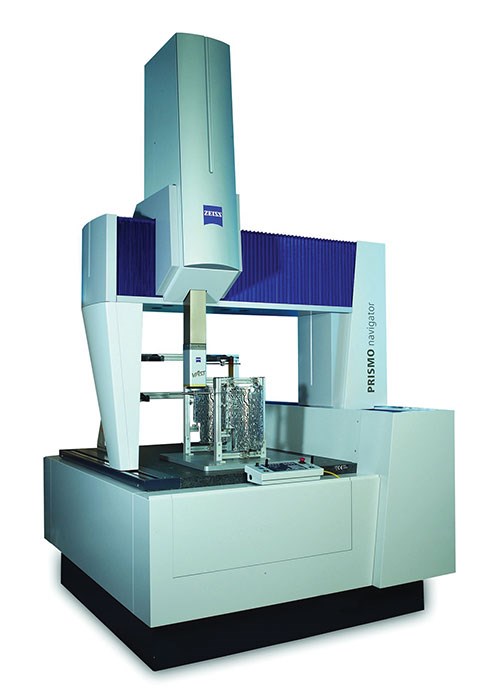
In 2011, Allison needed a CMM for its Indianapolis facility’s production floor that could efficiently handle a new series of transmission components in addition to existing parts, so it turned to Carl Zeiss Industrial Metrology (Maple Grove, Minnesota) and its custom engineered projects department to investigate solutions. The company was happy with the Prismo’s accountability and reliability, so it purchased a second one. The CMM features an X-, Y- and Z-axis measuring range of 1,200 by 1,800 by 1,000 mm and accuracy of 1.5 microns + L/350 (in which L is the length being measured in millimeters). During scanning, the navigator technology automatically configures the maximum measuring speed, the company says.
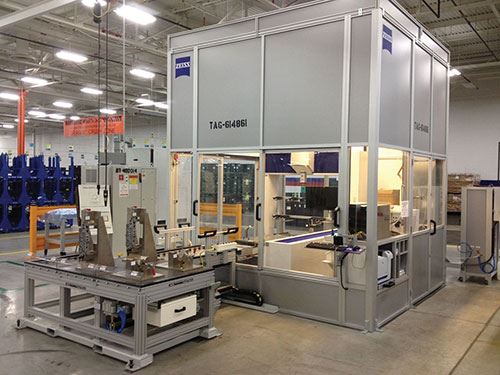
The first obstacle to using the new CMM on the shop floor was addressing ambient conditions. Dust, humidity and temperature fluctuations can reduce measurement accuracy, but by integrating an environmental enclosure with a dedicated HVAC system, the company was able to address these issues while increasing ergonomics, throughput and safety.
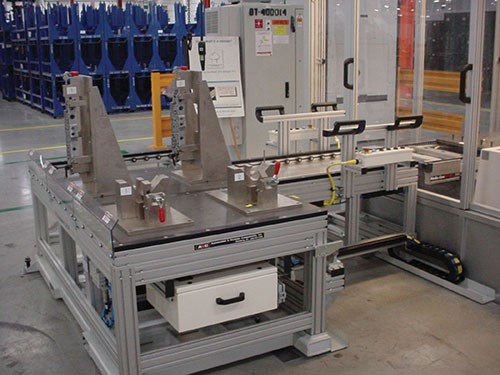
With the enclosure in place, the Zeiss team devised a solution to move parts to and from the stable measurement environment. To begin, an operator mounts the part to a fixture on a pallet at one of three loading stations. A shuttle cart moves the pallet from the loading station to the automated pallet receiver attached to the CMM. The pallet receiver is PLC controlled with a push-button operator interface. Next, the operator opens the enclosure door and starts the receiver roller conveyor that moves the pallet into and out of the CMM measuring volume. The pallet receiver interlock switches send a signal to make the rollers stop, and the conveyor lowers the pallet to the appropriate work position relative to the CMM to begin measurement. The company reports that in addition to providing a clean, stable measurement environment, the system improves inspection throughput by reducing CMM idle time. Prepping one pallet while another undergoes inspection keeps parts flowing efficiently through the production cycle.
To further increase productivity, the company uses Calypso software, which integrates seamlessly with product design CAD models and enables offline programming, Mr. Renshaw says. After various manufacturing processes, the software allows operators to run either full inspections or short, audit inspections that enable quick troubleshooting of machining or tooling issues on specific part features. The software highlights features that are still in tolerance but outside a user-defined warning limit, which can be programmed for a desired percentage of feature tolerance. This helps ensure that defects are not passed downstream.
The Zeiss CMMs play an integral role in ensuring that each step of the manufacturing process meets quality standards, the company says. They’ve also been a key part of Allison’s lean manufacturing process, which is designed to avoid passing down defects. In fact, each part follows a set process path, which includes an audit inspection, to ensure quality. Allison is able to consolidate many of its inspection reports on a CMM, saving labor and operational costs, while improving throughput along the entire production value chain. By having one accurate and flexible measuring device, the need for multiple hard or dedicated bench gages is eliminated. “For a fraction of the cost, you could just invest in a new fixture or probe tooling for your CMM,” Mr. Renshaw says.
Related Content
Help Operators Understand Sizing Adjustments
Even when CNCs are equipped with automatic post-process gaging systems, there are always a few important adjustments that must be done manually. Don’t take operators understanding these adjustments for granted.
Read MoreHow to Calibrate Gages and Certify Calibration Programs
Tips for establishing and maintaining a regular gage calibration program.
Read MoreThe Link Between CNC Process Control and Powertrain Warranties
Ever since inventing the touch-trigger probe in 1972, Sir David McMurtry and his company Renishaw have been focused on achieving process control over its own manufacturing operations. That journey has had sweeping consequences for manufacturing at large.
Read MoreOrthopedic Event Discusses Manufacturing Strategies
At the seminar, representatives from multiple companies discussed strategies for making orthopedic devices accurately and efficiently.
Read MoreRead Next
5 Rules of Thumb for Buying CNC Machine Tools
Use these tips to carefully plan your machine tool purchases and to avoid regretting your decision later.
Read MoreBuilding Out a Foundation for Student Machinists
Autodesk and Haas have teamed up to produce an introductory course for students that covers the basics of CAD, CAM and CNC while providing them with a portfolio part.
Read MoreRegistration Now Open for the Precision Machining Technology Show (PMTS) 2025
The precision machining industry’s premier event returns to Cleveland, OH, April 1-3.
Read More


.jpg;maxWidth=300;quality=90)


