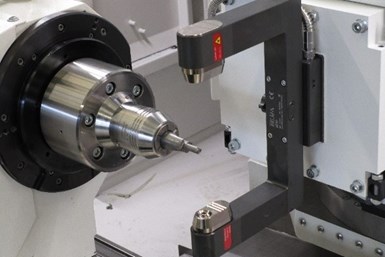
Studer Laser System Efficiently Measures Small Batches
Studer’s laser measuring control system can generate thousands of measuring points for evaluation, even with the workpiece rotating, reducing measuring time.
Share


.png;maxWidth=45)
DMG MORI - Cincinnati
Featured Content
View More

Hwacheon Machinery America, Inc.
Featured Content
View More
ECi Software Solutions, Inc.
Featured Content
View More
New laser measuring technology from Studer is designed to increase reliability and productivity for finishing processes on grinding applications with exacting tolerances and highly accurate surface qualities. Tools that require this tolerance range of dimension, form and position accuracies are often sensitive to tactile measurement. While companies typically have empirical values against which to measure these products, they may not have been able to measure small-batch products without time-consuming trips to intermediate measuring devices. This laser measuring control system can provide an efficient solution.
Operators mount the device mechanically and can adapt its size to the workpiece diameter. The existing air nozzles for blowing off the workpiece during measurement and the dirt screens protect the laser optics from lubricant in the machine. In comparison to previous models, this system’s lasers are said to have more accurate laser optics. According tot he company, the device can generate thousands of measuring points for evaluation, even with the workpiece rotating, reducing measuring time.
Not only does this system record different diameters, but it can carry out control measurements on interrupted diameters, such as shafts with keyways or longitudinal grooves and toothed gears in the diameter range. It omits setup and resetting of previously-used tactile in-process gauging devices, increasing efficiency. Users can select the measuring cycle after each machining operation or at the end of the grinding process. Studer’s software logs the measured values per diameter after each measuring cycle. This process enables the operator to ascertain the quality of the ground component at a glance.
Related Content
-
Turning Fixed-Body Plug Gages Inside Out
Fixed-body mechanical plug gages provide fast, high-performance measurement for tight-tolerance holes.
-
Ballbar Testing Benefits Low-Volume Manufacturing
Thanks to ballbar testing with a Renishaw QC20-W, the Autodesk Technology Centers now have more confidence in their machine tools.
-
The Link Between CNC Process Control and Powertrain Warranties
Ever since inventing the touch-trigger probe in 1972, Sir David McMurtry and his company Renishaw have been focused on achieving process control over its own manufacturing operations. That journey has had sweeping consequences for manufacturing at large.


