“Functional checks” involve using contact gages to simulate measuring a form or surface characteristic on a part. A form machine or an optical system is ultimately going to be the best way to perform roundness, flatness, straightness or similar checks because they do the check correctly per the ANSI spec for dimensioning and tolerancing.
In a perfect world, every critical dimension on a part would be tested with the best and most reliable equipment available. Unfortunately, we do not live in a perfect world. There is usually a long laundry list of things that get in the way, such as equipment cost, operator skill and measurement time. In a production environment, measurement must be affordable. Also, parts must be measured quickly, often by the production equipment operator.
The best way to check forms is with a form machine. Between the accuracy of the gage mechanics and its software capabilities, a lot of analysis can take place. However, form machines can be pricey, and using them takes time and training.
When a form machine is set up to make a circularity (roundness) check, a number of steps must be taken before the actual measurement is made. At least two part traces should be made to establish an axis. Once this is done, additional traces should be made at different planes to inspect for the form feature. A single circularity trace can take two or three minutes for each roundness check required.
The same is true with other form checks, including flatness, straightness and parallelism, to mention a few. All of these checks can be performed on a form machine with high accuracy, but also with high cost and increased time.
Many of these checks also can be made on a bench or fixture gage at a fraction of the cost and time. That’s what is meant by “functional checks.” However, as with every other decision, the risks and rewards have to be assessed. The functional check will be quick and easy. The tough part is deciding how critical the check is and whether the risk is too great to measure the part this way.
If the part has very tight tolerances and is part of a life-and-death application, then spending time and money to inspect it in the best possible manner may be a requirement. However, if the tolerances are not that tight, and there is a lot of pressure to produce many parts in the shortest amount of time possible, then a functional check may be the answer.
Usually, such parts will be qualified first with the best method of inspection to understand the manufacturing process and the stability of the process. If the process is determined to be under control and continues to produce the same quality level, then using a functional check may make sense.
Form checks, such as circularity, parallelism and others, are frequently used to refine the size requirements for the part. As such, they are always less than the size tolerance. For instance, a part might have a certain length tolerance. It might also have a parallelism tolerance on the length. The parallelism tolerance will almost certainly be smaller than the length tolerance. Thus, the parallelism check can be a free functional check as part of the length check.
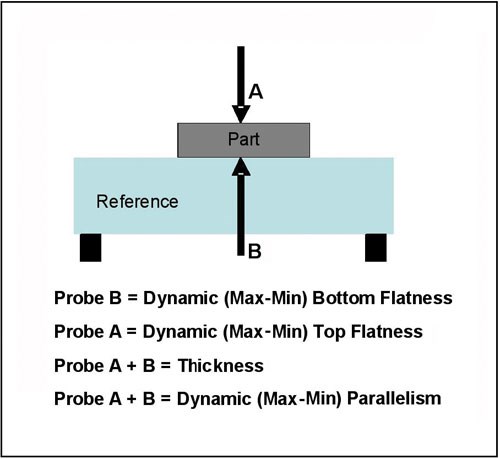
Let’s take a simple application in which part thickness, flatness and parallelism must be measured. Typically, thickness would be measured using two opposing probes and a flat reference surface. A form machine could then be used to measure the flatness of each side and the parallelism of the surfaces, but that would be costly and take a lot of time. Instead, a functional check of the part could be performed by looking at the probe measurements in different combinations—measuring dynamically—to make the required form measurements. As seen in the figure above, the probes can be used simultaneously to obtain required measurements.
This is where free comes in: The probes are already there. By using them in different combinations—and in a dynamic mode—more results can be obtained for the same measurement “cost.”


.jpg;maxWidth=970;quality=90)