Device Quickly Inspects 3D Parts on the Shop Floor
Various technologies combine to realize all-around laser measurement of a complex part in a single, quick, automatic cycle.
Share


.png;maxWidth=45)
DMG MORI - Cincinnati
Featured Content
View More
ECi Software Solutions, Inc.
Featured Content
View More

Autodesk, Inc.
Featured Content
View More


Hwacheon Machinery America, Inc.
Featured Content
View More
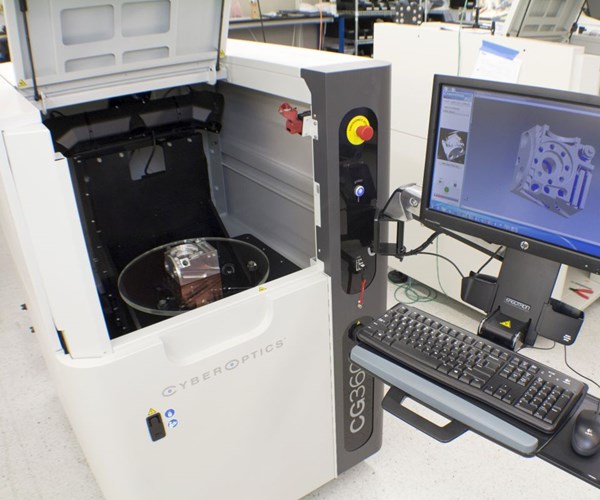
The automated inspection “appliance” can be used on the shop floor. The part is placed on the turntable inside the chamber so it can receive a detailed 3D inspection via laser scanning in a cycle of two to three minutes.
In describing Laser Design’s CyberGage 360 laser scanning unit, it is hard to avoid the comparison to a microwave oven.
The unit works this way: A user places a workpiece to be inspected inside the box-like chamber and shuts the door. Similar to choosing cooking time, the user chooses the desired inspection resolution. Then, within the unit, the part begins to rotate on a turntable as it is scanned from above and below. After two to three minutes, the cycle is done. There is a “ding” noting the cycle is complete, and the output is a PolyWorks inspection report detailing the complete 3D measurement of the part to an accuracy within 0.001 inch.
Laser Design President C. Martin Schuster welcomes the microwave-oven comparison—he uses it himself. He hopes the comparison can help convey the ease-of-use of a gage that he says represents “a new category of metrology device.” In his words, the promise of this device is “super easy, complete inspection on the production floor.”
At least one major manufacturer is already aiming to realize this promise. A large supplier of prototype and short-run production parts in Laser Design’s home state of Minnesota is planning to dramatically change the way it performs part inspection, installing a CyberGage unit near every few machine tools and injection molding machines throughout the facility. Mr. Schuster says this company’s CEO sought to test the device’s speed at one point by grabbing a part at random from the shop floor—a part no one was yet prepared to measure—and asking a production employee to inspect it. To comply, the employee had to locate the CAD file for the part that included product and manufacturing information (PMI), so the manufacturer’s own file organization contributed to the speed in this test. Including this retrieval, the complete time for the CEO to obtain an inspection report clocked in at eight minutes.
The appliance-like speed and simplicity of the device is the result of at least three patented technologies, plus the work of two formerly separate companies. While Laser Design was working on one technology, another laser scanning technology firm, Cyber Optics, was working on another. Recognizing they were pursuing separate pieces of the same puzzle, they joined, which is why Laser Design is a Cyber Optics company.
The three technologies are these:
- Software for knitting together 3D scans from various angles into a single model. This piece was Laser Design’s development, Mr. Schuster says. He notes the software combines laser scans not through best-fit analysis (which is typical), but instead according to the machine’s own encoder feedback as the scans are taken.
- Multiple Reflection Suppression (MRS), which was developed by Cyber Optics. This technology accomplishes many things, he says, but its most significant contribution includes avoiding the typical scan noise errors associated with scanning shiny surfaces.
- Capability for scanning accurately through glass. This third and final piece is what enables a complete 3D scan. The part sits unfixtured on a rotating glass plate within the device while it is measured using a projection sensor above the part and one below it that scans through the glass.
Mr. Schuster says the only input needed for automated programming and inspection with the CyberGage is a CAD file with PMI data. The presence of this information within the part model means no manual programming is needed, because PolyWorks can interpret the scan data into the measurements needed to validate the part according to its PMI. Geometric complexity is no obstacle to the scan, and in fact, the device is an effective solution for rapidly measuring complex parts. The primary limitations instead relate to the device’s capacity—inspection volume is 200 mm in diameter by 100 mm tall—along with the light-related properties of the part. Both highly reflective parts and transparent ones can prove challenging to scan.
Related Content
Rethink Quality Control to Increase Productivity, Decrease Scrap
Verifying parts is essential to documenting quality, and there are a few best practices that can make the quality control process more efficient.
Read MoreHelp Operators Understand Sizing Adjustments
Even when CNCs are equipped with automatic post-process gaging systems, there are always a few important adjustments that must be done manually. Don’t take operators understanding these adjustments for granted.
Read MoreProcess Control — Leveraging Machine Shop Connectivity in Real Time
Renishaw Central, the company’s new end-to-end process control software, offers a new methodology for producing families of parts through actionable data.
Read MoreParts and Programs: Setup for Success
Tips for program and work setups that can simplify adjustments and troubleshooting.
Read MoreRead Next
Registration Now Open for the Precision Machining Technology Show (PMTS) 2025
The precision machining industry’s premier event returns to Cleveland, OH, April 1-3.
Read MoreBuilding Out a Foundation for Student Machinists
Autodesk and Haas have teamed up to produce an introductory course for students that covers the basics of CAD, CAM and CNC while providing them with a portfolio part.
Read More5 Rules of Thumb for Buying CNC Machine Tools
Use these tips to carefully plan your machine tool purchases and to avoid regretting your decision later.
Read More


.png;maxWidth=150)


