Vision System Allows Automated Inspection Of Bore Finish
Bores machined in brake master cylinders, connecting rods, injection systems, valves and similar components must have a quality surface finish to ensure effective performance. Conventional bore inspection techniques, however, typically require an operator to evaluate the finish. Operators may use a bore scope l
Share


Autodesk, Inc.
Featured Content
View MoreBores machined in brake master cylinders, connecting rods, injection systems, valves and similar components must have a quality surface finish to ensure effective performance. Conventional bore inspection techniques, however, typically require an operator to evaluate the finish. Operators may use a bore scope linked to a video screen or other optical devices to examine bore surfaces for imperfections. Because some form of operator intervention is necessary, inspection can be a bottleneck in high-volume production environments.
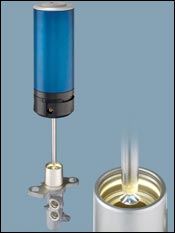
Hommel-Etamic (Rochester Hills, Michigan), has developed an optical inspection system to automatically detect bore flaws such as cavities, valleys, scratches, porosity and unmachined surfaces. It also can detect the completeness and the position of grooves and cross holes. The system, called the IPS-10, can inspect the finish of bores as deep as 450 mm with diameters ranging from 14 to 50 mm.
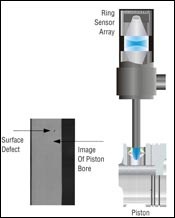
The system consists of a computer, an optical sensor and a slide that positions the sensor inside a bore. During operation, the 360-degree optical sensor creates a panoramic image of a bore wall via continuous scanning (as many as 10,000 scans per second) using a CMOS (complementary metal-oxide-semiconductor) ring sensor array. The sensor’s simultaneous linear motion down a bore and circular scanning creates an undistorted image of a bore’s surface.
The system’s software then automatically interprets the image to detect surface defects. Users can select inspection areas and define inspection parameters and classification criteria, including flaw size and types; distances between flaws; and flaw clusters. The software sorts out the defective parts and stores inspection results. Typical cycle times for complete surface inspection are only seconds per part, according to the company.
During set up for a new part, the system scans and captures the image of a flawless bore surface. Next, users define inspection areas in addition to key features such as grooves or cross holes. After that, the system is ready for automatic operation. The company recommends that bores to be checked by this optical inspection method have a clean, dry surface.
Related Content
-
Parts and Programs: Setup for Success
Tips for program and work setups that can simplify adjustments and troubleshooting.
-
Ballbar Testing Benefits Low-Volume Manufacturing
Thanks to ballbar testing with a Renishaw QC20-W, the Autodesk Technology Centers now have more confidence in their machine tools.
-
6 Machine Shop Essentials to Stay Competitive
If you want to streamline production and be competitive in the industry, you will need far more than a standard three-axis CNC mill or two-axis CNC lathe and a few measuring tools.


.png;maxWidth=150)


.jpg;maxWidth=300;quality=90)


