Turbocharging Scanning Metrology
All things being equal, the slower the scanning velocity, the more accurate the results. However, that is not an attractive solution for firms using CMMs right next to machine tools on the plant floor-firms that need inspection results as quickly as possible to keep those machines making good parts.
Share


Scanning a part on a coordinate measuring machine (CMM) is faster and, due to a much higher data sample, offers higher confidence in the result than the more conventional point-to-point measurement method. Not unlike point to point measurement, the accuracy of the data can be compromised by dynamic deflections of the measurement system (CMM and probe), which tend to increase with measurement/scanning velocity. All things being equal, the slower the scanning velocity, the more accurate the results. However, that is not an attractive solution for firms using CMMs right next to machine tools on the plant floor—firms that need inspection results as quickly as possible to keep those machines making good parts.
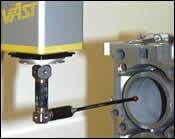
Scanning is an evolving technology, however, and Carl Zeiss IMT Corp. has introduced a “third generation” scanning system, called the VAST Navigator system, which meets the demands for shorter measuring times, gage lab accuracy, and repeatability of measurement results, particularly in the manufacturing environment. The system includes and depends on the interaction of three components: the VAST probe, a VAST Navigator option for Zeiss’ Calypso CMM software that automatically generates the measuring strategy for a part, and a “scanning engine” (control unit).
Sets Scanning Velocity Automatically
Zeiss explains that as a general rule scanning velocity is dependent on the stylus rigidity. Long thin styli can be troublesome, and when a stylus is modified, for example by adding an extension, measurement accuracy may be compromised. To ensure measurement accuracy, CMM operators tend to be conservative with scanning velocities. With the VAST Navigator, however, it is no longer necessary for the user to specify the correct scanning velocity for a particular task. The system automatically determines the optimum scanning velocity based on the CMM, the stylus used and the feature to be measured. The user simply specifies the test features and tolerance involved, and the system sets its own best velocity.
Smoother Moves
With Navigator, movements of the probe have been streamlined for faster measuring results and reduced wear and tear of the CMM. For example, a tangential approach allows smooth transition from the probe route to the point of contact without the pausing and repositioning that characterize conventional movement. Probe route rounding avoids jerky starting and stopping when traveling from one intermediate point to the next, reducing mechanical wear of the CMM. Another refinement is double helix scanning, which measures a bore along its entire length in one uninterrupted sweep. Zeiss reports that compared to conventional scanning, the new system reduces measuring time by as much as 30 percent on typical applications, such as a cylinder bore, while maintaining gage level accuracy.
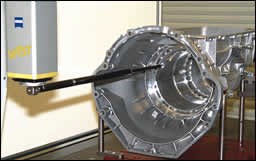
A very long stylus (680 mm) is needed to measure the gearbox shown, increasing the likelihood of unacceptable results at high scanning velocities. Using conventional scanning techniques, it was deemed necessary to hold scanning velocity to 20 mm per second to ensure the required uncertainty (within 1 micron) on diameter and form measurements. Measurement of the gearbox using the Navigator system was done at 120 mm per second—a velocity automatically set by the system—without any loss in measuring accuracy. Measuring time was reduced from 50 seconds by the conventional method to 12 seconds for Navigator, a 75 percent decrease.
Similarly, the 6.3-mm bore of a fuel injection valve was measured using a stylus that was 130 mm long by 3 mm in diameter. Best results by the conventional scanning method dictated a scanning velocity of 5 mm per second. Using Navigator, velocity was increased to 12 mm per second measuring to comparable accuracy, cutting inspection time in half.
Zeiss pioneered this 3rd generation Navigation system by determining the dynamic bending characteristics of its measurement systems and developing software tools and control systems to maximize the system performance. To the operator or programmer, the system is so seamlessly integrated that the Navigator technology is transparent.
Read Next
Setting Up the Building Blocks for a Digital Factory
Woodward Inc. spent over a year developing an API to connect machines to its digital factory. Caron Engineering’s MiConnect has cut most of this process while also granting the shop greater access to machine information.
Read MoreBuilding Out a Foundation for Student Machinists
Autodesk and Haas have teamed up to produce an introductory course for students that covers the basics of CAD, CAM and CNC while providing them with a portfolio part.
Read More5 Rules of Thumb for Buying CNC Machine Tools
Use these tips to carefully plan your machine tool purchases and to avoid regretting your decision later.
Read More


.jpg;maxWidth=300;quality=90)


