New Workholding Method Drives Production Efficiency
By replacing a three-jaw chuck and dead-center workholding model with a flange-mounted, mechanically compensating face driver from Riten Industries, Tuthill Corp. cut machining cycle time by about 39 percent.
Share


Autodesk, Inc.
Featured Content
View MoreAny competitive manufacturer will periodically review and challenge its current production process in search of ways to make it more efficient. Tuthill’s Pump Group did just that when it replaced its workholding method in a pump shaft application in favor of a face driver from Riten Industries. By enabling complete machining in one setup, the face driver reduced cycle times by up to 39 percent.
Tuthill’s Pump Group manufactures industrial transfer, process and circulation pumps. Among the components produced at its Alsip, Ill., facility, just south of Chicago, is a family of pump shafts ranging from 1- 1/16 inches in diameter and 11-1/4 inches long to 3 inches in diameter and 22-1/2 inches long. These are turned on a new Okuma LB4000EX CNC lathe and ground to a 32 micro-finish on a cylindrical grinder within the same machining cell.
Jim Spagnola, the plant’s heavy duty products supervisor, contacted the Morris Midwest division of the Morris Group, an Okuma distributor, to explore ways in which the pump shaft could be machined more efficiently—possibly eliminating the subsequent grinding operation altogether.
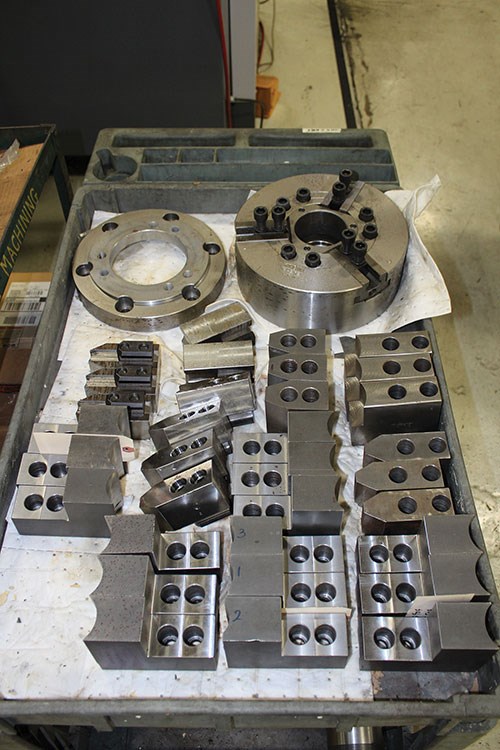
Through its THINC partnership with Okuma, Washington Courthouse, Ohio-based Riten was called to provide workholding recommendations. Riten engineers reviewed the part prints and machining data, and discovered that Tuthill’s existing dual-operation three-jaw chuck and dead-center workholding method didn’t allow the part to be machined completely from end to end. In fact, operators had to stop and reverse the part, a process that took about 15 minutes on average, to machine its entire length. This additional setup led to decreased accuracy, which in turn necessitated the secondary grinding operation.
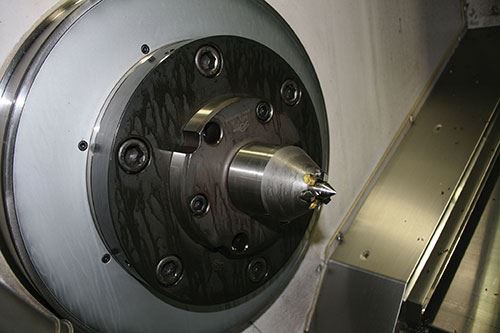
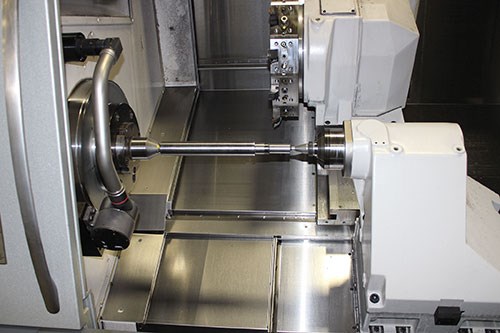
To reduce cycle time, the engineers suggested replacing the three-jaw chuck with a flange-mounted, mechanically compensating Riten face driver. Two main components comprise the face driver: the drive head and the mounting. The mounting locates the driver in the machine with a flange mount bolted to an A2-11-inch spindle adapter. This enables the face driver to adjust radially and increase concentricity. The part is held between the spring-loaded center point on the face driver and the tailstock of the center. This workholding method exposes the entire workpiece at once, so operators can machine its entire length in one operation.
The elimination of a setup in the production process results in increased accuracy and efficiency. Furthermore, the single-axis reference point established by the center point of the face driver also enables a higher concentricity.
To implement the new face driver, Tuthill needed to make sure the Okuma machine applied force sufficient enough to penetrate the drive pins on the face end of the part. While a typical hydraulic tailstock can produce constant, measureable force, the Okuma lathe is equipped with a servo-driven tailstock, which complicates measurement of applied force. However, Morris Midwest Application Engineer Brian Holmi was on-site to oversee the initial run and provide the exact force exerted by the new machine’s tailstock. In the pump shaft application, the measured force was below what was required by the already purchased and installed face driver.
While this would be a problem with a common hydraulically compensating or disc-type face driver, the Riten model is a mechanically compensating unit. According to Allen Boehnlein, Riten’s Midwest regional manager, the mechanical design enables the removal of three of the six drive pins, reducing the surface-contact area and increasing the effective force from the tailstock. Test runs in this configuration were said to achieve excellent drive pin penetration. With a 0.125-inch depth of cut at a 0.010-inch feed rate, concentricity was within specifications at 0.001-inch TIR.
To ensure the best performance from the face drivers, Mr. Boehnlein recommended following standard sizing guidelines. The maximum diameter of the rough workpiece should not exceed three times the gripping diameter (the circumference of the drive pin edges) on the face driver, and the overall length of the workpiece should not be more than 15 times the gripping diameter.
After the initial face driver installation, Sumitomo Electric Carbide Sales Engineer Wayne Crudell provided the cutting tools necessary to achieve the required surface finish and eliminate the need for the secondary grinding operation.
With these improvements, Mr. Spagnola says he recorded significantly lower run times with the modified Riten face driver. For example, on the 1.75-inch-diameter 4140 steel alloy shaft, average cycles were reduced by 35.7 percent, to just less than 9 minutes. The stainless steel shafts produced even better results. Runs averaged just over 10 minutes, with reductions ranging to 38.9 percent.
“We are holding 0.001-inch runout and 0.0005-inch size and a 32 micro on the three shaft lengths in both materials,” Mr. Spagnola says. “Since the technique has proven itself on these six part numbers, we’re now running all of our Global Gear and HD shafts, a family of more than 50 discreet parts, using the same process.”
Related Content
Navigating Large-Scale CNC Machining: Suburban Tool’s Niche Strategy to Stay Competitive
Facing increasing competition from lower-cost imports, Suburban Tool made a move toward large-scale, in-house machining. By identifying a niche in large, precision angle plates and tombstones, the company has strengthened its ability to control quality and protect its reputation.
Read MoreRail Manufacturer Moves Full Steam Ahead with Safe, Efficient Workholding Solution
All World Machinery Supply paired a hydraulic power unit with remote operating capabilities in a custom workholding system for Ahaus Tool & Engineering.
Read MoreCustom Workholding Principles to Live By
Workholding solutions can take on infinite forms and all would be correct to some degree. Follow these tips to help optimize custom workholding solutions.
Read MoreLean Approach to Automated Machine Tending Delivers Quicker Paths to Success
Almost any shop can automate at least some of its production, even in low-volume, high-mix applications. The key to getting started is finding the simplest solutions that fit your requirements. It helps to work with an automation partner that understands your needs.
Read MoreRead Next
Building Out a Foundation for Student Machinists
Autodesk and Haas have teamed up to produce an introductory course for students that covers the basics of CAD, CAM and CNC while providing them with a portfolio part.
Read MoreRegistration Now Open for the Precision Machining Technology Show (PMTS) 2025
The precision machining industry’s premier event returns to Cleveland, OH, April 1-3.
Read More5 Rules of Thumb for Buying CNC Machine Tools
Use these tips to carefully plan your machine tool purchases and to avoid regretting your decision later.
Read More



.jpg;maxWidth=300;quality=90)


.jpg;maxWidth=300;quality=90)


