Modular Tooling Interface Doubles As A Universal Workholding Device
A precision drives manufacturer uses a quick-tool-change coupling in a new way-to secure critical components for machining. This allows faster setups and provides a single workholding interface for multiple types of machines.
Share


Shops that continually follow and integrate the latest metalworking technologies will produce parts with increasing speed and quality. The same is true for savvy shops that apply proven technologies in new, innovative ways. Harmonic Drive LLC offers an interesting example of the latter scenario. The manufacturer’s efforts to reduce setup times for machined components led it to adopt a modular, quick-change tooling system for all of its CNC lathes. In doing so, it discovered it could use the same modular interface as a universal workholding coupling, speeding workpiece change-overs for components that travel across multiple pieces of equipment.
This Peabody, Massachusetts, manufacturer produces harmonic drives used for precision motion control and mechanical power transmission applications in nuclear power and aerospace industries, among others. According to Steve Foley, shop supervisor, 50 percent of his machine operators’ time is dedicated to job change-overs. That fact, combined with lot sizes that typically range from two to 25 workpieces, means that reducing setup times in this short-run, JIT production environment is paramount.
Years back, the company adopted block-style tooling to allow faster tool changes on its lathes. It has since modified all its lathes to accept the Capto modular tooling interface from Sandvik (Fair Lawn, New Jersey). According to Mr. Foley, one of the reasons for the switch was that the Capto interface offered improved rigidity versus the block-style tooling, especially for ID turning operations.
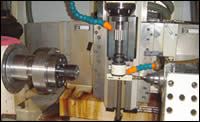
However, there was still work to be done to speed part fixturing time. Some workpieces traveled across different types of machines, and the workpiece would have to be indicated to each machine. It dawned on Mr. Foley that the modular tooling interface he used for quick tool changes could also be applied to workholding. Now, equipment such as lathes, gear hobbers and inspection devices uses the Capto interface as a workholding device so that lengthy indicating time is eliminated.
Modular Tooling And Workholding Interface
The Capto modular tooling system has been available for a number of years, and it can be used for milling, drilling and turning (static and rotational) operations. The system consists of a cutting unit (part of the toolholder) that couples with a clamping unit installed in a lathe’s turret or machine’s spindle. Its tapered, three-sided polygon coupling centers and aligns the toolholder in the clamping unit, providing 0.0001- to 0.0002-inch runout, according to Mr. Foley.
To use the Capto coupling as a workholding interface for his lathes, Mr. Foley installs a receiving clamping unit on a faceplate mounted in the lathe’s spindle. Custom toolholders are made from boring bar blanks that have the Capto C6-sized coupling (this is the largest available coupling size). The boring bar blank is machined to accept the different types of parts the company machines. According to Mr. Foley, the Capto system reduced part change-over time from 5 minutes (using a straight shank tool that requires indicating) to 30 seconds.
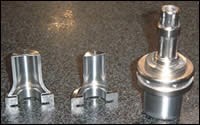
The Capto interface is especially effective working in conjunction with a nifty “lollipop” workholding method used to secure small, bell-shaped workpieces for lathe work, spline machining and OD inspection. The part, called a flexspline, begins as a 15-5PH stainless steel forging. Its ID is machined to leave a wall thickness of approximately 0.06 inch. A final wall thickness of 0.01 inch is attained through OD turning.
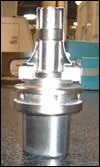
The OD turning is easier said than done, though, because the flexspline’s shape and thin wall present unusual workholding challenges. The part by itself can not be clamped in a lathe’s chuck because the very thin walls would not provide adequate support during the turning operation. Mr. Foley mounts the part on an arbor machined from a Capto boring bar blank. However, because of the bell-like internal profile, voids exist between the arbor and workpiece inner surface. To fill these voids, a low-melt-temperature alloy is poured through a bore that is machined down the center of the toolholder. Once the alloy solidifies, then the part and arbor bond together to become one. The alloy provides the wall support required to machine the part to the desired 0.01-inch wall thickness.
Once the part’s OD has been turned, the part becomes concentric to the arbor and Capto coupling, and succeeding operations no longer require indicating. For the flexspline, the next operation is machining a spline around the perimeter of the part’s “bell mouth.” Similar to the lathes, the gear hobber uses a Capto clamping unit attached to a faceplate installed in the machine. Once the hobbing operation is completed, the part is delivered to an inspection device to perform rotating concentricity runout checks. Mr. Foley topped a precision grinding head with a Capto clamping unit, having confidence that the Capto interface would not adversely affect runout inspection. Once machining and inspection are completed, the flexspline is removed from the arbor by simply heating and melting away the low-melt-temperature alloy. It is then ready for assembly.
Read Next
Building Out a Foundation for Student Machinists
Autodesk and Haas have teamed up to produce an introductory course for students that covers the basics of CAD, CAM and CNC while providing them with a portfolio part.
Read More5 Rules of Thumb for Buying CNC Machine Tools
Use these tips to carefully plan your machine tool purchases and to avoid regretting your decision later.
Read More


.jpg;maxWidth=300;quality=90)


.jpg;maxWidth=300;quality=90)


