Mind the Tool Center Height When Turning Small Diameters
Let’s use the Pythagorean Theorem to see how small, turned diameters can vary from nominal when your lathe’s tool center height is off.
Share


Louis Trumpet with Vallorbs Jewel Company in Bird-In-Hand, Pennsylvania, wrote a piece that reminds us how small turned diameters can vary from their nominal dimension when a lathe’s tool center height is off. What follows is what he sent to me (which I’ve only mildly edited).
From Louis: Very small, precision turned parts may have several different diameters, making for complications here and there. For example, when turning these small parts, you may notice that when one diameter is on the nominal dimension while others may be off by several tenths. At first, you might think this is caused by different tool pressure at the different depth of cuts, but that’s unlikely. To be sure the problem isn’t mechanical, check for backlash, flex in the machine/toolholder and the fit of the material to the guide bushing (when using a Swiss-type lathe). If everything checks out, and you’re still experiencing a differential, the likely culprit is that your turning tool center height is off. The following example shows how being off center can affect the diameters being turned.

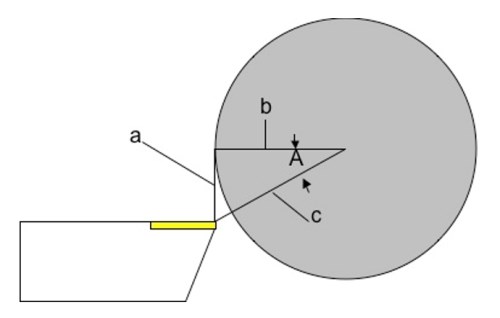
First, let’s assume that if your tool was brought to XO, the tip would be dead on the centerline of the bar. Line “A” is how far your tool is off center. Line “B” is your programmed X-axis dimension. Line “C” is the actual distance to the cutting edge of the tool or half the actual turned diameter dimension on your work.
Imagine making line “B” longer and longer (turning progressively larger diameters), and you see that angle “A” flattens out, which in turn will make line “C” shorter relative to line “B.” In other words, the error becomes less the larger the diameter your turn is. So, when turning very small diameters, it is critical to be on center.
The Pythagorean Theorem tells us that a2 + b2 = c2. Using that information, let’s assume your tool is 0.003 inch off center and you are turning a 0.030-inch diameter (side a = 0.003 inch, side b = 0.015 inch). Side “c” is equal to 0.0153 inch because c = √(0.0032 + 0.0152), so your turned diameter will be 0.0306 inch or will be 0.0006 inch off of nominal size.
Now assume you are using the same tool to turn a 0.0125-inch diameter. Running the same math, we find that the turned diameter (rounded) will be 0.1251 inch or 0.0001 inch off of nominal size.
Since the 0.030-inch diameter was 0.0006 inch off of nominal size, we have a differential of 0.0005 inch between the two dimensions. It follows, then, that when you offset one dimension to nominal size, the other dimension will be 0.0005 inch off of nominal. All this makes it difficult to dial in the workpiece without editing the program (bad), or using two separate offsets (nearly as bad).
You can also add a macro variable to the programmed dimension, but when you think about it, all that does is provide a convenient way for the operator to edit the programmed dimension. It’s better to fix the root cause of the problem by getting the tool on center. You can use this information to calculate how far your tool is off center and correct it with an offset, assuming you have Y-axis capability. Some small-capacity Tsugami Swiss-types have a feature built into the control to calculate the tool height using this principle, but you can see it works best at very small diameters where angle “A” and the resulting error are greater.
Related Content
Where Micro-Laser Machining Is the Focus
A company that was once a consulting firm has become a successful micro-laser machine shop producing complex parts and features that most traditional CNC shops cannot machine.
Read MoreOrthopedic Event Discusses Manufacturing Strategies
At the seminar, representatives from multiple companies discussed strategies for making orthopedic devices accurately and efficiently.
Read MoreThe Future of High Feed Milling in Modern Manufacturing
Achieve higher metal removal rates and enhanced predictability with ISCAR’s advanced high-feed milling tools — optimized for today’s competitive global market.
Read MoreHow to Mitigate Chatter to Boost Machining Rates
There are usually better solutions to chatter than just reducing the feed rate. Through vibration analysis, the chatter problem can be solved, enabling much higher metal removal rates, better quality and longer tool life.
Read MoreRead Next
5 Rules of Thumb for Buying CNC Machine Tools
Use these tips to carefully plan your machine tool purchases and to avoid regretting your decision later.
Read MoreRegistration Now Open for the Precision Machining Technology Show (PMTS) 2025
The precision machining industry’s premier event returns to Cleveland, OH, April 1-3.
Read MoreBuilding Out a Foundation for Student Machinists
Autodesk and Haas have teamed up to produce an introductory course for students that covers the basics of CAD, CAM and CNC while providing them with a portfolio part.
Read More


