Microfinish The Taper Away
Taper plagues manufacturers of precision wear components such as camshaft and crankshaft bearing journals. Taper is a geometric characteristic that most metal removal processes have a hard time dealing with.
Share


Autodesk, Inc.
Featured Content
View More

Hwacheon Machinery America, Inc.
Featured Content
View More
Taper plagues manufacturers of precision wear components such as camshaft and crankshaft bearing journals. Taper is a geometric characteristic that most metal removal processes have a hard time dealing with.
Even precision grinding has difficulty consistently eliminating a taper condition in round or cylindrical parts. Moreover, the idea of using microfinishing to remove a taper condition has been considered beyond the scope of the process.
With the introduction of a patented process, microfinishing can be used for consistent control of taper conditions in precision journals on workpieces including crankshafts, camshafts, compressor shafts and transmission shafts. Industrial Metal Products Corporation (Lansing, Michigan) developed this new process.
IMPCO’s new wrinkle on the microfinishing process is expected to reap benefits for precision journal and shaft manufacturers. In addition to the traditional benefits of microfinishing, which include control of surface finish parameters, geometry and final size—all in one operation—taper control can now be added to the list.
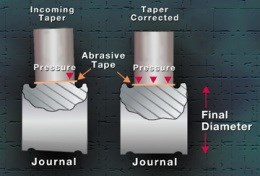
The enhancement to the conventional microfinishing process is called the axially variable taper compensation process. What this taper compensation process means is the IMPCO microfinishing tooling uses specially designed miniature gages located in the tool itself to automatically sense taper and adjust the tool to remove it.
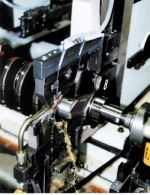
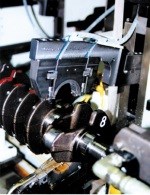
A hard tool, machined to conform precisely to the diameter to be generated, is contained in one half of the microfinishing arm. This arm closes on the bearing journal during microfinishing. Depending on which side of the journal that taper is detected, pressure is applied to the left or right side of the tooling to force a non-compressive abrasive film against the “high” side of the journal.
To sense a taper condition, small gage sets are fitted into the bottom half of the microfinishing arm. In these gages are two side-by-side calipers with two gages each to measure the journal diameter at each side of the journal.
Any discrepancy between the measurement of one gage set and the other results in additional pressure being applied to the high side. Within seconds, taper is controlled to within 3 microns on the diameter.
The enabling technology for this microfinishing taper control system is the production of gages small enough to be side-by-side in the tight confines between bearing journals—usually only about 20mm. This allows the taper detection and correction to be done in process, saving valuable cycle time.
Key to high production applications is the consistency of the process. In tests conducted by the company, 50 parts were run with nine of the parts known to have a taper condition.
Microfinishing without taper process control did improve some of the tapered journals but the tests showed the improvement was simply a function of the microfinishing process itself and was not predictable in the results delivered. When the parts were run, with taper correction in process, all of the tapers were brought to within specification.—GCK
Related Content
-
The Future of High Feed Milling in Modern Manufacturing
Achieve higher metal removal rates and enhanced predictability with ISCAR’s advanced high-feed milling tools — optimized for today’s competitive global market.
-
CNC Machine Shop Honored for Automation, Machine Monitoring
From cobots to machine monitoring, this Top Shop honoree shows that machining technology is about more than the machine tool.
-
How to Determine the Currently Active Work Offset Number
Determining the currently active work offset number is practical when the program zero point is changing between workpieces in a production run.


.png;maxWidth=150)


.jpg;maxWidth=300;quality=90)

.jpg;maxWidth=970;quality=90)