In It For The Long Haul
Curt Reed uses advanced grinding techniques in the pursuit of short-run, sub-micron work that other shops can’t perform or won’t attempt. His shop’s commitment to its customers is reflected in the high level of equipment sophistication and applied grinding acumen.
Share


While walking through Curt Reed’s shop, it became instantly clear to me that this grinding specialist is in it for the long haul. His tidy 3,000-square-foot facility in Wallingford, Connecticut, is anchored by $1.25 million in two Studer universal CNC grinding machines and a Zeiss CMM. That advanced equipment allows Mr. Reed to fully apply his extensive form and cylindrical grinding talents in the pursuit of tough work for the defense, aerospace, automotive and tool and die industries. Such an investment in capital equipment by a small business isn’t made by one lacking in confidence or commitment to its customers. This impression is important as Mr. Reed’s customers would rather have its precision grinding service provider act as a long-term partner than a stopgap supplier.
Mr. Reed started Precision Grinding Solutions in 2000. Prior to that, he spent 15 years in the tool room of a large consumer products manufacturer. That’s where he gained experience using a Studer S40 universal CNC grinding machine and CBN wheel technology to grind close-tolerance tooling. He originally set up Precision Grinding Solutions to provide applications engineering services to United Grinding Technologies’ Studer group. Having UGT as a major customer early on offered an opportunity to be involved in Studer’s grinding technologies and to meet a diverse range of customers, many of which formed Mr. Reed’s core customer base. This allowed Mr. Reed the opportunity to offer his own grinding services starting in 2004
One of these original customers was having difficulties grinding high-pressure turbine seals for tank engines. Using an S40 from a different shop, Mr. Reed proved he could do the work and won the job contingent upon setting up his own business.
Now Precision Grinding Solutions specializes in form grinding, profile grinding and internal and external cylindrical grinding. The shop primarily serves tier-one and tier-two suppliers in need of grinding work for intricate components made of super alloys, stainless steels, tool steels, carbides, ceramics or parts coated with hard plasma sprays.
Stout Shop
Mr. Reed’s facility is well suited for high-accuracy grinding operations. It was previously home to a printing business that performed sensitive work requiring precise environmental control. Two 5-ton-capacity Leibert climate control systems maintain temperature to ±1°F as well as appropriate humidity level.
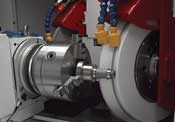
The shop’s first major purchase was a Studer S40 universal cylindrical grinding machine. It is equipped with a C-axis workhead for high-speed form grinding, a B-axis wheelhead, rotary wheel dresser, automatic CO2 fire suppression and HEPA-filter oil mist collection. (Studer equipment is available in the United States from United Grinding Technologies, located in Miamisburg, Ohio.) As business grew, it added a Studer S31universal CNC grinding machine with a shorter center line than the S40.
The B-axis wheelheads used on these machines are said to offer resolution of 0.0001 degree and can be configured with 30 different arrangements of external and internal grinding wheels. Mr. Reed’s S40 machine has two in-line, external grinding wheels on one side of the wheelhead. These wheels have diameters of 400 mm and 500 mm, and can be used in straight- or angular-approach positions. On the other side of the wheelhead is a position for interchangeable Fischer spindles that range in speed from 12,000 rpm to 120,000 rpm and are used to grind internal features. The S31 machine has two 500-mm external wheels on opposing sides of the wheelhead and a position for an internal grinding spindle. The spindles for internal work are also used for grinding out-of-round features or cam profiles around the outside of a part.
Mr. Reed says he uses mineral oil as the coolant medium instead of water-based solutions, because oil offers grinding performance advantages and helps maintain machine cleanliness. Each grinding machine has a dedicated coolant filtering and cooling unit from Transor Filter USA (Elk Grove Village, Illinois). One unit has a 1,000-liter capacity; the capacity of the other is 1,200 liters. The size of these units is appropriate for such large grinding machines performing operations that require a large volume of coolant. To date, 11,000 hours have been logged on the S40’s Transor unit, which still contains the original oil. A magnetic separator in the unit extracts some of the pollutants before the coolant reaches the 1-micron filtration system. The heat generated by these two units is vented to the open space above the facility’s drop ceiling to avoid increasing the shop’s ambient temperature.
Effective oil cooling is just as important as filtration for precision grinding work, Mr. Reed notes. The Transor units deliver coolant to the grinding machines at 20°C to stabilize the temperature of the machine’s base and components. Mr. Reed says it would be impossible to grind valve components and hold 1 micron cylindricity as he has done without keeping machine components at the same temperature.
As far as Mr. Reed is concerned, any time oil is used as a grinding coolant, the machine must have an automatic fire suppression system. He’s seen larger manufacturers skimp on this vital safety precaution, likely because they focused on initial cost versus potential benefits. Mr. Reed believes the added cost for the system is worth it if the system is needed just one time. In fact, the system once saved not only his S40, but also his facility. A software issue during setup caused a wheel to collide with the dresser, breaking off the dresser and causing a flash fire. Had the fire suppression system not been installed, the entire facility would have been lost. Instead, the only damage was a few melted wires in the machine.
Exotic Workpieces
Mr. Reed is deft in grinding free-form cam profiles. Oftentimes the external form grinding work for cam profiles is performed by rotating the workpiece in the C axis and oscillating the grinding wheel in the X axis. Mr. Reed’s S40 has been modified to also perform form grinding using simultaneous motion in the C and Z axes. This is possible using a special version of the StuderForm off-line programming package. This modification was spurred after the shop won a job grinding a 350-mm-diameter facial cam. The profile of the round cam resembles a sine wave. (The sidebar on the following page contains photos of this cam and link to an online video showing the C-Z grinding operation.)
The shop commonly grinds bearing components. During my visit, the shop was grinding mating bearing components for a fine-focus assembly in a camera system used to guide weaponry fired from military helicopters. The shop grinds the raceway, inner lens seating surfaces, ID and OD for each mating component. The components are then plated in chromium nitride, which increases their hardness to 86 HRc. The problem the shop’s customer was experiencing was that the heat applied during plating sometimes distorted the parts, which originally caused the costly components to be scrapped. However, using superabrasive grinding wheels, Mr. Reed found a way to grind the hard coating and bring the distorted components back to shape. To date, the shop has saved more than 40 sets for its customer.
High-End Inspection Capabilities
Nearly all grinding work is inspected with an Accura CMM from Zeiss (Maple Grove, Minnesota). In some cases, the shop has more accurate measurement capability than its customers. Having such an accurate measuring instrument eliminates any finger pointing between shop and customer relative to grinding accuracy. In fact, some customers use the measurement data during component assembly. One example is a customer that assembles components to an interference fit. The mating components, which are delivered to the customer laser-etched with an ID number, are paired per measurement data to create the best possible fit.
Mr. Reed appreciates the user-friendly interface of the CMM’s Calypso software, in addition to its helical high-speed scanning and tangential approaching capabilities. Workholding fixtures are often left installed on the CMM’s table for jobs currently in production. That way he can easily mount a part and quickly call up the appropriate inspection program. All measurement data is collected into PDF files, which are burned onto CDs each day. The CDs are then stored off-site in a bank vault.
Mr. Reed has parlayed this high-end inspection capability into some contract measuring work, which helped pay off the CMM. He admits that it is becoming increasingly difficult to schedule time for that side measurement work because the shop has been so busy.
Risks And Challenges
Part of the thrill for Mr. Reed is pulling off particularly tricky grinding jobs. Very rarely will he turn down a job, so long as the part fits in the machine. He admits that it can be tough to correctly price a job that he may see only once. However, he makes the assumption that he will see those jobs again, knowing that he will usually find a way to make the operation more efficient and possibly make more money on the job. Even if repeat jobs don’t follow, the knowledge gained grinding that one tough part could be applied to similar jobs down the line.
The challenge in figuring out how to grind complex components, however, is surpassed by the difficulty finding skilled employees who can do this type of work. Mr. Reed currently runs the machines during the first shift and another employee who works second shift. Because he wears so many hats at the shop, finding time to locate and train new employees isn’t easy. This is a scenario shared by a number of small shops across the country.
Related Content
Inside the Premium Machine Shop Making Fasteners
AMPG can’t help but take risks — its management doesn’t know how to run machines. But these risks have enabled it to become a runaway success in its market.
Read MoreLean Approach to Automated Machine Tending Delivers Quicker Paths to Success
Almost any shop can automate at least some of its production, even in low-volume, high-mix applications. The key to getting started is finding the simplest solutions that fit your requirements. It helps to work with an automation partner that understands your needs.
Read MoreHigh RPM Spindles: 5 Advantages for 5-axis CNC Machines
Explore five crucial ways equipping 5-axis CNC machines with Air Turbine Spindles® can achieve the speeds necessary to overcome manufacturing challenges.
Read MoreThe Future of High Feed Milling in Modern Manufacturing
Achieve higher metal removal rates and enhanced predictability with ISCAR’s advanced high-feed milling tools — optimized for today’s competitive global market.
Read MoreRead Next
5 Rules of Thumb for Buying CNC Machine Tools
Use these tips to carefully plan your machine tool purchases and to avoid regretting your decision later.
Read MoreSetting Up the Building Blocks for a Digital Factory
Woodward Inc. spent over a year developing an API to connect machines to its digital factory. Caron Engineering’s MiConnect has cut most of this process while also granting the shop greater access to machine information.
Read MoreRegistration Now Open for the Precision Machining Technology Show (PMTS) 2025
The precision machining industry’s premier event returns to Cleveland, OH, April 1-3.
Read More


.jpg;width=860)


.jpg;maxWidth=300;quality=90)


