Improving In-The-Cut Time And Part Setups With Ductile Iron Vises
Previously using double-station vises with aluminum bodies, Vincent Precision Machining's workholding upgrade to HDL vises from this manufacturer provided the workholding rigidity that assured repeatable precision part after part, while the setup eliminated expensive scrap parts.
Share


Previously using double-station vises with aluminum bodies, Vincent Precision Machining’s workholding upgrade to HDL vises from Kurt Manufacturing Company (Minneapolis, Minnesota) provided the workholding rigidity that assured repeatable precision part after part, while the setup eliminated expensive scrap parts.
“We struggled through two different workholding setups that did not have the needed rigidity and holding power for these difficult-to-machine stainless steel medical parts,” reports Bill Ehnstrom, owner and sole operator of Vincent Precision Machining. “During heavy milling operations, parts tended to creep upward and out of alignment within the vise jaws. Small chips became imbedded between the part and the vise jaws, causing all kinds of problems. We couldn’t operate our new Bridgeport XP3 VMC from Hardinge, Inc. (Elmira, New York) to its full potential on this part project, so we sought a better workholding solution.” At this juncture, Mr. Ehnstrom contacted his local Kurt sales representative, Mike Neeley, for his workholding recommendations for the new Bridgeport VMC.
An applications engineer with a background as a machine tool salesman and a machining center operator, Mr. Ehnstrom had perceived the need in the upper Midwest’s medical device industry for quality precision machining work at competitive prices, which is what led him to start the company. Specializing in high speed, 3D machining and hard milling to 65 Rc using a new 2XiF machining center from Kitamura Machinery of USA Inc. (Wheeling, Illinois) with two Kurt 3600V vises, the company realized that proper workholding could potentially contribute to creating a quality product while turning a fair profit. The workholding challenge was a 1 1/2-inch by 1-inch by 3/4-inch 420 stainless steel medical device component machined with a series of recessed flat and contoured surfaces inside a center slot. The company’s goal was to produce these components to tight tolerances with a near-perfect finish to avoid secondary operations. Quantity requirements for these parts averaged 250 a week, which was a stretch for the previously tested dual twin station vise setup. Mr. Neeley recommended five side-by-side mounted Kurt HDL vises on the Bridgeport’s 47.2-inch by 23.6-inch (1,200-mm by 600-mm) worktable in lieu of using two vises. For some machining centers, five ductile iron vises would prove too heavy, says the manufacturer. This model Bridgeport, however, has a table load capacity of 2,000 pounds (900 kg) and accommodated the vises, which weighed less than 100 pounds each.
“This 420 stainless material is very hard and difficult to machine with the many complex features we required,” reports Mr. Ehnstrom. “The Kurt HDL vises, with their ductile iron bodies, gave us the rigidity we needed. Plus, the machine table and base are all iron castings, so everything from the vise clamping stations down to the floor is solid iron.”
According to the manufacturer, the bases of Kurt HDL vises are made of 80,000 psi ductile iron, which provides strength, rigidity and long-term accuracy while absorbing vibration (especially when machining hard material such as 420 stainless steel).
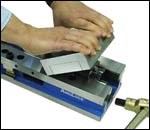
Using changeable iron jaws machined to the medical components’ outer contours, the vises in effect become custom fixtures using a standard model vise base. The parts “nest” inside the machined jaws; when the vise is clamped up, all outer surfaces are held tightly. This can therefore reduce the likelihood of part misalignment or chatter at high speeds. When the part run is completed, jaws can be replaced with others for different jobs. The jaws themselves relocate quickly and precisely without special alignment tools, according to the manufacturer.
“Part loading and unloading requires less than a minute,” says Mr. Ehnstrom. “The parts position within the jaw plate’s machined pockets—no alignment is needed. When the part is machined, less than a half-turn of the vise screw releases it. There’s no wasted motion or heavy labor needed with this setup.
“Before, with the aluminum body vises, part loading took several minutes,” he continues. “With the new arrangement, however, this process takes seconds. The five vises also handle 20 parts, whereas before the two vises handled only eight parts.”
Mr. Ehnstrom says the enclosed design makes it easier to blow out chips and coolant with an air hose. The five-vise setup also frees him for 30 minutes to work on other projects while the machine cycles through all 20 clamping stations.
Each vise on the worktable holds the components for a different series of milling operations performed at cutting speeds as high as 350 sfm, which is well within the range of XP3 capabilities. The VMC has a rapid traverse rate of 43/43/36 meters per minute (1,690/1,690/1,410 ipm). The company says it uses premium toolholders and high-performance solid carbide end mills for all of the milling operations. When completed, each machined component has a 16 mil surface finish and tolerances of ±0.0005 inch on bores—without necessitating secondary operations.
Several features of the vise design expedite Mr. Ehnstrom’s process for reduced cycle time while maintaining quality. With a 21–inch length (533.4 mm length) and 6-inch width (152.4 mm width), the vises are compact and position within 1 inch (25.4 mm) of each other so that less spindle travel is required (part to part) to get into and around parts for complex machining operations. With clamping forces as strong as 5,556 pounds at 70 foot-pounds of input torque, these vises provide repeatable accuracy to 0.001 inch, well within the company’s tolerance requirements.
“The best machining center is only as good as the workholding used,” concludes Mr. Ehnstrom. “After trying three different vise setups, I learned that when machining very hard materials, rigidity makes the key difference. Ductile iron helps me to achieve the desired level of rigidity.”
Read Next
Registration Now Open for the Precision Machining Technology Show (PMTS) 2025
The precision machining industry’s premier event returns to Cleveland, OH, April 1-3.
Read MoreBuilding Out a Foundation for Student Machinists
Autodesk and Haas have teamed up to produce an introductory course for students that covers the basics of CAD, CAM and CNC while providing them with a portfolio part.
Read MoreSetting Up the Building Blocks for a Digital Factory
Woodward Inc. spent over a year developing an API to connect machines to its digital factory. Caron Engineering’s MiConnect has cut most of this process while also granting the shop greater access to machine information.
Read More


.png;maxWidth=300;quality=90)


