How to Drill Holes With a Right-Angle Head
Drilling with a right-angle head in a machining center spindle can be tricky – doubly so if the hole must be peck-drilled. A custom macro and careful attention to positioning help ensure smooth production.
Share


The above video shows a dry run of the FANUC custom macro for simplifying the drilling of angular holes.
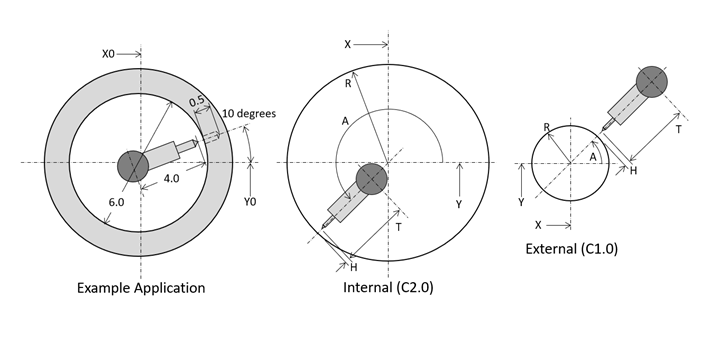
Drilling with a right-angle head in a machining center spindle can be challenging, especially when drilling is not parallel with an axis. Consider, for example, a hole that must be cross-drilled inside a large hole at a 10°-angle (see Fig. 1). Trigonometry is involved, and coordinates will change based upon the drill’s axial length. The issue is further complicated if the hole must be peck-drilled.
The first challenge is often to get the right-angle head to aim the drill at the correct angle, 10° in this case. While the angular positioning of some main spindles can be programmed, most cannot. Instead, the right-angle head must be manually adjusted. When placed in the spindle, the right-angle head’s housing is engaged with a stop-block on the main spindle face. The setup person then manually sets the angular pointing direction for the drill. When the main spindle is activated, typically in the reverse direction for right-hand tools, the drill will rotate, but the housing will remain stationary, firmly securing the drill at the angle to which it has been set.
Figure 1. Example application, where a hole must be cross-drilled inside a larger hole at a 10°-angle.
This FANUC custom macro dramatically simplifies the programming for drilling — or G83-type peck drilling — angular holes. It was developed while helping Chad Kluth of Mid Valley Industries, LLC in Kaukauna, Wisconsin. Chad’s components require angular holes to be drilled inside large bores or into external round/cylindrical surfaces.
The custom macro is called with G65, in much the same way you call a canned cycle. Note that all arguments in the G65 command are tested. For some, an alarm is generated if they are left out. For others, a default value is set.
Here is an example main program:
- %
- O0001
- N005 T01 M06
- N010 G90 G54 G00 X0 Y0
- N015 M04 S250 (Drill is pointing at 10°)
- N020 G43 H01 Z1.0 M08
- N025 G65 P1001 T4.0 X0 Y0 R5.0 C2.0 A10.0 Z-1.0 Q0.1 D0.5 F4.0
- N030 G91 G28 Z0 M19
- N035 G28 X0 Y0
- N040 M30
- %
Letter address arguments in line N025 represent the following (see Fig. 1):
- C: Condition of the hole, 1:external (cylinder), 2:internal (hole)
- T: Tool length, drill tip to spindle center
- X: Center of hole or cylinder in the X-axis
- Y: Center of hole or cylinder in the Y-axis
- R: Radius of the hole or cylinder
- A: Angle from 3 o’clock position. See illustration. Note the difference in specification regarding external and internal surfaces.
- Z: Position of the hole in the Z-axis
- H: Initial approach distance (default 0.1)
- D: Hole depth
- Q: Peck amount; if left out, drill will go to depth in one pass
- U: Peck-approach distance (default 0.03)
- F: Feedrate for drilling
- E: Fast feedrate for retract and peck approach (default 20.0)
Note: The tool length compensation offset value is the distance between tool tip and spindle face in the Z-axis.
Here is the Custom Macro:
- %
- O1001
- (DEFAULTS)
- IF[#11EQ#0]THEN#11=0.1
- IF[#21EQ#0]THEN#21=0.03
- IF[#8EQ#0]THEN#8=20.0
- (ALARMS FOR MISSING DATA)
- IF[#20EQ#0]THEN #3000=100(T MISSING IN CALL)
- IF[#24EQ#0]THEN #3000=100(X MISSING IN CALL)
- IF[#25EQ#0]THEN #3000=100(Y MISSING IN CALL)
- IF[#18EQ#0]THEN #3000=100(R MISSING IN CALL)
- IF[#1EQ#0]THEN #3000=100(A MISSING IN CALL)
- IF[#26EQ#0]THEN #3000=100(Z MISSING IN CALL)
- IF[#7EQ#0]THEN #3000=100(D MISSING IN CALL)
- IF[#9EQ#0]THEN #3000=100(F MISSING IN CALL)
- (INTERNAL/EXTERNAL CALCULATIONS)
- IF[#3EQ1.0]GOTO 5 (EXTERNAL)
- IF[#3EQ2.0]GOTO 25 (INTERNAL)
- #3000=100(MISSING C-WORD IN CALL)
- N5 (EXTERNAL)
- #32=#24+COS[#1]*[#18+#11+#20] (X CLEARANCE)
- #33=#25+SIN[#1]*[#18+#11+#20] (Y CLEARANCE)
- #30=#24+COS[#1]*[#18-#7+#20] (X BOTTOM)
- #31=#25+SIN[#1]*[#18-#7+#20] (Y BOTTOM)
- GOTO 50
- N25 (INTERNAL)
- #32=#24+COS[#1]*[#18-#11-#20] (X CLEARANCE)
- #33=#25+SIN[#1]*[#18-#11-#20] (Y CLEARANCE)
- #30=#24+COS[#1]*[#18+#7-#20] (X BOTTOM)
- #31=#25+SIN[#1]*[#18+#7-#20] (Y BOTTOM)
- N50 (MACHINING MOTIONS)
- IF[#17 NE #0] GOTO 75
- (ONE PASS)
- G00 X#32 Y#33
- Z#26
- G01 X#30 Y#31 F#9
- X#32 Y#33 F#8
- GOTO 99
- N75 (PECK DRILLING LOOP)
- #29=ROUND[#7/#17] (NUMBER OF PECKS)
- #28=#7/#29 (RECALCULATED PECK DEPTH)
- #16=#28 (STARTING PECK DEPTH
- #27=1 (CURRENT PECK)
- G00 X#32 Y#33 (APPROACH)
- Z#26
- N78 IF[#27GT#29]GOTO 99 (LOOP START)
- IF [#3 NE 1.0]GOTO 80
- (EXTERNAL)
- #4=#24+COS[#1]*[#18-#28+#20] (CURRENT PECK BOTTOM X)
- #5=#25+SIN[#1]*[#18-#28+#20] (CURRENT PECK BOTTOM Y)
- #14=#24+COS[#1]*[#18-#28+#16+#21+#20] (CURRENT PECK APPROACH X)
- #15=#25+SIN[#1]*[#18-#28+#16+#21+#20] (CURRENT PECK APPROACH Y)
- GOTO 85
- N80 (INTERNAL)
- #4=#24+COS[#1]*[#18+#28-#20] (CURRENT PECK BOTTOM X)
- #5=#25+SIN[#1]*[#18+#28-#20] (CURRENT PECK BOTTOM Y)
- #14=#24+COS[#1]*[#18+#28-#16-#21-#20] (CURRENT PECK APPROACH X)
- #15=#25+SIN[#1]*[#18+#28-#16-#21-#20] (CURRENT PECK APPROACH Y)
- (PECK DRILLING MOTIONS)
- N85 G01 X#14 Y#15 F#8
- X#4 Y#5 F#9
- X#32 Y#33 F[#8]
- (STEPPING)
- #27=#27+1
- #28=#28+#16
- GOTO78
- N99 M99
- %
Since many CNCs do not make multiaxis motions in a perfectly straight line, we use G01 to fast-feed out of the hole and to the peck-approach position. The fast feedrate is specified with the “E argument.”
Related Content
5 Reasons Why You Should Know How to Write Custom Macros
Custom macros enhance what can be done in G-code programs, giving users the ability to code operations that were previously not possible.
Read MoreHow to Determine the Currently Active Work Offset Number
Determining the currently active work offset number is practical when the program zero point is changing between workpieces in a production run.
Read More4 Commonly Misapplied CNC Features
Misapplication of these important CNC features will result in wasted time, wasted or duplicated effort and/or wasted material.
Read MoreObscure CNC Features That Can Help (or Hurt) You
You cannot begin to take advantage of an available feature if you do not know it exists. Conversely, you will not know how to avoid CNC features that may be detrimental to your process.
Read MoreRead Next
Setting Up the Building Blocks for a Digital Factory
Woodward Inc. spent over a year developing an API to connect machines to its digital factory. Caron Engineering’s MiConnect has cut most of this process while also granting the shop greater access to machine information.
Read MoreBuilding Out a Foundation for Student Machinists
Autodesk and Haas have teamed up to produce an introductory course for students that covers the basics of CAD, CAM and CNC while providing them with a portfolio part.
Read More5 Rules of Thumb for Buying CNC Machine Tools
Use these tips to carefully plan your machine tool purchases and to avoid regretting your decision later.
Read More
.jpg;width=70;height=70;mode=crop)


