Share


Featuring a seventh axis of motion that enables reaching around doors and other objects, Treske Precision Machining’s first-ever collaborative robot is ideal for machine-tending applications. However, machine tending is Plan B. Plan A is to automate manual, hand-gauge inspections of threaded holes.
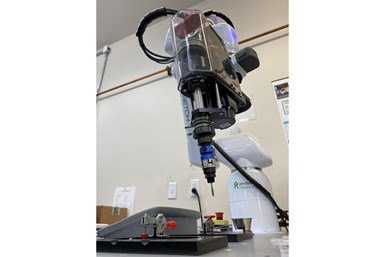
Treske’s goal is to automate one of the most time-consuming tasks in quality control by integrating a collaborative robot with a dedicated thread-gaging head.
Photo Credit: Tim Gilboy, Treske Precision Machining
This machine-tending backup plan does not indicate any lack of confidence in the arm itself. After all, the seventh axis – and even more so, the system’s simple programming – helped spark the idea to automate thread-checks in the first place. As has been the case with past automation projects at Treske, the task is complicated due to the nature of the work, which on any given day might consist of as many as 1,200 unique part numbers winding their way through the shop.
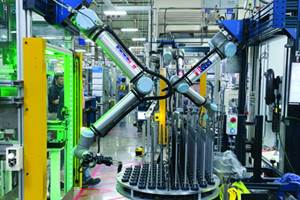
The experience with a second collaborative robot has been very different. As just one component of a pre-integrated machine-tending system that comes standard with all the necessary mounting, part storage and programming, this six-axis arm is already busily loading and unloading coordinate measuring machines (CMMs).
Is “job shop” automation getting easier? Perhaps. Regardless, nothing about Treske’s experience indicates that automation will ever be easy, at least not for those who hope to maximize its potential. Even the essentially plug-and-play CMM-tender works so well in part because it plugs into digitalized workflows that the company has already developed. In this context, the quality control department’s first robots are among the final pieces of an automation puzzle that has been in the works for years.
Whatever the extent of the challenge, intense competition and increased data collection requirements leave no room for Plan B. If Treske’s growth is to continue, the pace of inspection must match the pace of machining. Keeping pace requires providing tools that can liberate quality control personnel in the same way that pallet systems and other physical automation already liberate production personnel. Otherwise, inspectors become essentially glorified machine tenders. “We want to use our inspectors as inspectors,” explains Scott Ferguson, business development manager. “They are most beneficial in reviewing reports, solving problems and providing feedback to manufacturing.”
The Final Puzzle Piece
Robotic thread inspection is not new, but robotic thread inspection in a job shop environment is ambitious. As opposed to loading and unloading a machine, the task requires manipulating diameter pins, pitch gages, “go/no-go” gages and other thread-checking instruments around the part, re-orienting as-needed to align with each hole.
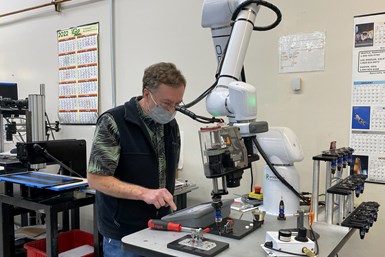
Tim Gilboy, production manager, demonstrates hw controlling the thread gaging process with the robot pendant eases changeover from gage to gage. The arm’s seventh axis also adds flexibility. Photo Credit: Treske Precision Machining
By the time of the shop visit that led to this article, the team had poured months of work into this application. Yet, they seemed undaunted by the challenges to come, preferring instead to riff on the possibilities of leveraging the unusual seventh axis of the arm, an OB7 from Productive Robotics, to access both parts and gages stored in the adjacent docking unit. Further conversation reveals that Treske has always thrived on this kind of creative problem solving, and that in-house automation projects like this one have driven this company’s growth since its deliberate shift away from semi-conductor work in the late aughts.
Since then, the shop floor has come to be dominated by five lines of Makino HMCs, all serviced by rail-guided pallet shuttles jetting back and forth between loading stations that break up the surrounding safety fencing. Whether during the day or skeleton-shift nights, personnel rely on workstation computer displays for instructions and information, such as breakdowns of the tooling in each machine and the workpieces on each pallet. Although some of this data was already available through the Makino cell controllers, this output is customized to be easier to interpret and to prevent the need to “dig” for insights, says Mike Olander, operations director.
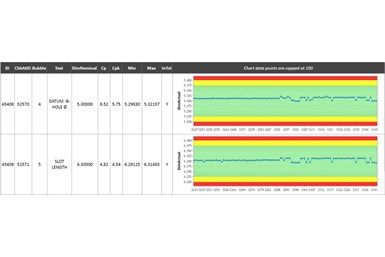
In-process inspections are almost continuous. Whether collected with shop-floor gages or on a CMM, readings feed directly into a real-time statistical process control (SPC) analysis system. The people measuring the parts are empowered by clear prompts and instructions and easy data entry, Olander says. The people watching the trend lines are empowered by standard, custom formatting that reduces the risk of drowning in what Ferguson calls “data overload.”
Frequent in-process inspections, facilitated and streamlined by the intranet, serve a dual purpose. First, they prevent shop-floor bottlenecks by promoting quality parts off the machines. Second, they prevent inspection bottlenecks by collecting data mid-process rather than at the final stage. The “problem” is that throughput has accelerated so fast in recent years that the company has essentially become a victim of its own machining automation. “We could handle managing more work, and we could handle machining more work, but the automation in quality needed to match production,” Ferguson says.
Hence the introduction of the OB7 for thread verification. Meanwhile, the second robot is already helping quality control keep up with machining. As part of the “Tempo” system from Hexagon Metrology – the supplier of Treske’s 6 CMMs – it has freed personnel from not only machine-tending, but also from yet another extensive in-house automation project.
Keeping the Pace
Based on testimony from Ferguson and Olander, Tempo is aptly named. For one, it increases the tempo of inspections. This became necessary with the addition of higher-volume jobs (that is, on the order of several thousand parts per year rather than the more typical several hundred), along with increasing demand for final inspections on entire batches of parts, regardless of the level of in-process inspection. With both forms of measurement competing for time on the same CMMs, inspectors could not keep up, and the feedback loop slowed. Siphoning final-inspection work as-needed to a dedicated, Tempo-tended CMM helps keep other CMMs open.
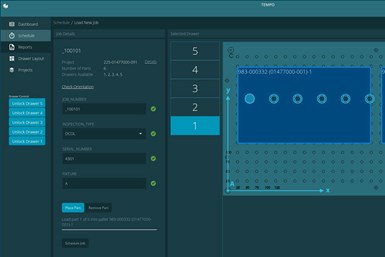
By default, Tempo’s interface is organized around the job number. As shown in this image of the scheduling screen, Treske’s system also includes fields for inspection type and serial number (both of which are drop-down menus). Overall, custom data formatting has been critical for pulling the most relevant information into custom, easy-to-interpret displays that drive inspection workflows and decision-making. Photo Credit: Treske Precision Machining
For another, the system helps inspectors manage the tempo of their work. For example, repeat batches of a high-volume part might take only 2 minutes each to inspect – too little time to attend to anything other than the CMM. Tempo not only eliminates the need to stand in front of the machine, but also works at a precisely predictable pace. Inspectors typically carve out 10 or 15 minutes to reload the drawers and keep the system going when its work is almost finished. Rather than stressing about work piling up in front of the CMMs, they can maintain focus on more thought-intensive tasks, such as reviewing data and troubleshooting. “They can really do everything they’ve always done, but with an extra machine’s worth of runtime throughout the shift,” Ferguson says.
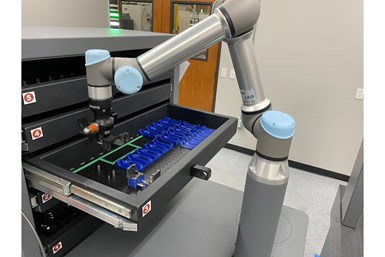
Beyond swapping the parts in the drawers (which can be done while the system runs), operation is mostly a matter of queuing up the PC-DMIS measurement routines. There is no need to teach or otherwise program the motion of the robot, provided by Universal Robotics. No one has had to think much about the necessary arm motion, gripper orientation, clamping pressure and other variables required to open a drawer, retrieve a part, place it on the CMM table, then return it to the drawer after inspection. “Our original plan was to develop some type of automated loading system in quality control. But starting from scratch? There’s a lot to it,” Ferguson says.
Just ask Tim Fugate, leader of the still-ongoing effort to automate thread verification. Granted, he and his colleagues did not exactly “start from scratch” in this case. Robotic thread measurement is a well-established application, and, not unlike Tempo, the RTU-SM2 thread verification unit at the end of the robot arm shipped from supplier New Vista with everything most users would require. However, the challenges of a high-mix workload make this application particularly ambitious, Fugate says. As detailed below, work continues on driving the process not through the New Vista head, but through the collaborative robot interface.
Tempo, meanwhile, is running for an average of 16 hours per day at the time of this writing (a figure that will likely continue to improve). Nonetheless, even with a pre-engineered system, “plug-and-play” simply is not in Treske’s DNA. As is the case with thread checking, the company is finding its own rhythm in adapting the automation to its high-mix, data-driven workflow.
Easier, But Not Easy
Olander and team may have found their own rhythm with Tempo, but they did not get there alone. Although fully ready for tending the CMMs, the out-of-box system was not fully compatible with Treske’s digitalized workflow. Getting there required help from the supplier in storing and labeling the PC-DMIS output in a manner that would enable Treske’s system to extract the data for display in custom dashboards.
Pulling the most relevant information for real-time inspection tracking, including SPC, directly from CMM output (PC-DMIS) makes trends easier to identify in masses of inspection data. This system is critical for keeping pace with machining regardless of whether CMM tending is automated. Photo Credit: Treske Precision Machining. Cooperation from Hexagon Metrology, supplier of Tempo and Treske's six CMMs.
The work that followed mirrored collaboration with the same supplier on CMM output years ago, when Treske first sought to customize data fields and headers for its custom intranet. Even prior to that, the company had made essentially the same strides with the machining cell controller output, among other systems. In fact, everyone in the company takes their cues from custom, department-specific dashboards that consolidate and clarify relevant information from anywhere on the shop’s network, from ERP (Epicor) to document management (Omnify) to the software that drives the CMMs (PC-DMIS).
“We pull what we want into our database, and put it through the workflows,” Olander explains. “We develop our own pages and programs to display what’s relevant, and we prompt actions to happen based on that.”
For quality control personnel tasked with tracking trends and driving improvements, “what’s relevant” includes more than just whether parts are good or bad. For example, the company’s flexible production system might enable the same part to run on different fixtures in different machining cells, depending on available capacity. Selecting the appropriate fixture from the custom drop-down in Tempo’s scheduling system ensures that this information will be readily at hand if it is needed. In short, Tempo works well in this job-shop-like environment, but only because it has been configured to output data in Treske’s custom, standardized format.
The work of automating thread-checks after CMM inspections has been far more extensive, but no less essential. After all, automated CMM tending would be worth little if parts with multiple, threaded holes piled up afterward, awaiting the attention of someone with the time and skill to check each thread with a different hand-gage. Similarly to CMM tending, collaborative robots offer the potential of a flexible solution that works in a job-shop environment.
Specifically, the OB7 offers a tile-based programming interface that makes queuing up different thread checking routines a simple matter of drag-and-drop. The plan is that the robot will cycle autonomously through multiple holes, swapping out
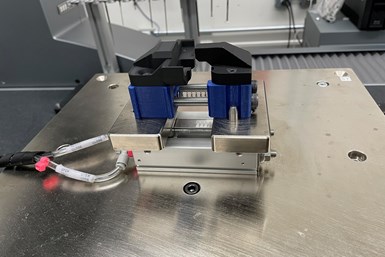
At the foundation of Tempo’s workholding system is the universal pneumatic jaw on the CMM table. The dual-purpose end-of-arm tooling never changes – a knob to open the drawer and a simple two-jaw gripper to interface with universal mounting clamp, which is a standard part of the Tempo system that Treske prefers to 3d-print in-house. One end of this clap mates with part-specific jaws while the other orients parts on the grid system in each drawer to enable the robot to approach the same way every time. Photo Credit: Treske Precision Machining
thread-gages as-needed from the racking system that came with the RTU thread verification head. Operators need only intervene to change parts, which is accomplished via a standardized workholding system similar to the one Tempo uses. “We created template tiles for generic hole programs, and a generic complete part program, so we just have to set specific coordinates for the holes within those templates,” Fugate explains.
The Work is Worthwhile
The robot and head did not come pre-integrated. As Fugate explains it, using the pendant to control the process required connecting a number of I/O signals between the OB7 and the thread verification PLC, using relays to ensure electrical isolation (each unit has its own power supply). Tool changes required particular attention. This signal must be sent from the tool magazine to the thread-verification unit PLC, and then translated to the OB7, he says. “Once OB7 knows how the signal reads, we can build logic into our part programs accordingly. This gives us the ability to run go gage and no-go gages for different thread sizes on the same part without operator assistance.”
Overall, Treske’s experience proves that automation need not be limited to repetitive processes. However, nothing about that experience suggests that integration is ever likely to be a matter of simply dropping technology into place — and perhaps that’s OK. The work is worthwhile, even if it is always ongoing. And in the (seemingly unlikely) event that thread verification doesn’t work out for Treske, the company will doubtless find another clever way to employ its new collaborative robot.
Related Content
4 Steps to a Cobot Culture: How Thyssenkrupp Bilstein Has Answered Staffing Shortages With Economical Automation
Safe, economical automation using collaborative robots can transform a manufacturing facility and overcome staffing shortfalls, but it takes additional investment and a systemized approach to automation in order to realize this change.
Read MoreIncreasing Productivity with Digitalization and AI
Job shops are implementing automation and digitalization into workflows to eliminate set up time and increase repeatability in production.
Read More3 Ways Artificial Intelligence Will Revolutionize Machine Shops
AI will become a tool to increase productivity in the same way that robotics has.
Read MoreInvesting in Automation, Five-Axis to Increase Production Capacity
To meet an increase in demand, this shop invested heavily in automation solutions and five-axis machines to ramp up its production capabilities.
Read MoreRead Next
5 Rules of Thumb for Buying CNC Machine Tools
Use these tips to carefully plan your machine tool purchases and to avoid regretting your decision later.
Read MoreRegistration Now Open for the Precision Machining Technology Show (PMTS) 2025
The precision machining industry’s premier event returns to Cleveland, OH, April 1-3.
Read MoreSetting Up the Building Blocks for a Digital Factory
Woodward Inc. spent over a year developing an API to connect machines to its digital factory. Caron Engineering’s MiConnect has cut most of this process while also granting the shop greater access to machine information.
Read More






.jpg;maxWidth=300;quality=90)
