Share


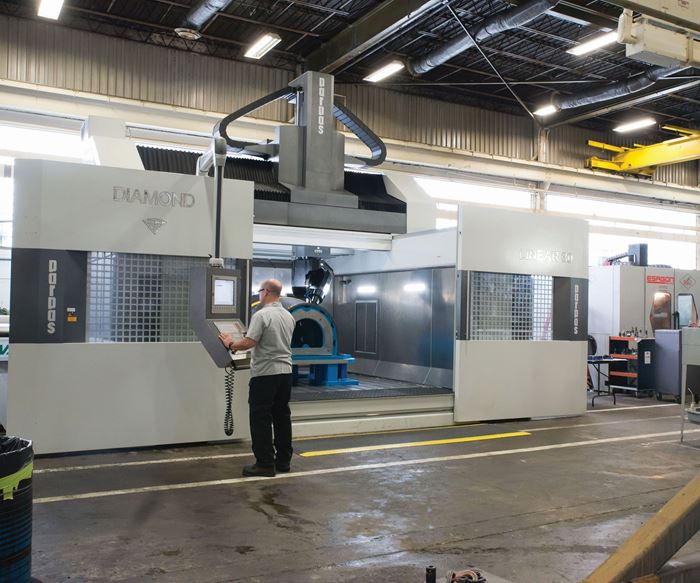
Large, monolithic parts are the trend in many aerospace and defense systems. These parts call for machine tools with the capacity to process them, often in three, four or five axes. However, it is difficult to maintain the accuracy of large machine structures, especially in the outer reaches of axis movement. Calibrating and adjusting a machine to hold tight tolerances is time-consuming and the results may be incomplete, uncertain or not long-lasting.
Automated Precision Inc. (API) has developed a volumetric-error-compensation (VEC) process designed to overcome these limitations. This process was the result of a project originally coordinated through the efforts of the National Center for Manufacturing Sciences and its Commercial Technologies for Maintenance Activities program. API’s now-patented approach is intended to capture machine error and apply this data in the machine controller to correct for the error. According to the company, this technology enables a machine to achieve a tolerance within 0.005 inch over the entire 20 by 10 by 5 foot or larger volume of its work envelope.
The method uses a laser tracker, an active target and analysis software to derive parametric-equation-based, real-time position and path compensation for a large machine equipped with a modern machine tool controller. The results are said to promote the production of large parts so accurate that they are interchangeable in assembly operations, thus avoiding inefficient and costly assembly accommodations such as make-to-fit, drill-at-assembly, shim-as-needed and rework.
API's VEC process is essentially a method to create a volumetric map that shows the position of the tool tip in hundreds of points in all possible poses of which its arrangement of linear and rotary axes is capable. Creating this map is an alternative to how a typical three-axis machine used the traditional 21-error-parameter method to measure machine axis errors. In that example, measurements were taken one at a time along the X, Y and Z axes to detect errors in six parameters (linear position, vertical straightness, horizontal straightness, pitch, yaw and roll). Each error parameter required a different setup, and each required its own measurement process. In addition to these 18 error parameters, three more error parameters were checked to determine squareness of the X, Y and Z axes to each other (X to Y, Y to Z and Z to X) for a total of 21 error parameters. The company notes that even with the most sophisticated laser, acquiring this data is a long process that does not count time to check roll error in the Z axis, which must be determined by some other means.
API’s process consists of a precision laser tracker with an interferometer capability. The interferometer feature is the same technology that has been used with traditional laser systems for years to calibrate machine tools. Coupling the interferometry technology with a laser tracker enables it to track the machine’s tool-tip location during extensive axial movements throughout the entire volume of the machine, the company says.
To measure and track the tool-tip position accurately, API developed a spindle-mounted targeting system called an active target. The active target is described as a compact, motorized-target system that enables the laser tracker to accurately measure the machine’s tool-tip position from the laser tracker’s position. This capability is significant because the VEC process intentionally exercises the spindle in real time through all the machine’s axes during the measurement routine.
By using the laser tracker and active target, all 21 error parameters for 200 to 400 randomly selected points within the machine’s work envelope can be measured. These points represent all possible machine poses, including the rotary axes. The company says that each point is an accurate reflection of the machine’s kinematic errors. A software algorithm extracts error sources and builds an extremely accurate volumetric map. Based on this map, compensatory values are added or subtracted to the appropriate axis positions as an adjustment to offset the error.
In addition to the measuring routine, the API solution includes proprietary calibration software that uses a polynomial-equation-based kinematic model of the machine to map errors throughout its work envelope. In order to compensate for machine error in real time, the API software resides on the machine’s controller or an industrial computer interfaced to it.
In simple terms, the software uses the measurements from the laser tracker and active target, then develops compensation values to reduce machine errors. Once the machine is put back in production, the API software runs in the background to monitor the programmed tool path and apply real-time compensations automatically to keep the tool tip at the desired location.
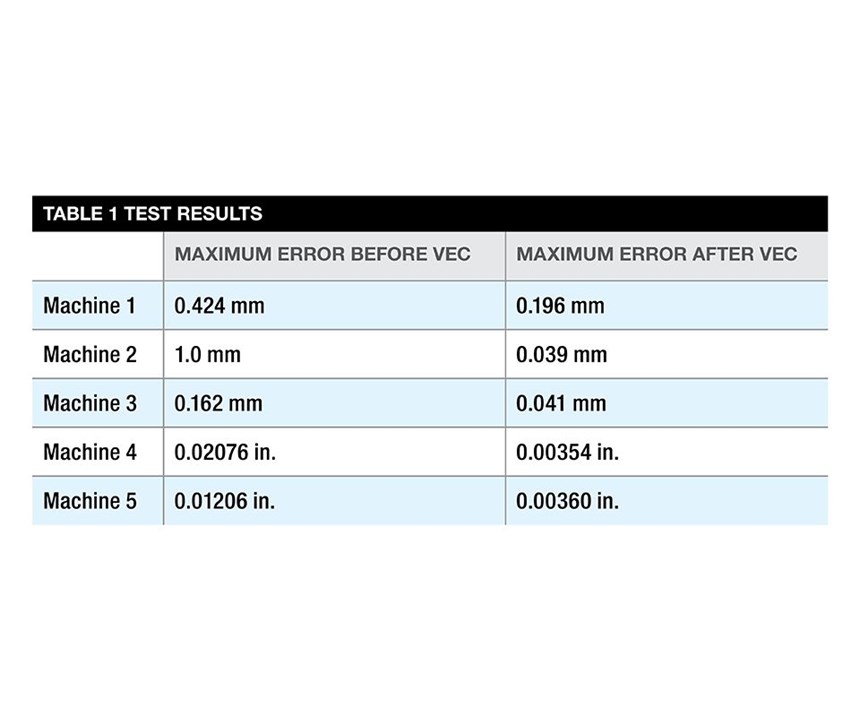
The company reports that in a variety of field tests, this method improved machine tool accuracy by fourfold or better. The table above, provided by API, shows five different types of machine tools to which VEC was applied. The largest single error in any parameter of the machine served as a benchmark in these tests.
According to the company, a large machine tool can be calibrated and get excellent results using this method in a few hours instead of a week or more.
Related Content
Choosing the Correct Gage Type for Groove Inspection
Grooves play a critical functional role for seal rings and retainer rings, so good gaging practices are a must.
Read More6 Machine Shop Essentials to Stay Competitive
If you want to streamline production and be competitive in the industry, you will need far more than a standard three-axis CNC mill or two-axis CNC lathe and a few measuring tools.
Read MoreThe Many Ways of Measuring Thickness
While it may seem to be a straightforward check, there are many approaches to measuring thickness that are determined by the requirements of the part.
Read MoreRethink Quality Control to Increase Productivity, Decrease Scrap
Verifying parts is essential to documenting quality, and there are a few best practices that can make the quality control process more efficient.
Read MoreRead Next
Registration Now Open for the Precision Machining Technology Show (PMTS) 2025
The precision machining industry’s premier event returns to Cleveland, OH, April 1-3.
Read MoreSetting Up the Building Blocks for a Digital Factory
Woodward Inc. spent over a year developing an API to connect machines to its digital factory. Caron Engineering’s MiConnect has cut most of this process while also granting the shop greater access to machine information.
Read More5 Rules of Thumb for Buying CNC Machine Tools
Use these tips to carefully plan your machine tool purchases and to avoid regretting your decision later.
Read More


