Contract Machining Firm Meets Zero Defects Goal Using Automated Gaging Solutions
This shop specializes in low- to high-volume subcontract manufacturing of machined castings and forgings for the construction, off-road heavy equipment and automotive industries. The operations are housed in a 150,000-square-foot facility with approximately 95 machine tools.
Share


Finding innovative ways of helping his company’s 200 employees produce quality parts at a profit is “job one” for Hubert J. Mennie and his family. By working hard and smart, Mennie Machine Company Inc. (Mark, Illinois) has grown from a simple garage operation in 1970 into one of the Midwest region’s most successful contract machine shops.
Mennie Machine specializes in low- to high-volume subcontract manufacturing of machined castings and forgings for the construction, off-road heavy equipment and automotive industries. The operations are housed in a 150,000-square-foot facility with approximately 95 machine tools.
When asked how the company weathered the recent economic downturn, vice president Bill Mennie replies, “What downturn?” Mennie Machine has been running three shifts, 7 days a week, for months. Bill Mennie says that diversifying its customer base between the construction and heavy equipment industries, and becoming a Tier I and II supplier of parts for popular light trucks and SUVs, helped the company to sustain and even grow during the recession. Challenging its staff to continually innovate also had something to do with the company’s success. One example was automating many manual processes.
The move to automation began in 1997, with the production of cast iron rear-axle wheel hubs for heavy-duty pickup trucks. Initially, Mennie was asked by its OEM customer to step in when another supplier couldn’t deliver on the parts contract. The company had only 5 days to organize, meet the process requirements and begin shipping parts, so it ran the parts using four CNC vertical lathes with two operators. Everything was done manually, including setting up the parts and loading and unloading the machines. Each part was also manually inspected to ensure consistent quality. The critical main bearing bore, which must be held to ±0.001 inch on diameter, was measured with a dial bore gage—a time-consuming process that made the job unprofitable.
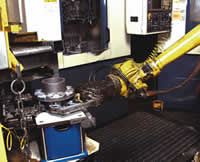
The Mennie machine team decided to automate production by installing a Fanuc S430i robot to load and unload the lathes. Two inter-operational gages from Marposs (Auburn Hills, Michigan) were installed to monitor and control the machining cell.
The hub castings are machined in two separate chuckings on Daewoo Puma V10 vertical lathes. Following the first set of machining operations, the robot transfers the part into a Marposs Universal Quick Set gaging system, which automatically measures the ID and OD dimensions from Op 10. The part is then removed from the gage by the robot and placed in the Op 20 lathe. A second Universal Quick Set gage inspects the part following Op 20. The gage automatically measures the part ID and OD. A length measurement is also made using a Marposs Quick Block measuring unit moving on a pneumatic slide. Both Universal Quick Set gages are connected to Marposs E9066 PC-based industrial workstations that process the data and interface with the system controller. Data from the gages is used to automatically compensate the machine tool offsets without human intervention. A trending function in the gage amplifier prevents over-compensating the machine tools. Company engineers have also used data from the gages to develop predictive maintenance routines for the machining processes.
Automating the wheel hub machining and inspection process enabled the company to produce more parts with fewer operators. But the increased productivity and improvement in quality were the real measurable benefits. “We now have fewer scrap problems because we’ve removed the errors from the system,” says Bill Mennie.
“Frankly, at first, no one here wanted the automatic gages,” says vice president David Mennie, “but it was only fear of the unknown. Once we convinced our operators and our engineering staff that this technology works with very little maintenance and that it makes life easier, they were sold.”
With its first automated system, Mennie Machine proved that it could meet its commitment to delivering zero defect parts. The company has since duplicated the automation on two additional hub-machining production lines comprised of 28 CNC vertical lathes. One Marposs Universal Quick Set gage with E4N column amplifiers is used to monitor and control the production of four lathes doing identical operations in cellular arrangements.
As a result of the success with the Universal Quick Set inter-operational gages, the managers at Mennie have implemented several other automated measurement and inspection applications. These include the use of Marposs Mida spindle touch probes to set up cast ductile iron transmission components before machining.
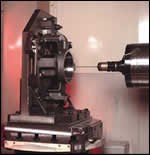
These large, high-value parts used in off-road vehicles weigh between 60 and 130 pounds. The parts are machined in a three-step process using two vertical lathes and a horizontal machining center in each cell. In Op 30 on the HMC, all machined surfaces of the part must be held in relation to a central bore. A Mida touch probe inserted in the machine spindle quickly and accurately locates the center of the bore so the machine control offsets can be adjusted according to the actual part position.
Probing the part requires less than 1 minute. A standard routine directs the probe stylus to contact the main bore in four locations, and the center is then automatically calculated. That point is used to determine the machine control offsets necessary to compensate for any mislocation of the part or fixture from the nominal position. The probes are re-calibrated daily using a standard routine supplied with the Mida software.
“With the touch probe, you always know you’re dead-on the center of the part,” says Joe Smoode, plant manager at Mennie Machine. “Before, we were always gambling on whether the fixture was correct or if the part was loaded properly. Now we verify the critical dimension using the Mida spindle probe and set the machine zeroes off of that point.”
After machining the first side, most shops would take the part off the machine and re-fixture it in a second machine to finish the other side. But Mennie’s fixtures are designed so there is access to both sides of the part. After machining the first side, the fixture is indexed and the part is probed again to relocate the bore center before machining the second side.
Applying Marposs Mida touch probes is an important part of Mennie Machine’s zero-defects strategy. The probes, combined with innovative fixturing, help to reduce part handling. By automating the process, one less machine is required, which helps Mennie control its costs.
While implementing advanced measurement and control techniques for many of Mennie Machine’s production machining systems forced it to give up some of its old methods, brothers Bill and David Mennie have never looked back. “Without change, there’s no way we could have remained competitive in the market,” says Bill Mennie. “We would become a standard machine shop just like everyone else.”
Read Next
5 Rules of Thumb for Buying CNC Machine Tools
Use these tips to carefully plan your machine tool purchases and to avoid regretting your decision later.
Read MoreSetting Up the Building Blocks for a Digital Factory
Woodward Inc. spent over a year developing an API to connect machines to its digital factory. Caron Engineering’s MiConnect has cut most of this process while also granting the shop greater access to machine information.
Read MoreRegistration Now Open for the Precision Machining Technology Show (PMTS) 2025
The precision machining industry’s premier event returns to Cleveland, OH, April 1-3.
Read More


.jpg;maxWidth=300;quality=90)


