A Unique Additive/Subtractive Process for Injection Mold Components
This hybrid machining approach takes advantage of the benefits of deposition 3D printing while using CNC machining to overcome its limitations.
Share


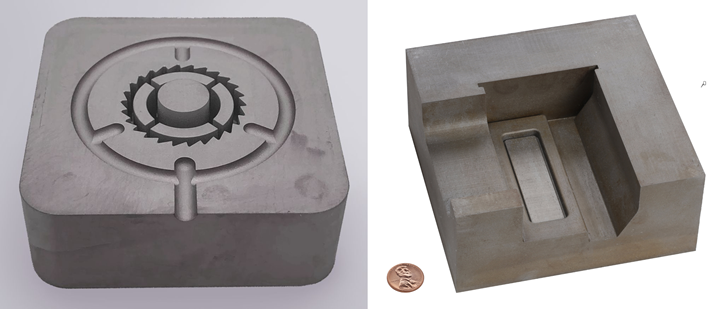
In last month’s CNC Tech Talk column, I stated that each form of manufacturing – additive or subtractive – has limitations that are easily overcome by the other. This month, I will elaborate on one of the hybrid machining approaches that I introduced last month. Developed by Mantle Inc., it takes advantage of the benefits afforded by deposition 3D printing, and it uses CNC machining to overcome deposition 3D printing limitations. I will concentrate on how this process is particularly applicable to producing injection mold components – core and cavity inserts – made from P20-equivelant and H13 materials. Still, you will likely discover other feasible applications.
Deposition 3D printing is the most common form of additive manufacturing. With this technology, material is deposited – usually by extruding it through a nozzle – onto a build surface, layer by layer. Countless hobby- and industry-grade fused filament fabrication (FFF) 3D printers exist that extrude melted plastic or plastic infused with other materials, like wood, carbon fiber or metal.
Our hybrid machine’s deposition method differs from FFF in at least five ways:
- This machine extrudes metal-infused paste instead of heated plastic.
- A removable and reusable build plate contains a pocket filled with a special build surface material. CNC milling flattens the build surface to ensure that the first layer will properly adhere.
- Once each layer is extruded, a heater dries the material. This solidifies the material and improves its density by removing moisture, and in turn, minimizes shrinkage during the upcoming sintering process. Material consistency after drying is that of a crayon, making it very easy to machine.
- Milling is done after each layer to flatten the top of the layer. This ensures good adhesion for the next layer. Precision milling is done after every ten layers to smooth sidewalls and cut fine features.
- Vacuuming is automatically done during every CNC milling operation to remove machined particles.
After the 3D printing/CNC milling process, the removable build plate is placed in a sintering furnace with the printed component still attached. During sintering, the build surface dissolves away, ensuring easy component removal and consistent component shrinkage.
While the process sounds complicated, this methodology produces a component that will have all the needed qualities of a mold-ready component. Mold surfaces commonly require no post-process work.
Common results:
- Accuracy of 0.004 inches or less in a 4-inch cubic volume
- Hardness of 42 on the Rockwell C scale for H13, 32-Rc for P20-equivalent
- Surface finish of 1-3-microns RA
- The same characteristics as metals (H13 or P20) produced with conventional methods.
The software for this hybrid machine resembles that used for any 3D printer. Once a model is created using 3D-modeling software, a stereolithography (STL) file is exported. The STL file is then imported to the software, where parameters are set to specify how the component is to be printed and milled. This step usually takes less than an hour.
The main deposition advantage for mold components
Any form of additive manufacturing that uses a layering approach will enable complex geometries – especially internal geometries – that are impossible to produce with subtractive manufacturing methods. Of particular importance for mold making is the creation of cooling channels. Channels created with a 3D-printing process can follow any path. This is especially important when conformal cooling is required; these channels can conform to the shape of the molded component and provide superior cooling and mold performance.
While some of these points may be obvious, this process would not produce acceptable results without the help of CNC machining. Consider these examples:
- Milling to flatten the build surface material ensures appropriate nozzle height and adhesion for the first layer. Compared to probing the build surface to deal with flatness and angularity issues (as many FFF 3D printers do), this method ensures perfect squareness/angularity between the bottom of the component and other component surfaces.
- Milling after each layer ensures consistent adhesion for each subsequent layer. This, in turn, provides consistent density within the component (no voids).
- Fine-feature milling after each ten layers ensures a smoothness that cannot be achieved by deposition 3D printing alone.
Post-process work is commonly limited to tapping the cooling channels and grinding to ensure flatness and squareness. Since sintered components have the same characteristics as traditional materials, they need no special considerations — for other post-processes, like texturing, laser welding or EDM.
If a better surface finish is required on the molded component, polishing is certainly possible, just as it is with any other kind of P20 or H13 material. If required, it is also possible to heat treat sintered components to increase hardness.
An important limitation: This process does not allow for overhangs that require support structures as FFF 3D printing does. Fortunately, at least from the standpoint of producing injection mold inserts and mold components, the required draft angles are in a direction opposite those of overhangs. For most mold components, geometry does not include overhangs.
The benefits of this process are numerous. Users have documented the hybrid Mantle process routinely removes 60 to 80% of the time it would take to create injection mold tooling inserts with conformal cooling channels and complex geometries using traditional CNC. Because toolpaths are automatically generated, the skill levels needed to produce high-quality components are on par with a 3D printer operator, rather than a toolpath specialist. And in cases where prototypes must be created in a tough-to-mold production material, the P20 and H13 tool steel inserts are often a better fit for the task than aluminum tools or 3D-printed plastics inserts.
Related Content
Obscure CNC Features That Can Help (or Hurt) You
You cannot begin to take advantage of an available feature if you do not know it exists. Conversely, you will not know how to avoid CNC features that may be detrimental to your process.
Read More2 Secondary Coordinate Systems You Should Know
Coordinate systems tell a CNC machine where to position the cutting tool during the program’s execution for any purpose that requires the cutting tool to move.
Read More3 Mistakes That Cause CNC Programs to Fail
Despite enhancements to manufacturing technology, there are still issues today that can cause programs to fail. These failures can cause lost time, scrapped parts, damaged machines and even injured operators.
Read More6 Ways to Streamline the Setup Process
The primary goal of a setup reduction program must be to keep setup people working at the machine during the entire setup process.
Read MoreRead Next
Registration Now Open for the Precision Machining Technology Show (PMTS) 2025
The precision machining industry’s premier event returns to Cleveland, OH, April 1-3.
Read More5 Rules of Thumb for Buying CNC Machine Tools
Use these tips to carefully plan your machine tool purchases and to avoid regretting your decision later.
Read MoreSetting Up the Building Blocks for a Digital Factory
Woodward Inc. spent over a year developing an API to connect machines to its digital factory. Caron Engineering’s MiConnect has cut most of this process while also granting the shop greater access to machine information.
Read More
.jpg;width=70;height=70;mode=crop)


.jpg;maxWidth=300;quality=90)


