Measuring Squareness With Air
The right angle is one of those things that man has created in his mind. In nature it happens only by chance. However, the importance of this concept—which results from the perpendicular intersection of lines or surfaces—applies to many things, including architecture, civil engineering, agriculture and manufacturing.
Share


ECi Software Solutions, Inc.
Featured Content
View MoreThere are a number of different terms used to describe this relationship, including “perpendicularity,” “90 degrees,” “normalcy” and “squareness.” In engineering products, which may not have perpendicular surfaces, the right angle is used in the dimensioning of rectangular coordinates. In manufacturing, the implementation and measurement of perpendicularity is never perfect. Instead, it is assessed as having achieved a greater or lesser degree of perpendicularity.
The most common method to inspect for perpendicularity is to compare the part with a master square, which can be steel, granite or ceramic. A faster, more automated way of checking surface plate perpendicularity is with an electronic height gage. While the electronic height gage may not have the level of mechanical perpendicularity that is built into a precise master square, it is a very repeatable gage. This allows any inherent inaccuracy to be measured and corrected, thereby improving the total performance of the gage.
Master squares or height gages are great for checking perpendicularity in machine tools or part lengths of more than 4 inches (10 mm) . However, those big boys become too cumbersome for measuring perpendicularity in parts where lengths are less—say a hole to a face where the hole diameter is 1 inch (25.4 mm) and the face about the same length. There is a better way.
It comes back to air gaging, that same versatile tool that can measure a lot of locations in some pretty small areas. Though most frequently used for diameter measurement, an air plug and platen can be readily configured to measure perpendicularity—though it kind of measures it from inside out. Think about using a master cylindrical square: The normal way of using it is to place it on a granite surface plate to set up the reference square. The face of the cylinder is square to the surface and constitutes a comparative surface against which to check your part.
With air tooling for squareness, the air plug is square to the platen that holds it and is manufactured to a very high tolerance. Therefore, the accuracy of the squareness plug is built into it, much like the cylindrical square on the granite plate. Rather than transfer the squareness reading from the gage to the part, the air tooling becomes the master, and the part is compared to it using the built-in air jets. Using two jets at 180 degrees and at different heights sets up the method for comparing out-of-squareness.
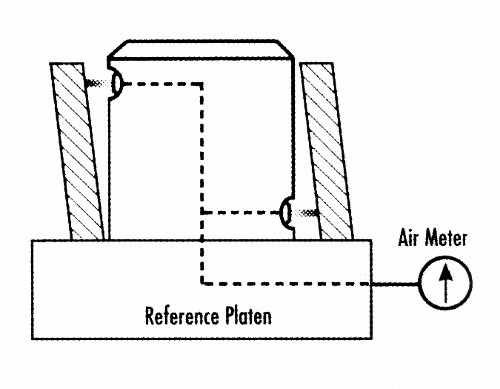
As shown in Figure 1, page 56, the tooling creates the reference square, and the single pair of jets will monitor the out-of-square condition of the face to the ID. This is not a static check, though. The part must be rotated 180 degrees. Comparison of total indicator reading (TIR) shows the relative squareness compared with a nominal master (usually a master ring with controlled face squareness). The total indicator reading can be taken by watching the movement of the indicator reading from its minimum to its maximum value. In the case of an electronic readout, using the dynamic mode for TIR will gather this value automatically.
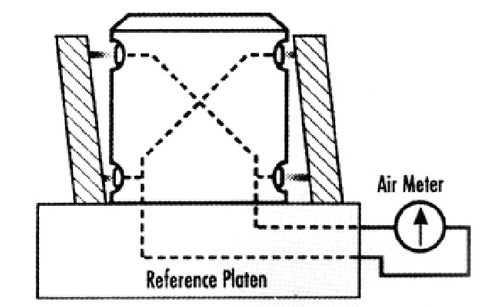
A second method (shown in Figure 2) is very similar, but it uses two pairs of opposing jets in a differential mode. Top and bottom jets on each side of the air plug are channeled to opposite sides of a special air meter to provide a differential measurement. Lack of squareness is indicated by movement of the meter hand as the part is rotated on the reference platen. This method is used primarily when squareness readings should not be influenced by any taper condition.
The critical thing to remember about this type of measurement is that the jets are only measuring over the distance between them. For example, the tolerance on the parts illustrated is 0.001 inch over the part’s length of 1.00 inch. Looking at the gage, you can roughly say the pair of jets is covering about 80 percent of the total length. Thus, the tolerance of the gage would be 0.0008 inch.
If the length of the part and the jets are very close, tolerances can get tight. Pay close attention to the actual gaging tolerance to ensure accuracy of the squareness measurement.
Read Next
Registration Now Open for the Precision Machining Technology Show (PMTS) 2025
The precision machining industry’s premier event returns to Cleveland, OH, April 1-3.
Read More5 Rules of Thumb for Buying CNC Machine Tools
Use these tips to carefully plan your machine tool purchases and to avoid regretting your decision later.
Read MoreBuilding Out a Foundation for Student Machinists
Autodesk and Haas have teamed up to produce an introductory course for students that covers the basics of CAD, CAM and CNC while providing them with a portfolio part.
Read More


.png;maxWidth=150)


.jpg;maxWidth=300;quality=90)


