AGD Versus DIN Style
Use this as a primer in master ring philosophy.
Share


Autodesk, Inc.
Featured Content
View More


ECi Software Solutions, Inc.
Featured Content
View MoreIn today’s manufacturing environment, most people are comfortable working to the industrial standards that apply to their region. In the United States, the standards might originate from any one of several groups with acronym names such as ANSI, ASME, AGMA or others, depending on what products are being manufactured.
However, if a company wants to be a player in the global market, it must be familiar with—and potentially use and manufacture products to—standards from other regions and countries. It’s not uncommon for each country to have its own standards and thus demand slight differences in products or features. For example, one would have to know DIN and ISO standards for Europe, JIS standards for Japan, and SAC for China.
We manufacturer and inspect precision rings for the U.S. to the ASME B47.1 standard that defines the gage blanks and then to ASME B89.1.6 for final inspection and classification. A master ring, or ring gage, is basically a bore of known dimension used as a setting master for variable inside-diameter gages such as bore gages, air tooling and mechanical plug gages. The ASME standards define the rings in classes, with XXX indicating the tightest tolerances; XX, X and Y denoting intermediate grades; and Z the lowest. Class tolerances vary by size; larger sizes have more open tolerances since they are harder to manufacture.
For example, the following tolerances would apply for a 0.820-inch master ring:
Class XXX = 0.00001 inch
Class XX = 0.00002 inch
Class X = 0.00004 inch
Class Y = 0.00007 inch
Class Z = 0.00010 inch
Of course, the better the class, the more expensive. The XXX ring is manufactured to a tighter tolerance, and there is cost involved with this. It may take longer to manufacture, take the skill of a more highly paid technician or, if something goes wrong, it may have to be remanufactured and take longer to deliver.
This class philosophy comes from the way we tend to master our gages here in the U.S. The idea is to make a master as close to the nominal size as possible and then set the gage display to read zero when the master is placed on the gage. But as noted, this can be a cause for added cost, longer delivery time and shorter master life when the highest grade of masters are specified.
In much of the rest of the world, DIN masters (or some derivation of these standards) have been adopted. DIN 250 A, B and C are pretty much used to manufacture and measure the precision rings. In both systems, a precision hole is bored in a piece of steel and precisely refined to a known size, form and surface finish. But in the DIN world, things are a bit different, both in terms of physical dimension and mastering philosophy. Let’s look at some of the small differences between an AGD and DIN Type B ring used for mastering air gaging.
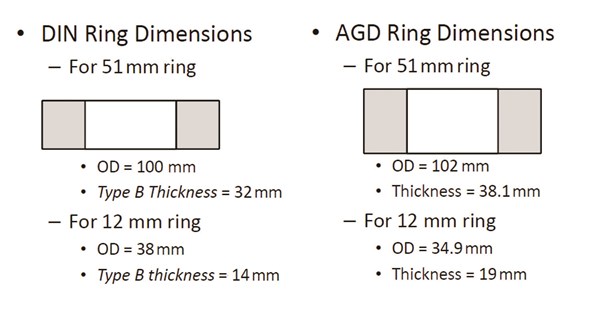
As seen in Figure 1, for example, there is a slight difference in the physical size of the ring blanks or “hole holders” being used for the masters:

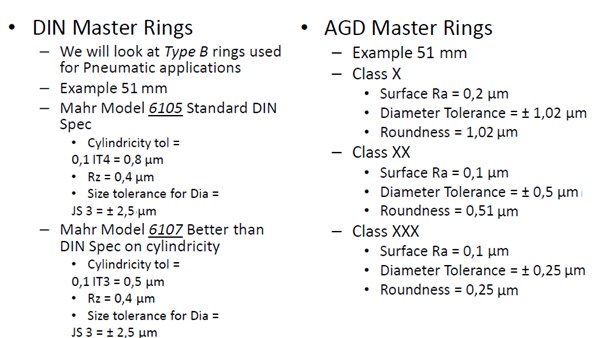
The real difference comes in the tolerances on the bore. This is reflective of the way the master ring is used in the philosophy of the mastering routine. As seen in Figure 2, the diameter tolerance for the DIN ring is twice as much as a Class X AGD master ring: for this size, 2.5 µm for the DIN and 1.02 µm for the AGD. But the roundness is tighter in this area. So this says the actual size of the hole is really not important. So long as it’s round, the surface finish is good and the shape is cylindrical, you can get the best results from the mastering process just by knowing the size and using it as part of the mastering routine. What’s also different is that the deviation from the nominal (within the spec) is marked on the master ring. This way, the user knows what the deviation is and can use it as part of the mastering routine.

Thus, the difference in the mastering philosophy is a result of the way the standards are used. With the DIN philosophy, the deviation of the master itself is used to improve the performance of the mastering process, rather than trying to build greater accuracy into the master. In a sense, the DIN master is more like a known reference point than an absolute mark. However, it also requires more capability of the gage users on the shop floor. It takes a little more awareness and calculation to use these master deviations. That’s something we may not want machinists to have to worry about here in the U.S. Our philosophy is to make it as simple as possible. Thus, we use the grades and high-precision masters rather than a high-precision technique.
Something that we have discussed in the past is the way tolerances keep shrinking. Maybe we will get to the point in the future where we can’t make the masters good enough or the cost of that quality will simply become too prohibitive, and the mastering technique using the deviation will eventually catch on.
Read Next
Registration Now Open for the Precision Machining Technology Show (PMTS) 2025
The precision machining industry’s premier event returns to Cleveland, OH, April 1-3.
Read More5 Rules of Thumb for Buying CNC Machine Tools
Use these tips to carefully plan your machine tool purchases and to avoid regretting your decision later.
Read MoreSetting Up the Building Blocks for a Digital Factory
Woodward Inc. spent over a year developing an API to connect machines to its digital factory. Caron Engineering’s MiConnect has cut most of this process while also granting the shop greater access to machine information.
Read More


