Bring the Surface Finish Check to the Part
Dedicated handheld gages can assist the operator in making critical checks.
Share


ECi Software Solutions, Inc.
Featured Content
View More


Autodesk, Inc.
Featured Content
View More.png;maxWidth=45)
DMG MORI - Cincinnati
Featured Content
View MoreThe types of gaging on an automotive engine component include options where the part is brought to a gage or where the gage is brought to the part. For example, pistons, connecting rods, camshafts and transmission gears are all small and easy to bring to a dedicated gaging station where the operator can quickly assess the surface finish on the part. These gages align the part to the probe and create a foolproof operation to get the part measured properly.
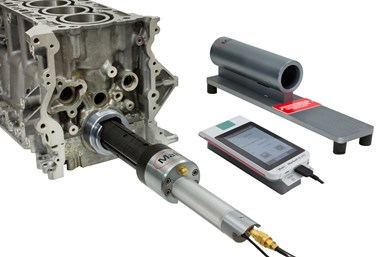
On the other hand, some automotive engine components are not that easy to move around. The engine block is a prime example. Surface finish in these applications is critical. There are thousands of dimensional checks and many critical surface finish and surface waviness callouts to measure. The surfaces of the engine block that specify certain surface finish measurements include cylinder and crankshaft bores, and deck, pan rail and front faces. Moving an engine block off a machine to a workbench is hard enough, but trying to align a portable surface finish gage to a short land, precisely and without damaging a probe, is nearly impossible. This is where dedicated handheld gages can assist the operator in making these critical checks.
Let’s start with measuring cylinder bores that need specific finishes to balance retaining oil and smooth axial movement. This is a prime candidate for a dedicated portable surface finish gage. The feature characteristic includes bores of various sizes with depths up to 8 inches and callouts at specific depths/locations on up to 12 cylinders. Therefore, the gages must be highly portable and easy for the operator to align and set the depth, while ensuring the sensitive probe does not get damaged when bringing the gage to the part.
A portable surface finish bore gage is very much like an expandable tri-bore type of gage. The tri-bore has a certain amount of size adjustment but is settable to a specific size. This enables it to “lock” in place and provides repeatable readings with no operator influence. In addition, a transfer mechanism protects the indicating device, so no locating forces are applied to it when the gage is placed onto the part.
The surface finish cylinder bore borrows the same principles. The first requirement is to give it adjustability with interchangeable plates to achieve the proper measuring range for the diameter. Once in place, a manually controlled air cylinder expands the sizing block to lock the gage into position. The clamping force is such to ensure rock-solid probe positioning. But even more critical, when no air is applied, the sensitive surface probe is retracted; only when the gage has air supplied and locked into place is the surface probe contacting the part. The probe is placed onto the part once the operator is satisfied with the gage location.
However, some bores in the block are smaller than a cylinder but still require shop floor measurement. Again, a take-off on the fixed mechanical plug can be incorporated. With this type of gaging, the mechanical body of the plug is very close to the bore being measured. It is made to measure a specific size and provides a fast, self-centering gage with no operator influence. This concept is also used for portable surface finish gaging of smaller bores. In this case, a plug body, made close to the bore size being measured, incorporates a surface finish probe. With these tools, the surface finish version retracts the probe until a mechanical transfer mechanism releases it when the bore is in its final measuring position.
Like the fixed-body bore gage these portable surface gages are modeled after, routine mastering is required. In the case of the handheld surface gage, a holder for the reference specimen that simulates the part and places the reference specimen at the proper location to easily perform the calibration throughout the day as needed is required.
Read Next
Building Out a Foundation for Student Machinists
Autodesk and Haas have teamed up to produce an introductory course for students that covers the basics of CAD, CAM and CNC while providing them with a portfolio part.
Read MoreRegistration Now Open for the Precision Machining Technology Show (PMTS) 2025
The precision machining industry’s premier event returns to Cleveland, OH, April 1-3.
Read More5 Rules of Thumb for Buying CNC Machine Tools
Use these tips to carefully plan your machine tool purchases and to avoid regretting your decision later.
Read More


.jpg;maxWidth=300;quality=90)


