Operating Characteristics And Calibration Curves
Gage accuracy is described by a number of concepts, including repeatability, linearity, calibration, and "accuracy" itself. The Operating Characteristics (OC) curve presents an easy way to visualize what these terms mean, and how they are interrelated.
Share


ECi Software Solutions, Inc.
Featured Content
View More
.png;maxWidth=45)
DMG MORI - Cincinnati
Featured Content
View More
Takumi USA
Featured Content
View More


Autodesk, Inc.
Featured Content
View More
Gage accuracy is described by a number of concepts, including repeatability, linearity, calibration, and "accuracy" itself. The Operating Characteristics (OC) curve presents an easy way to visualize what these terms mean, and how they are interrelated.
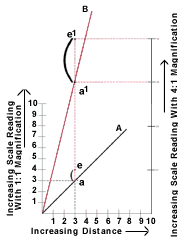
A simple non-magnifying measuring instrument, like a steel rule, produces an OC curve that is a straight 45-degree line (Figure 1, Curve A). For any measurement (for example, at Point a), there is a 1:1 relationship between part size (horizontal axis), and movement along the instrument's scale or display (left axis).
Most gages employ magnification to make small changes in part size below 0.01 inchdetectable on the display. For illustrative purposes, we'll use a very low magnification of 4:1, but in practice, most gages used in metalworking magnify distance by 100X, 1,000X or more.
The OC curve for a magnifying gage, such as an indicator height gage, is still straight, but it is steeper, indicating that the distance traveled by the tip of the indicator needle is greater than the change in part size. Point a' on OC Curve B shows the same size part that was measured on Curve A, but using a gage with 4:1 magnification (right axis).
The effect of instrument error is shown at Point e on Curve A, and magnified, at Point e' on Curve B. Because magnification enlarges mistakes, but does nothing to correct error, gage specifiers must be careful not to confuse high magnification with high accuracy.
Instrument error may be caused by improper use of the gage, or it may be inherent to the gage's design, the quality of its manufacture, or its condition. Examples of inherent errors include: incorrectly spaced graduations on the dial; imperfect gear profiles in dial indicators; improperly spaced lines on linear encoders or glass scales; and a master jet on an air gage that is partially clogged by dirt.
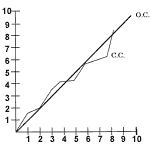
Annual gage calibration will uncover instrument errors. Where the cause of error is constant and the error repeats itself every time the gage is used, we speak of "calibration error," which can be plotted as a Calibration Curve ("C.C." in Figure 2). Using a calibration curve, an operator can manually apply correction factors to gage readings. Alternately, the indicator dial can be modified with uneven spacing between graduations, to correct for the error, while some electronic gages allow correction factors to be entered into memory, so that the readout displays the proper value.


