First-article inspections can be critical for any manufacturer. However, when work consists of a diverse array of low-volume jobs, the stakes can be especially high.
Anyone working in the quality department at Arnprior Rapid Manufacturing Solutions can vouch for that. While it doesn’t shy away from higher-volume jobs, much of the company’s business involves low-volume production runs and prototype and development work. Each new process requires validation and approval. As such, the cost and time commitment associated with first-article inspections is more significant for Arnprior than for manufacturers focused on producing repeat parts in high volumes.
One tool the company uses to stay on target in terms of both budgets and schedules is InspectionXpert software from Extensible CAD Technologies (Apex, North Carolina). Since installation, the software has automated and standardized the company’s previous time-consuming, error-prone process of generating ballooned drawings and inspection report forms. “It used to take me about two hours to balloon a drawing and another two hours to create an Excel spreadsheet,” says Tony Gratto, quality assurance inspector. “Using InspectionXpert, I can do an equivalent project in at least half the time, if not better.”
Arnprior touts itself as “one of the largest ‘all under one roof’ manufacturing solution centers in the Northeastern United States,” and the list of capabilities at its 170,000-square-foot facility in Rochester, New York is, indeed, extensive. On the precision machining side, the company offers milling, drilling, turning, tapping, jig boring, grinding and EDM. Other capabilities include stereolithography and selective laser sintering; rubber molding and thermo-forming; precision sheet metal fabricating; laboratory testing; and plastic parts engineering, design, analysis and molding.
Customers hail from an equally diverse range of industries, including aerospace, medical, automotive and consumer products, among others. Many of these industries are heavily regulated and competitive, so consistent on-time delivery is a key requirement. Moreover, errors can prove costly in terms of both direct expense and lost development time, whether for prototypes and short-run parts or higher-volume production runs. “Our customers are totally dependent on our quality process, and there’s no room for faults,” says Brian Meehan, the company’s principal IT consultant. He adds that a solid quality process is also essential to maintaining AS9100 certification, an important consideration because aerospace and defense work is a key element of the company’s planned growth strategy.
Until recently, however, the company’s manual process for managing inspection data was neither efficient nor fully trustworthy. Quality personnel would balloon drawings and assign numbers for various part dimensions manually. To generate inspection reports, they would type data into an Excel spreadsheet. If a customer were to revise a drawing, the quality engineer would have to enter all the dimensions a second time from scratch. In addition, that person would now have to manage multiple documents—the base document, the PDF with all the dimensions and an Excel spreadsheet—without the aid of software.
The company began to investigate various software solutions. After an online demo of
InspectionXpert, Arnprior was “sold immediately,” Mr. Meehan says. “We saw that the bubbles would actually be useful, not just something we’d add to a drawing layer on the page,” he recalls. “We could actually manipulate them and create a report, and we could query them and use them to calculate values. That’s what sold us on it.”
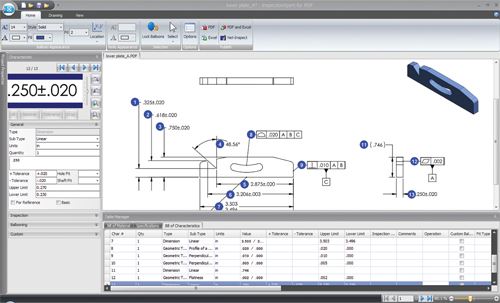
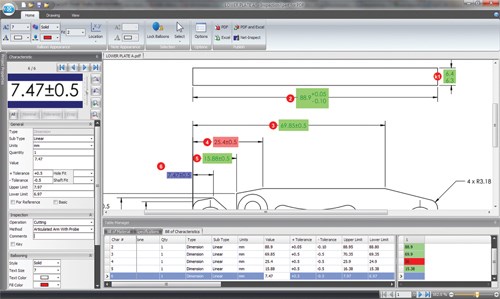
Today, the company’s newly automated process is faster and significantly less error-prone. The first step is importing a drawing into the software and then bubbling it by drawing a box around each dimension, Mr. Gratto explains. The software automatically assigns a bubble number to each characteristic. The user then checks each dimension, makes any necessary edits and assigns an inspection method. The drawing zone and location are then automatically imported into the form.
Finally, header information is added and automatically imported into Arnprior forms, and the bubbled drawings are exported into a PDF file that can be printed. The software enables exporting an Excel spreadsheet into one of several different formats for both first-article and in-process inspection plans. “Once the forms are exported, we again determine which characteristics are going to be checked at which operation,” Mr. Gratto explains. “We assign those to the appropriate forms for each operation, and we edit the dimensions if necessary. Then we print, and it’s ready to go.”
Users also have no trouble learning the software, Mr. Meehan says. It builds on technology that quality personnel are already used to, such as PDF and Excel, so they don’t have to learn a new interface. They are also already familiar with the terminology used in the software. “Honestly, these guys were up and running with less than an hour of training,” he says. Likewise, the need for IT support has been minimal, he adds.
Similarly, creating templates was intuitive enough that personnel were able to immediately begin creating custom templates after only a quick demo, Mr. Meehan says. Now, the company uses shared templates across multiple workstations so that any updates apply throughout. This helps standardize the process and further reduces the risk of errors.
Finally, implementing the software did not force the company to make any process changes that would cause headaches with maintaining AS9100 compliance, Mr. Meehan reports. “We were worried that we were going to have to rewrite our procedures manual, and we try not to do that because we get audited every year for compliance with the quality standard,” he explains. “We want to make sure there is as little change as possible to run a fine-toothed comb through.”




.png;maxWidth=150)





.jpg;maxWidth=300;quality=90)


